
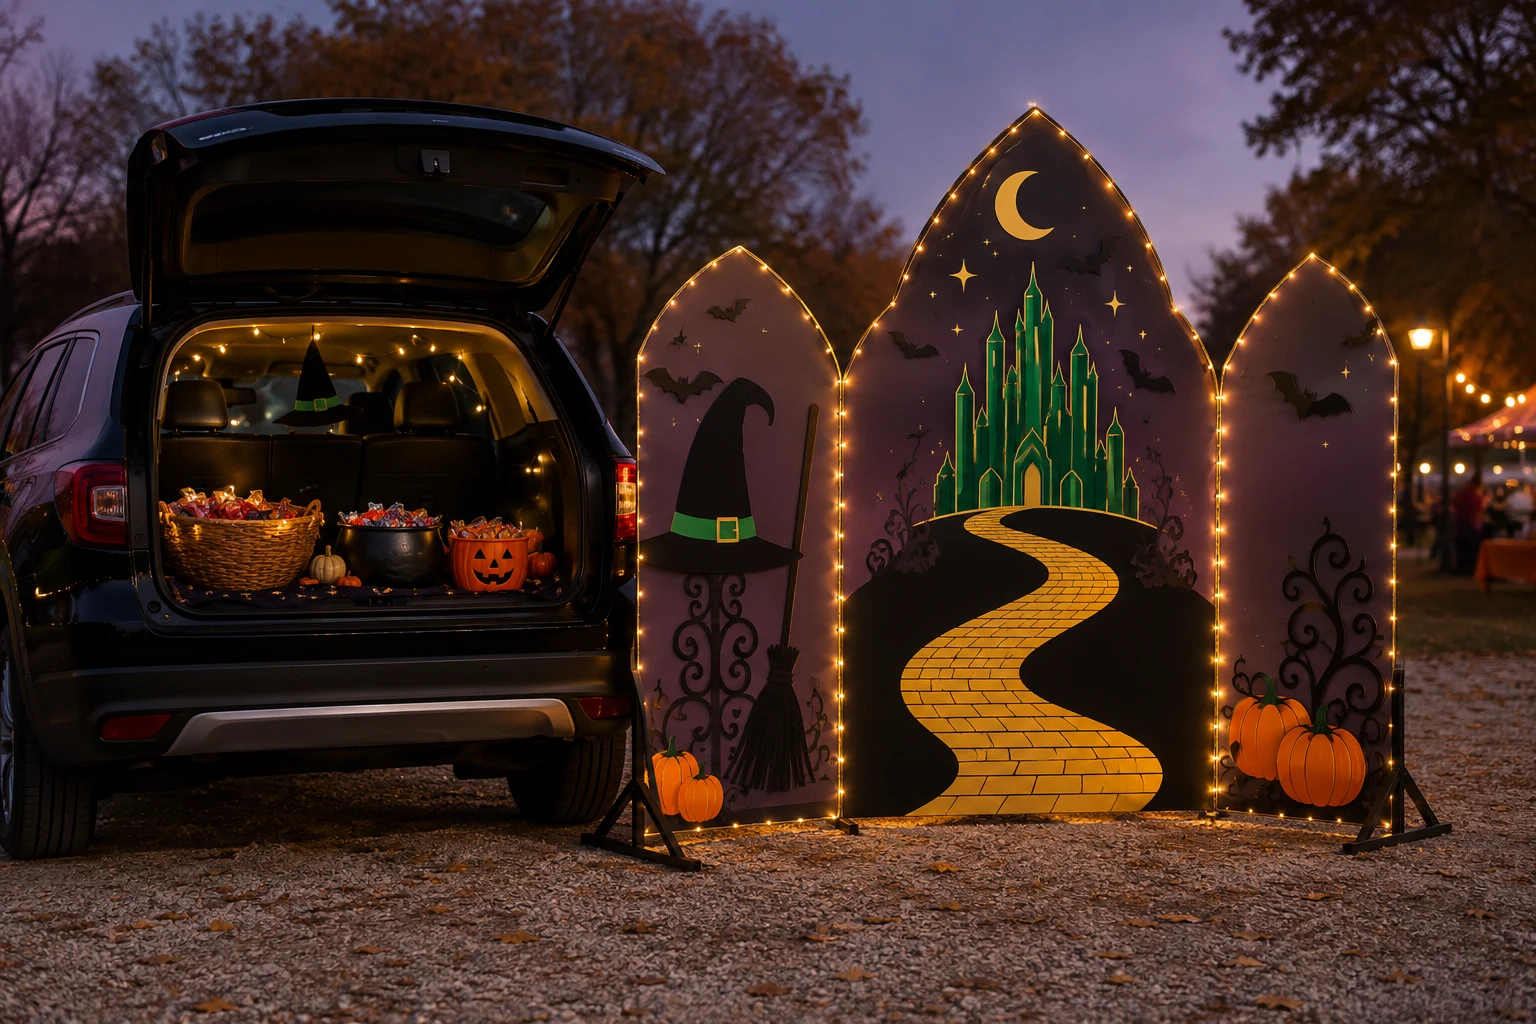
This modular backdrop turns three lightweight sign panels into a walk-up Halloween scene: a sweeping gold road anchors the center, an original emerald skyline rises above it, and witch hats, bats, stars, and pumpkins frame the treats. The panels stand on their own weighted frame behind or beside a fully parked vehicle, so the display can be assembled at the event, photographed from several angles, and packed flat before the vehicle moves.
This is an original project plan based on common corrugated-plastic sign construction, layered adhesive-vinyl application, and freestanding event-display methods. Panel thickness and flute direction, surface energy, temperature, humidity, wind, vinyl type, transfer tape, blade condition, mat grip, frame geometry, ballast, event rules, and the exact vehicle all affect the result. Make the paper and full-size mockups, test the complete vinyl stack on an offcut, obtain venue approval, follow every material and equipment maker's current directions, and have the frame reviewed by a competent adult before public use. The featured KleanKutChaos artwork supplies decorative imagery; it does not include the structural panels, frame, road layout, or vehicle-clearance plan described here. This exact build has not been represented as physically tested.
What you’ll need
- 19 Wizard of Oz SVG Bundle from the featured KleanKutChaos listing
- Three 4-millimeter corrugated-plastic sheets or reclaimed sign blanks in sound condition
- Plain kraft paper, painter's tape, ruler, and marker for a full-size vehicle-clearance mockup
- Cricut-, Silhouette-, or similar cutting machine with a clean fine-point blade
- Cutting mat and settings approved for the chosen adhesive vinyl
- Outdoor-rated permanent adhesive vinyl in black, emerald, gold, plum, and orange
- Transfer tape matched to the vinyl, including lower-tack tape for small or delicate pieces
- Scraper, brayer, weeding tools, tweezers, and parchment or release paper
- Metal ruler, fresh craft-knife blades, self-healing cutting mat, and cut-resistant glove
- Awl or hole punch sized for the chosen reusable ties, plus scrap wood as backing
- Black PVC pipe and fittings, a commercial photography-backdrop frame, or another venue-approved freestanding support
- Two or more low, wide ballast bags filled on site with sand or water and rated for the frame
- Reusable hook-and-loop straps or UV-rated cable ties, with flush cutters for tails
- Battery-powered LED string lights with an enclosed battery pack and fresh batteries
- Alcohol-free surface cleaner approved by the panel maker, lint-free cloths, and dry towels
- Wrapped candy in stable baskets plus optional artificial pumpkins and nonflammable fabric
- Tape measure, small level, work gloves, eye protection, and a second adult for setup
How to make it
- 1
Ask the venue before designing
Confirm the event's rules for display height, ground anchors, ballast, lighting, access lanes, electrical items, vehicle spacing, and setup time. Ask whether the vehicle must remain off, whether the hatch may stay open, and how much aisle clearance guests need. Plan an indoor or tabletop version if wind limits, fire rules, or venue staff make a full-size structure unsuitable.
- 2
Park, power down, and map clearances
On level private property, place the exact vehicle in Park, set the parking brake, switch it off, remove the key, and supervise children around it. Open the hatch to its intended event position. Measure the cargo opening, full hatch sweep, bumper edge, tail lamps, license plate, exhaust outlet, rear sensors, camera, handles, vents, and walking path. Nothing in the display may cover, touch, or obstruct those areas.
- 3
Build a full-size paper silhouette
Tape kraft paper into three panel shapes no higher or wider than the venue permits. Round every top corner and keep the lowest artwork above wet ground. Stand the paper on temporary chairs behind the parked vehicle, then view it from the guest line, neighboring spaces, and driver's approach. Trim until the hatch moves freely and adults can reach treats without ducking under a hard edge.
- 4
Design three independent visual zones
Use a broad winding-road shape on the center panel, an original pointed skyline above it, and bold witchy silhouettes on the side panels. Import selected artwork from the bundle as decorative accents rather than copying the listing collage. Remove character-specific facial detail, hairlines, loose specks, and tiny islands. Keep the lowest vinyl at least one inch from cut panel edges and leave space for straps and lights.
- 5
Tile the artwork for a home cutter
Split every large color layer into sections that fit the machine's actual cutting width, using straight seams hidden in brick joints, skyline edges, or intentional panel breaks. Add small paper registration marks outside the vinyl artwork rather than cutting permanent marks into the display. Label each backing sheet by panel, color, row, and left-to-right order before cutting.
- 6
Make a complete material test
Cut a sample containing a brick corner, narrow star, small interior opening, and overlapping colors. Clean a corrugated-plastic offcut with only the panel maker's approved method, let it dry, and apply the sample with the chosen transfer tape. Wait for the vinyl maker's stated dwell time, flex the panel lightly, and check edges in the expected temperature. Change material or simplify details if adhesion is unreliable.
- 7
Cut and round the sign panels
Transfer the approved paper outlines to the corrugated plastic with the flutes running vertically for each upright panel. Clamp a metal ruler over a self-healing mat and score in several light passes with a fresh craft knife; never force one deep pass. Keep the non-cutting hand behind the ruler and wear eye protection and a cut-resistant glove. Round corners generously and smooth only with a panel-maker-approved method.
- 8
Plan reinforced attachment points
Hold each panel against the freestanding frame and mark pairs of holes well inside the edges—typically near the upper, middle, and lower rails. Punch or drill through the hollow flutes over scrap wood using the exact tool its maker recommends. Add broad plastic washers or small backing tabs if approved for the material, then test a loose reusable tie. A hole that splits, elongates, or sits near an edge must be relocated or the panel remade.
- 9
Cut and weed the vinyl in batches
Run the saved test cut for each vinyl because colors and finishes can behave differently. Cut one labeled group at a time, weed on the backing liner, and keep enclosed counters such as star centers supported. Roll finished sections loosely with the liner outward or store them flat; do not stack exposed adhesive or leave weeded pieces in heat, dust, or direct sun.
- 10
Dry-align every tiled section
Lay the panel flat on a clean table and position all paper-backed sections before exposing adhesive. Use the centerline, panel edges, and temporary paper marks to establish the road first, then skyline, silhouettes, and small accents. Tape each piece along one edge as a hinge and photograph the arrangement. Maintain deliberate overlap only where the vinyl maker permits layered application.
- 11
Apply vinyl with controlled hinges
Work at the vinyl maker's recommended temperature. Fold one hinged section back, peel a few inches of liner, lower the vinyl gradually, and burnish from the anchored area outward. For longer tiles, remove liner in stages so adhesive never drops uncontrolled onto the panel. Peel transfer tape back at a sharp angle; if vinyl lifts, replace the tape, reburnish, and slow down rather than stretching the graphic.
- 12
Assemble the frame away from the vehicle
Build the approved support on level ground with the car outside its footprint. Square the feet and crossbars, attach the empty ballast bags, and check every fitting. Strap panels to the frame from the center outward with modest tension, leaving a small gap between them. Cut tie tails flush and orient them away from hands. Add ballast only as specified by the frame or event, and never improvise a frame beyond its maker's limits.
- 13
Add low-voltage lighting without heat
Attach only battery-powered LEDs rated for the event conditions, keeping wires clear of sharp panel edges, treats, trip paths, the hatch mechanism, and vehicle surfaces. Place the enclosed battery pack where an adult can reach it but children cannot. Do not pierce wires with staples or ties, do not mix old and new batteries, and do not use candles, hot lamps, extension cords, or damaged light strings.
- 14
Run the event-day safety check
With two adults present, position the freestanding display only after the vehicle is parked, braked, off, and cool. Recheck hatch sweep, exhaust clearance, required lights and plate visibility, frame level, ballast, sharp edges, aisle width, and guest reach. Stop using the backdrop if wind rises, the frame rocks, panels bow, lights heat, or venue staff object. Remove every panel, frame part, light, tie, and prop before closing the hatch or moving the vehicle.
Practical finishing tips
- Choose three narrower panels instead of one huge sheet. They are easier to cut, transport, straighten, and replace after damage.
- Let panel seams become part of the composition. A road joint or skyline break looks intentional and reduces the need for risky oversized vinyl handling.
- Photograph the finished strap map and label matching holes. Reassembly is faster when every panel and tie position has a repeatable home.
- Use permanent vinyl only on the craft panels, never on vehicle paint, glass, lights, trim, seals, sensors, or the license plate.
- Carry spare reusable ties, dry cloths, batteries, and a clearly labeled hardware pouch, but never repair a rocking frame while guests stand nearby.
- Store cleaned panels flat between cardboard sheets; heat and unsupported leaning can warp lightweight plastic.
Troubleshooting
The surface may be contaminated, textured, damp, too cold, or incompatible with the adhesive. Stop and repeat the offcut test using maker-approved cleaning and application conditions. Do not compensate with heat, spray adhesive, or edge sealer unless both manufacturers explicitly allow it.
Lift only the unapplied section if the vinyl still permits repositioning. Return to the paper registration plan and align the most visible road or skyline edge first. If the applied piece has stretched, recut that tile; pulling it into position will distort adjacent graphics.
Heavy vinyl concentrated on one side, heat, storage angle, or flute direction may be causing stress. Lay the panel flat within its safe temperature range and reduce unnecessary vinyl area on the next version. Do not force a bowed panel onto the frame with extreme strap tension.
Remove the panel from service. The hole may be too close to an edge, the tie too tight, or wind load too high. Recut a sound panel with wider margins and approved backing tabs; tape is not a structural repair for a public display.
Clear guests away and dismantle it. Confirm the frame's geometry, fittings, foot orientation, ballast rating, surface, and venue wind rules. Add only manufacturer-approved stabilization; never lash the display to a vehicle, tree, signpost, or unknown structure.
Do not operate the hatch again until the entire frame is moved outside its swept path. Return to the clearance mockup and increase the gap. Never rely on a power-hatch sensor to protect panels, wiring, fingers, or vehicle finishes.
Ways to make it yours
Skip the vehicle, use a venue-rated backdrop stand, shorten the panels, and place a marked photo position several feet in front so guests cannot lean on the display.
Scale the three-panel shape to 18–24 inches tall and secure it to a wide tabletop base, keeping every edge and light cord away from food and children's reach.
Use matte lavender, mint, orange, and gold vinyl with smiling pumpkins and oversized stars while keeping the same freestanding structure and safety checks.
Mount the panels on a freestanding, maker-rated outdoor sign system away from sidewalks and utilities; follow local rules and bring them inside whenever weather exceeds the system's rating.
Keep crafting
- DIY Removable Halloween Classroom Door Window Border With Static-Cling Vinyl — Turn spooky-school border files into a reusable static-cling frame for a classroom door window while keeping the center clear, the exit hardware visible, and cleanup residue-free.
- DIY Gothic Rose Window Mirror With Vinyl — Turn a thrifted mirror into a cathedral-inspired rose window with black vinyl, an antique-gold frame, and a clean reflective center.
- DIY Whimsical Pumpkin Dry-Erase Harvest Menu Board — Turn a thrifted glass frame into a reusable fall menu board with a whimsical pumpkin border protected behind the glass and a smooth write-on surface in front.
Inspiration & further reading
This is an original Klean Kut Halloween Crafts project inspired by approachable techniques shared across trusted craft and home sources. Explore Cricut vinyl cutting and application guide, Cricut transfer tape instructions, NHTSA guidance for supervising children around parked vehicles and U.S. Fire Administration Halloween decoration guidance for more ideas and technique background.