
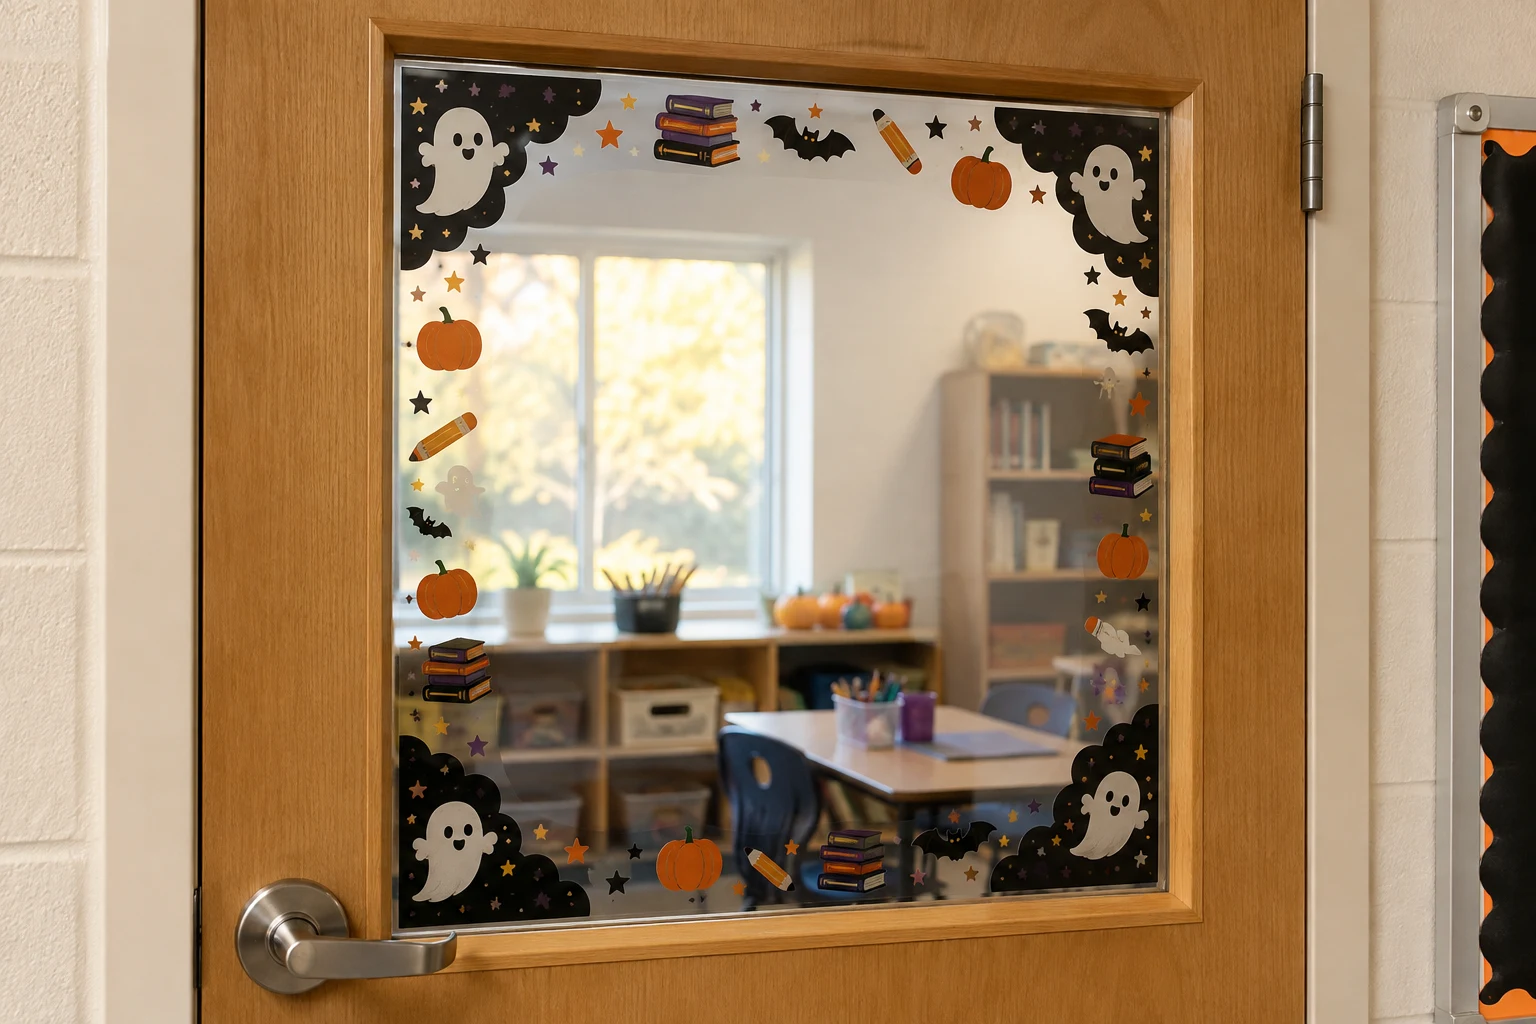
A door-window border can make a classroom feel festive without covering the glass or committing to adhesive vinyl. This project breaks one spooky-school frame into four reusable static-cling strips, then adds a few separate bats, pumpkins, stars, books, or friendly ghosts near the corners. The middle remains deliberately open for supervision and visibility, and every piece lifts away for flat storage after Halloween.
This is an original project plan based on manufacturer-described window-cling cutting and application methods. Glass coatings, door ratings, school rules, required sight lines, window dimensions, cling brands, blade condition, mat tack, temperature, humidity, and cleaning products vary. Obtain school or facilities approval before making anything, use only non-adhesive cling approved for the exact glass, complete a small test cut and surface test, and follow current instructions from the material, machine, mat, blade, glass, door, and cleaning-product makers. The featured KleanKutChaos files provide the decorative artwork; they do not determine code compliance or the safe installation area. This specific installation has not been represented as physically tested.
What you’ll need
- 17 Halloween Classroom Border SVG Bundle from the featured KleanKutChaos listing
- Non-adhesive static window-cling material compatible with the cutting machine and exact glass; use black for the main frame and optional orange, cream, or muted plum for separate accents
- Cricut-, Silhouette-, or similar cutting machine with the blade recommended for window cling
- Cutting mat matched to the cling maker’s directions
- Measuring tape, transparent ruler, pencil, and removable painter’s tape
- Plain paper or low-cost copy paper for full-size placement templates
- Weeding tool, fine tweezers, scraper, brayer, and small sharp scissors
- Clean lint-free microfiber cloths
- Glass-safe cleaner approved by the door or window maker, or the cleaning method specified by the cling maker
- Four labeled release-liner sheets or smooth reusable backing sheets for seasonal storage
- Large kraft envelope or flat portfolio folder for storing the finished border pieces
- Optional low-tack paper tabs for numbering the four border sections during layout
How to make it
- 1
Get the installation area approved
Ask the school or facilities contact whether decorations are allowed on this exact door and pane. Confirm required vision-panel clearance, fire-door restrictions, accessibility rules, security sight lines, cleaning requirements, and removal date. Do not assume a classroom door is ordinary glass; if approval is uncertain or the pane is wired, coated, filmed, cracked, labeled, or part of a fire-rated assembly, pause until the responsible staff approves the material and placement.
- 2
Measure glass, hardware, and clear zones
Measure the visible glass width and height, then mark every area that must stay uncovered: the center sight line, door label, frame edge, latch, handle, closer, hinges, signage, alarm device, and any required inspection marking. Plan a narrow border—often 1½ to 2½ inches wide—inside the approved zone. Record the actual dimensions instead of relying on the door model or a nominal window size.
- 3
Build a full-size paper map
Tape copy paper together to match the glass opening and draw the approved clear center. Add the planned top, bottom, and side strips plus corner accents. Hang the paper map temporarily beside the door, not on it, and check the view from both directions and from seated and standing heights. Remove or shrink any element that competes with visibility or important hardware.
- 4
Choose one border family
Import the bundle and select one frame with broad connected shapes that remain readable as a narrow perimeter. Pick only three to five optional accents—such as a ghost, pumpkin, bat, star, or book motif—from the same visual family. A restrained set looks intentional and is easier to align, clean, remove, and store than all seventeen designs used at once.
- 5
Split the frame into modular strips
Duplicate the chosen border and crop or intersect it into a top strip, bottom strip, left strip, and right strip. Keep each section within the machine and mat limits and add a small overlap only where the corners can hide it. Number the sections in the project notes, not as cut artwork. Preserve proportions and avoid stretching a detailed border to force it across a long pane.
- 6
Simplify fragile details
Inspect every strip at final size. Remove isolated dots, hairline webs, and slivers narrower than your reliable test cut. Thicken delicate bridges and join floating pupils, book pages, or pumpkin features to a sturdy shape when needed. Keep the main border one color; use other colors as separate standalone accents rather than stacking cling layers that may trap air or release unevenly.
- 7
Decide which side faces the hallway
If facilities approves an inside-glass installation, determine whether the design should read from the hallway. Mirror directional artwork before cutting when it will be viewed through the glass from the opposite side. Symmetrical borders may not need mirroring, but letters, numbers, arrows, and asymmetrical classroom motifs do. Print a small paper arrow test to confirm orientation.
- 8
Run a kiss-cut test
Place the cling liner side down on the mat or load it exactly as the material maker specifies. Select the named window-cling setting when available and cut a one-inch sample containing a curve, inside corner, and small opening. A successful kiss cut separates the cling cleanly while leaving the liner intact. Adjust only through the machine and material maker’s recommended settings before sending full strips.
- 9
Cut and weed one strip first
Cut the shortest border section before using the rest of the material. Weed the negative spaces while the strip remains supported on its liner, using tweezers around small school details. Compare it to the full-size paper map and hold the lined piece near the glass without applying it. Confirm width, corner overlap, orientation, and clear-center spacing before cutting the other three strips.
- 10
Prepare a clean, dry pane
Remove prior decorations only as the school permits. Clean the approved glass area with the exact method allowed by the glass, door, and cling makers, then dry it completely with a lint-free cloth. Do not use unapproved blades, abrasive pads, solvents, oils, or adhesive removers. Apply a tiny spare cling test in an inconspicuous approved spot and remove it after the recommended check period.
- 11
Place the top strip as the reference
Mark the border endpoints outside the application area with short pieces of painter’s tape. Start one end of the top strip on the clean, dry glass and peel the liner away gradually while supporting the remaining material. Burnish from the attached area outward with a scraper, using light overlapping strokes to remove air. Reposition promptly if the edge leaves the approved zone; do not stretch the cling into alignment.
- 12
Add sides, bottom, and corner accents
Install the two side strips from top to bottom, keeping their inner edges parallel to the glass frame, then add the bottom strip. Let planned corner overlaps hide tiny measurement differences without building bulky stacks. Place the separate accents near corners only after the frame is square, keeping every required clear area open and leaving small gaps between colors so each piece can be removed independently.
- 13
Inspect from both sides
Step into the hallway and back into the room. Confirm that the center view remains useful, every exit and safety feature is visible and operable, no piece touches hardware or labels, and no dark cluster resembles an obstruction. Open and close the door several times without slamming it. Remove any piece that curls, catches, distracts from signage, or violates the approved layout.
- 14
Remove and store the border flat
At the required removal date, lift each piece slowly from a sturdy outer edge with clean dry fingers. Return it to a labeled liner or smooth backing sheet without folding, then place all four strips and accents in a large flat envelope. Clean the pane using the approved method and inspect the cling before reuse; discard pieces that are stretched, dirty, brittle, torn, or no longer lie flat.
Practical finishing tips
- Photograph the approved paper map next to a ruler so next year’s reinstall does not depend on memory.
- Use tiny registration marks only on the removable paper template, never as permanent marks on school glass or the door frame.
- Keep the longest strip on its liner until the first inch is aligned; unsupported cling can fold onto itself and collect lint quickly.
- Apply color accents as separate pieces with visible breathing room. Static cling is reusable, but stacked layers are harder to burnish and store.
- Label storage liners TOP, BOTTOM, LEFT, and RIGHT before removal so the set can be reinstalled in minutes.
Troubleshooting
The glass may be dusty, damp, cold, coated, or incompatible, or the corner may contain too much overlap. Remove the piece, clean and dry the approved area, trim bulky overlap, and reapply without stretching. Stop if the material maker does not approve the surface.
The path is too fine, blade or setting is unsuitable, or the liner is being pulled too aggressively. Enlarge or simplify the detail, verify the named material setting, make a new test cut, and weed while the strip remains fully supported.
It was stretched or aligned by eye over too much distance. Lift it gently if reusable, return it to the liner, and reapply from one measured endpoint in short sections. A straight inner-edge paper guide beside the glass can help without becoming part of the installation.
Work from the center of each bubble toward the nearest open edge with light scraper strokes. If air cannot escape, lift the closest section and lay it down again. Do not puncture school window cling or glass with a pin unless the manufacturer and facilities staff explicitly permit it.
The inside application needed mirroring. Reopen the cut project, mirror the directional pieces, and recut them. Symmetrical corners may be reused, but never leave backward text or arrows in a school-facing display.
Remove the largest or darkest accents immediately and narrow the border until the approved center view is restored. The decorative plan must yield to supervision, security, accessibility, and fire-safety requirements.
Ways to make it yours
Cut only the four main strips in black cling and omit accent colors for the fastest installation and simplest flat storage.
Use book, star, bat, and friendly-ghost accents on a non-door interior window only after the same surface, sight-line, and facilities checks.
When door-glass decoration is not approved, apply the cling to a separate clear acrylic panel with finished edges and place it on an approved easel away from egress routes.
Cut the border from cardstock instead of cling and staple it only to an approved bulletin board, following school limits for combustible classroom decorations.
Keep crafting
- DIY Cute Bat Magnetic Bookmarks for Halloween Reading — Turn six playful bat cut files into slim magnetic bookmarks with hidden paired magnets, reinforced paper hinges, and book-friendly rounded edges.
- DIY Whimsical Pumpkin Dry-Erase Harvest Menu Board — Turn a thrifted glass frame into a reusable fall menu board with a whimsical pumpkin border protected behind the glass and a smooth write-on surface in front.
- DIY Gothic Apothecary Drawer Labels With Removable Vinyl — Turn a plain mini-drawer cabinet into functional gothic storage with nine ornate frame decals, readable center labels, and a reusable placement jig.
Inspiration & further reading
This is an original Klean Kut Halloween Crafts project inspired by approachable techniques shared across trusted craft and home sources. Explore Cricut Window Cling Instructions, Silhouette Window Cling material specifications, NFPA school fire-inspection considerations and U.S. Fire Administration escape-planning guidance for more ideas and technique background.