
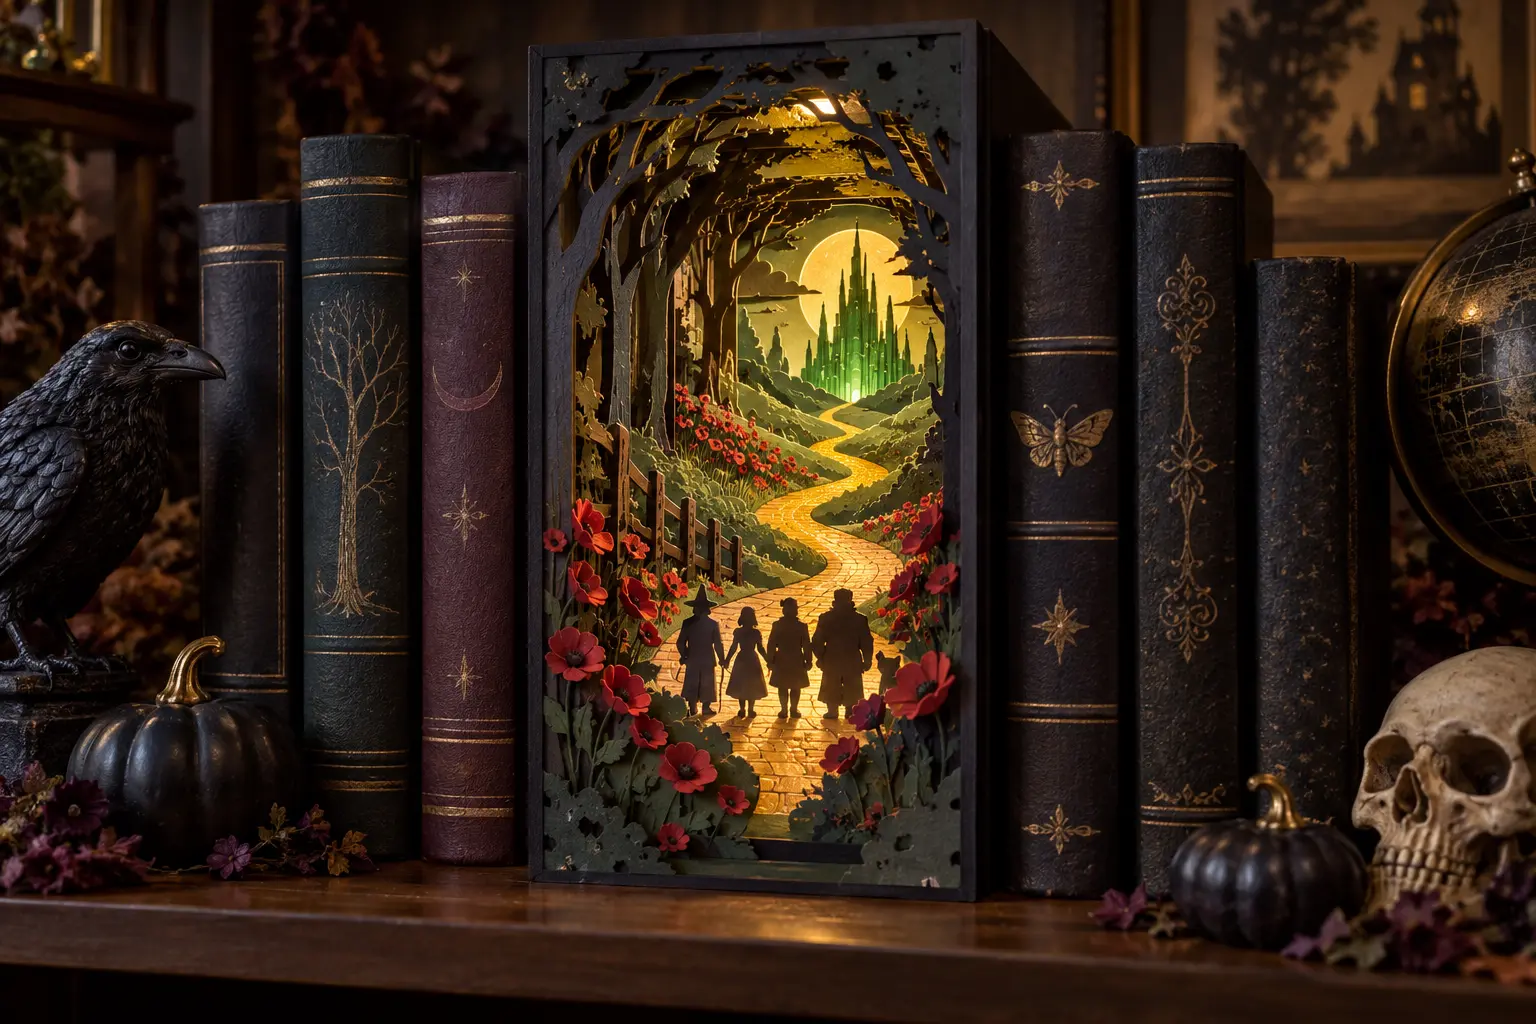
A narrow book nook can hold a surprisingly deep paper landscape. This version leads the eye through red flowers and a winding antique-gold road toward a distant green city, while four simplified travelers anchor the foreground. Each cardstock layer stays removable from a purchased shell, and a cool-running battery light sits in its own channel instead of touching the paper scene.
This is an original project plan based on common layered-cardstock, foam-spacer, and book-nook assembly methods. Shell dimensions, interior finish, cardstock weight, paper grain, artwork detail, blade condition, mat grip, adhesive, spacer thickness, LED temperature, battery access, humidity, and handling can all change the result. Make a full-size paper proof, test the smallest retained details, and follow the current directions from the shell, cardstock, adhesive, cutting-machine, blade, mat, and light makers. Preserve the purchased design and simplify only a duplicate. The featured KleanKutChaos listing supplies the character artwork; the featured KleanKutChaos file is the design source for this tutorial, and this tutorial does not claim that the pictured combination was physically tested with the listing files.
What you’ll need
- Wizard of Oz Characters SVG from the featured KleanKutChaos listing
- One factory-made open-front wood or heavy chipboard book-nook shell with smooth finished edges and maker instructions
- 65–80 lb solid-core cardstock in charcoal, black, moss, deep green, antique gold, muted red, cream, and plum
- Acid-free foam tape or clean cardstock spacer strips in one consistent thickness
- Paper-safe tacky glue or dry adhesive approved for the chosen cardstock
- One cool-running battery LED strip or compact battery light with an enclosed battery holder and accessible switch
- Cricut-, Silhouette-, or similar cutting machine with a clean fine-point blade
- Compatible clean standard-grip cutting mat and cutting-machine software
- Copy paper, printer or pencil, ruler, metal straightedge, compass, scissors, and low-tack painter's tape
- Scraper, brayer, weeding tool, fine tweezers, bright task light, and a self-healing cutting mat
- Thin tracing paper or vellum for an optional moon or sky diffuser, kept clear of the light source
- Small removable tabs or hook-and-loop dots for securing the light battery holder outside the paper cavity
- Lidded container for blades, tiny scraps, and button or coin cells if the selected light uses them
- Eye protection and a stable, dry work surface
How to make it
- 1
Inspect the shell and light
Check the purchased shell for splinters, cracks, loose joints, blocked ventilation, unstable feet, and sharp hardware. Confirm that the battery light is intact, cool-running, approved for indoor décor, and supplied with its original enclosed battery holder. Do not use a damaged shell, bare wires, hot lamp, candle, mains-voltage kit, or improvised battery connection.
- 2
Measure the usable interior
Measure width, height, and depth in several places because small shells are rarely perfectly square. Mark the manufacturer's required clearances around the light, switch, wire, ventilation openings, and battery compartment. Deduct those no-paper zones before sizing any scenery.
- 3
Plan five to seven depth layers
Sketch a rear sky, distant city, middle hills, winding road, flower banks, travelers, and a dark foreground arch. Keep the main road visible through every opening and leave at least a quarter inch around the outer edge of each layer for gluing and alignment. Fewer bold layers usually read better than many fragile ones.
- 4
Simplify a duplicate of the artwork
Preserve the purchased original and edit only a duplicate. Retain the broad outline and four distinct traveler poses, then remove tiny facial features, hairline accessories, isolated dots, and narrow negative spaces. Weld each figure to a low foreground strip so feet and canes do not become loose pieces.
- 5
Make a full-size paper proof
Print or draw every layer on inexpensive copy paper and cut the openings by hand. Stack the proof inside the unlit shell with temporary tape, checking sightlines from standing and seated heights. Confirm that no paper touches the light, battery holder, switch, wire, ventilation, or access panel.
- 6
Choose the color sequence
Use charcoal or black nearest the viewer, muted red for flower shapes, moss and deep green through the middle, antique gold for the road, and cream or vellum only in the rear sky. Repeat at least one color across several layers so the scene feels connected rather than striped.
- 7
Test-cut the hardest detail
Cut the smallest retained hand, hat brim, road curve, flower center, and city spire at final size from scraps of the exact cardstock. Begin with the cardstock maker's recommended setting, then change one variable at a time. Enlarge or simplify details that snag, feather, curl, or detach.
- 8
Cut and release the final layers
Place cardstock on a clean mat and brayer it flat without stretching the paper. Cut one color and layer at a time, then turn the mat face down and peel it away from the cardstock to reduce curling. Keep each layer flat under clean paper and a light book until assembly.
- 9
Build consistent spacers
Cut foam tape or folded cardstock strips to the same depth for each gap. Keep spacers behind solid margins so they cannot be seen through openings. Add short supports behind wide bridges, but leave the center of the road, city, figures, and light path unobstructed.
- 10
Dry-stack and align
Place the rear layer in the shell and add each foreground layer without adhesive. Use two temporary corner guides to keep the stack square. View the scene under ordinary room light, remove tangencies that merge figures into scenery, and verify the LED clearances once more.
- 11
Assemble from the rear
Attach spacers to the back of the rear sky, then add the distant city, hills, road, flowers, travelers, and foreground arch in order. Apply adhesive sparingly to solid margins, weight each joined pair flat as directed, and let it set before adding the next layer.
- 12
Route the light separately
Mount the cool-running light only in the maker-approved position, outside the paper stack and with the required air gap. Secure the battery holder where it can be reached without removing cardstock. Keep the wire relaxed, protected from sharp edges, and clear of glue, tape joints, doors, and feet.
- 13
Install the paper scene
Slide the fully set paper assembly into the shell without forcing it. Use removable tabs at the side margins if the shell permits so the artwork can be serviced later. Check that the shell remains level, the open front is unobstructed, and every paper edge stays clear of the lighting system.
- 14
Inspect, display, and store
Run the light for the maker's recommended first-use interval while an adult remains present. Switch it off immediately if paper warms, adhesive softens, light flickers, or batteries heat, leak, swell, or smell unusual. Display the nook indoors on a stable shelf with battery access visible; switch it off before leaving the room and remove batteries for storage.
Practical finishing tips
- Photograph the copy-paper proof from the final viewing angle; the image makes crowded overlaps easier to spot.
- Use solid-core cardstock so cut edges match the face color under the nook's side lighting.
- A wider gold road in the foreground creates depth more reliably than adding many tiny bricks.
- Alternate spacer placement from side to side to prevent a tall paper stack from bowing.
- Keep the traveler layer removable until final inspection so it can be enlarged if the figures disappear against the road.
- Label the rear of every layer with its order and top edge before cutting spacers.
Troubleshooting
Increase the gap between the two most important depth planes, darken the nearest silhouette, lighten the distant city, and simplify overlapping foliage. Do not add spacer depth beyond the shell's safe clearance.
Cut them again from the darkest solid-core cardstock, enlarge the group slightly, remove competing shapes directly behind their heads and feet, and add a lighter road section for contrast.
Replace a dull blade, clean the mat, reduce unnecessary detail, thicken weak bridges, and repeat the scrap test. Avoid repairing exposed figures with wet glue because it can wrinkle the visible surface.
Remove the scene, check that all spacers share one thickness, and rebuild only the uneven joins on a flat surface. Add hidden corner supports behind solid margins rather than forcing the stack into the shell.
Increase the maker-approved distance between the light and rear layer or add a loose vellum diffuser in a separate paper frame, never directly against the light. Stop if the diffuser or cardstock becomes warm.
Switch it off, remove it from service, and follow the light maker's troubleshooting and battery instructions. Never bypass the switch, mix batteries, tape bare wires, or keep using a damaged holder.
Ways to make it yours
Omit the lighting system and use cream cardstock behind the city so the scene remains bright in ordinary room light.
Cut every layer from black, charcoal, gray, and cream, using only a narrow antique-gold road for contrast.
Replace the red paper flowers with orange pumpkins for Halloween, silver stars for winter, or violet blooms for a year-round witchy library shelf.
Use the same proof and layer order in a purchased front-opening shadow box when a book-nook shell is unavailable, keeping all lighting and battery clearances unchanged.
Keep crafting
- DIY Witchy Yellow Brick Road Trunk-or-Treat Backdrop With Vinyl — Build a freestanding, weather-aware trunk-or-treat scene with modular corrugated-plastic panels, a winding gold road, and witchy vinyl silhouettes cut on a home machine.
- DIY Witchy Crystal Ball Halloween Prize Wheel With Cricut Vinyl — Turn a factory-made dry-erase prize wheel into reusable witchy party décor with removable vinyl wedges, celestial icons, and a crystal-ball centerpiece.
- DIY Gothic Castle Halloween Wreath With Vinyl — Build an indoor black grapevine wreath with a suspended frosted-acrylic center, burgundy ribbon, and a bold gothic castle vinyl scene.
Inspiration & further reading
This is an original Klean Kut Halloween Crafts project inspired by approachable techniques shared across trusted craft and home sources. Explore Cricut cardstock project and material guidance and Cricut cutting-machine safety instructions for more ideas and technique background.