
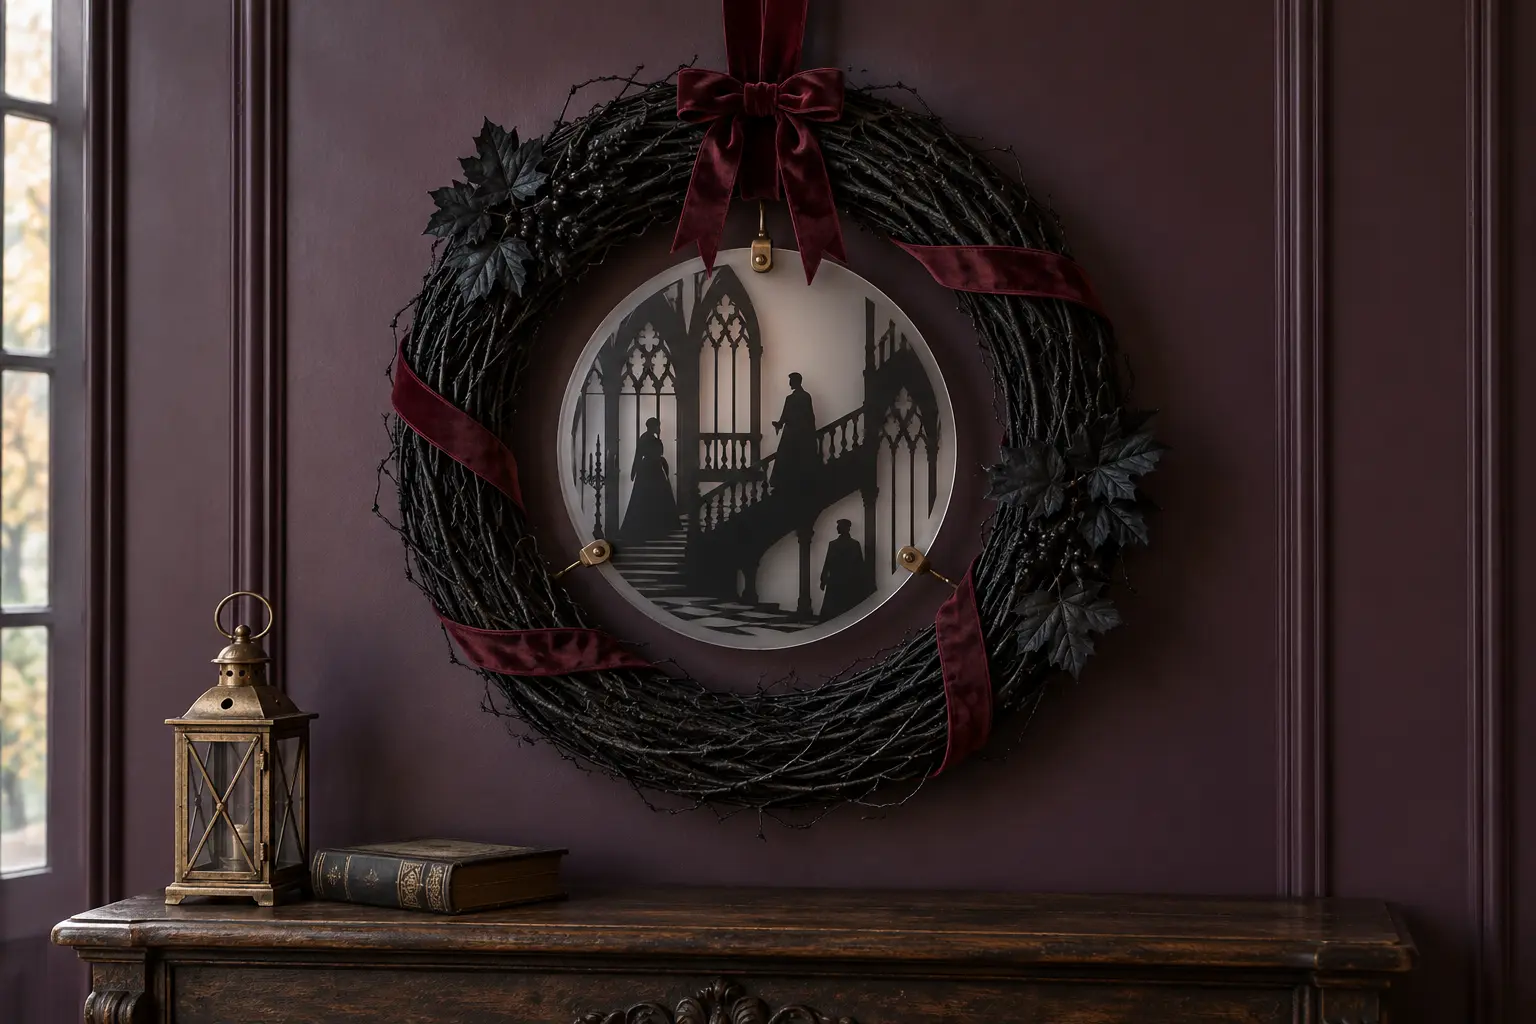
This indoor wreath pairs the texture of a matte-black grapevine base with a smooth frosted-acrylic medallion. A simplified castle-and-staircase scene in black permanent vinyl gives the center strong contrast, while burgundy velvet ribbon and wired black foliage add depth without hiding the artwork. Three mechanical attachment points keep the acrylic disc stable inside the wreath instead of asking adhesive to carry its weight.
This is an original project plan based on common adhesive-vinyl, acrylic-sign, and wired-wreath methods. Wreath density, coating chemistry, acrylic thickness and hole placement, vinyl adhesive, blade condition, mat grip, transfer tape, wire gauge, hardware, wall substrate, temperature, and humidity all affect the result. Make the full-size paper proof and exact-material test before committing the main pieces, and follow the current directions from every material, tool, wreath, acrylic, wire, hardware, and wall-fastener maker. The featured KleanKutChaos file supplies the decorative character-and-castle scene; this tutorial simplifies it to suit an 8.5- to 9-inch vinyl cut and does not claim that the pictured material combination was physically tested with the listing artwork.
What you’ll need
- Riff Raff and Magenta Castle Scene Cut File from the featured KleanKutChaos listing
- One sturdy 18-inch grapevine wreath, prefinished black or unpainted
- Matte-black craft paint approved for natural vine plus compatible primer when required
- One factory-cut 10-inch frosted acrylic disc with smooth finished edges, one smooth vinyl face, and three factory-drilled 1/8-inch perimeter holes
- Black permanent adhesive craft vinyl rated for the acrylic and indoor conditions
- Transfer tape matched to the chosen vinyl
- Cricut-, Silhouette-, or similar cutting machine with a clean fine-point blade
- Compatible cutting mat and the vinyl maker's recommended cut setting
- Printer, copy paper, scissors, ruler, pencil, and painter's tape for a full-size proof
- 20- or 22-gauge coated floral or craft wire, or smooth maker-rated miniature hardware approved for the acrylic holes
- Burgundy velvet ribbon, wired black faux leaves, and lightweight floral picks
- Floral wire, wire cutters, needle-nose pliers, and small cable ties if approved for the wreath
- Acrylic-safe cleaner, lint-free cloth, scraper, weeding tool, tweezers, and brayer
- Kitchen scale, measuring tape, level, eye protection, gloves when required, and a drop cloth
- Manufacturer-rated indoor wall hook or fastener suitable for the finished weight and actual wall
How to make it
- 1
Choose the display location and load limit
Select a dry indoor wall away from exterior doors, fireplaces, heaters, cooking areas, stairs, beds, and busy walkways. Identify the wall material and a hook or fastener rated comfortably above the complete finished weight. Confirm that the 18-inch wreath will not interfere with switches, frames, doors, cords, or ventilation.
- 2
Inspect and weigh every structural piece
Check the wreath for broken or protruding vines and the acrylic for chips, cracks, sharp edges, clouding, or damaged holes. Reject questionable parts. Weigh the bare wreath, disc, and decorations together, then compare that total with every hanger, connector, and wall-fastener rating rather than relying on a visual estimate.
- 3
Plan the three-point centerpiece mount
Place the protected acrylic disc behind the wreath and mark the top and two lower attachment positions. Each factory-drilled hole should align with a dense, stable vine bundle without forcing the disc. Plan three short independent wire loops or approved smooth fasteners so one connection cannot let the disc rotate or fall, and keep the top wall hanger separate from the decorative mount.
- 4
Finish the wreath base
If the wreath is not already black, work over a drop cloth in the ventilation and temperature range required by the coating maker. Apply thin compatible primer and paint coats from several angles without saturating the vine. Keep paint out of the future wall-hanger area and let every coat dry and cure for the full stated time before adding wire, ribbon, acrylic, or vinyl.
- 5
Simplify the castle artwork
Open a duplicate of the SVG and preserve the original. Keep the central staircase, broad window shapes, two largest figure silhouettes, and a few bold candelabra curves. Remove facial details, hairline textures, tiny buttons, narrow brick marks, isolated specks, and fragile candle flames. Weld intentional overlaps and repair any open paths.
- 6
Make a full-size paper proof
Size the simplified scene to about 8.5 to 9 inches wide and print it at 100 percent. Cut around the outline, center it on a paper tracing of the 10-inch disc, and mark all three mounting holes. Tape the mock disc temporarily inside the wreath and view it from across the room. Enlarge weak shapes, preserve at least a half-inch visual border, and keep vinyl clear of every hole.
- 7
Run an exact-material cut and adhesion test
Cut a small sample containing a broad fill, inside corner, narrow curve, and tiny opening from the final vinyl. Apply it with the chosen transfer tape to an acrylic offcut or inconspicuous test area approved by the blank maker. Check that it cuts cleanly, releases from the tape, bonds without haze or bubbles, and does not react with the acrylic cleaner or surface.
- 8
Cut the full vinyl scene
Place the vinyl liner-side down on the compatible mat, load it square, and run a fresh test cut in an unused corner. The vinyl should separate while the liner remains intact. Adjust only within the material and machine guidance, replace a dull blade rather than using excessive force, and then cut the approved full-size design without leaving the machine unattended.
- 9
Weed from large spaces to fine details
Trim the sheet while leaving a stable border around the scene. Remove the large exterior vinyl first, then work through windows, stair openings, and enclosed spaces under bright light. Hold narrow curves against the liner with tweezers or a fingertip. If a line stretches, tears, or detaches, recut that section instead of attempting an unreliable patch.
- 10
Clean and align the acrylic
Keep the protective film on the reverse face. Remove it only from the smooth decorating face, then clean that surface exactly as the acrylic maker directs and let it dry fully. Mark the disc center and horizontal axis on removable painter's tape outside the vinyl area. Use the paper proof to position the scene with an even border and generous clearance around the three holes.
- 11
Transfer the design center-out
Apply compatible transfer tape and burnish from the vinyl side and then the liner side. Peel the liner away at an acute angle. Hinge the graphic across its center with painter's tape, anchor one half, and smooth from the middle toward the edge before applying the other half. Burnish gently, then peel the transfer tape back across itself while watching every stair and candelabra curve.
- 12
Mechanically secure the disc
After the vinyl maker's stated settling time, place the disc inside the wreath with the decorated face forward. Thread three separate short lengths of coated wire or approved smooth hardware through the factory holes and around the planned stable vine bundles. Tighten only enough to prevent movement—never bend the acrylic—turn cut wire ends inward, cover or cap sharp ends as appropriate, and confirm no connector touches the vinyl.
- 13
Wire on the ribbon and foliage
Build the burgundy bow and black foliage as small wired clusters away from the wreath, then attach each cluster to several substantial vines. Keep the top hanger and all acrylic fasteners visible from the back and free of ribbon. Distribute lightweight accents around the lower third so the wreath remains balanced and the castle scene stays readable.
- 14
Mount and complete a stability check
Weigh the finished wreath again and verify every component exceeds that load. With a second adult stabilizing the work area, install the rated wall fastener according to its instructions and hang the wreath by its structural base or designated hanger—not by ribbon or acrylic wire. Check level, gently test for rotation, and observe it for a full day before leaving it displayed unattended.
Practical finishing tips
- A frosted disc creates contrast behind black vinyl without adding another vinyl layer, but confirm which face is smooth before cleaning or cutting.
- Fewer large architectural lines read better through grapevine than a dense miniature illustration.
- Photograph the paper proof inside the wreath before removing it; the image gives you a quick centering reference during final assembly.
- Use three independent attachment points around the disc. Two points can create a hinge that lets the acrylic swing forward.
- Build decorative picks as removable wired bundles so you can refresh ribbon later without disturbing the centerpiece mount.
- Label and store the simplified project file separately from the original KleanKutChaos download so you always retain the full artwork.
Troubleshooting
The design may be too detailed for its finished size, the blade may be dull, or the test setting may be incomplete. Enlarge or simplify the weakest lines, repeat the test cut, and recut the whole affected section instead of stretching it back into place.
Turn the assembly face down and peel the liner away from the vinyl first. After placement, burnish through the transfer tape and peel it back at an acute angle. If the vinyl still follows the tape, test a lower-tack compatible tape rather than forcing the artwork.
Stop before peeling all the transfer tape. Smooth outward with an acrylic-safe felt-edged scraper while the remaining hinge is controlled. Replace a badly creased or stretched panel; do not puncture bubbles, add heat, or use unapproved liquid application.
Take the wreath down and support it flat. Check that the three factory holes form a stable triangle, each independent connector reaches a substantial vine bundle, and decorative weight is balanced. Reposition approved connectors without drilling, bending, or adding hanging weight to the disc.
Remove the wreath from display. Shorten and turn every cut end inward with pliers, then use an approved cap or wrap that cannot slip. Replace brittle, corroded, or kinked wire; ribbon is not a reliable cover for a hazardous end.
Take it down and inspect the wall fastener, wreath hanger, back profile, and decoration placement. Move bulky rear attachments or use a manufacturer-approved spacer and fastener arrangement. Do not tighten acrylic wires to pull the wreath flat or add an adhesive strip as a structural repair.
Ways to make it yours
Swap burgundy ribbon for deep plum and add a few lightweight pewter leaves, keeping all embellishments clear of the acrylic mount and hanger.
Remove the figures and candles, retaining only the staircase, windows, and strongest castle silhouette for subtler year-round gothic décor.
Display the finished lightweight wreath on a manufacturer-rated tabletop wreath stand placed on a stable surface instead of altering a wall.
Use a 14-inch wreath and a proportionally smaller factory-finished disc, then recalculate the art size, hole spacing, connectors, balance, total weight, and stand or fastener rating before assembly.
Keep crafting
- DIY Gothic Candelabra Canvas Pillow With Metallic HTV — Turn a plain black canvas pillow cover into polished gothic décor with a large silver candelabra cut from metallic heat-transfer vinyl.
- DIY Gothic Corset Halloween Favor Boxes With Cricut or Silhouette — Turn sturdy cardstock, tiny eyelets, and satin ribbon into structured gothic corset favor boxes for Halloween parties, movie nights, or dramatic place settings.
- DIY Gothic Rose Window Mirror With Vinyl — Turn a thrifted mirror into a cathedral-inspired rose window with black vinyl, an antique-gold frame, and a clean reflective center.
Inspiration & further reading
This is an original Klean Kut Halloween Crafts project inspired by approachable techniques shared across trusted craft and home sources. Explore Cricut vinyl cutting and application guide, Cricut transfer tape instructions and Cricut Value Vinyl instructions for more ideas and technique background.