
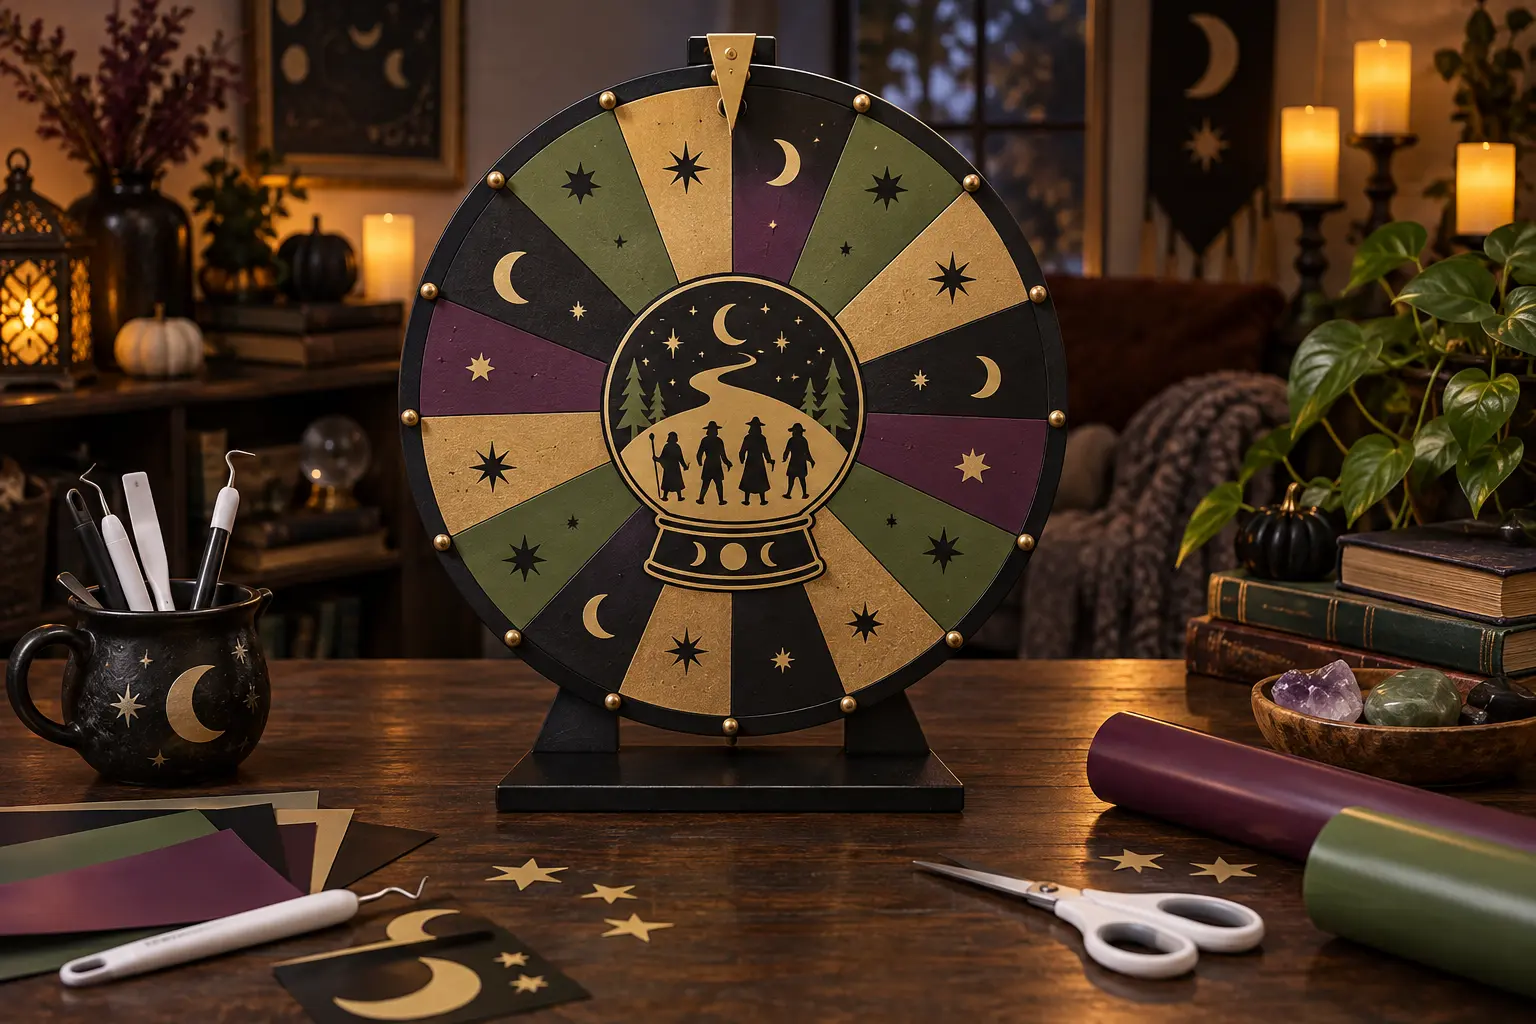
A compact tabletop prize wheel gives a Halloween classroom, party, trunk-or-treat, or family game night one interactive centerpiece that can change from event to event. This version uses a purchased dry-erase wheel exactly as supplied, removable vinyl decoration kept clear of every moving part, and handwritten prize labels that wipe away after the celebration. A simplified crystal-ball scene anchors the center while broad celestial motifs make each wedge readable from across the room.
This is an original project plan based on common removable-vinyl application and factory-made tabletop prize-wheel use. Wheel diameter, face material, surface coating, balance, pointer design, peg clearance, base stability, vinyl adhesive, artwork detail, blade condition, mat grip, transfer-tape tack, room temperature, humidity, and handling can all change the result. Make full-size paper proofs, test the exact vinyl on an inconspicuous nonmoving area, and follow the current directions from the wheel, cleaner, dry-erase marker, vinyl, transfer-tape, cutting-machine, blade, and mat makers. The featured KleanKutChaos listing supplies the decorative crystal-ball artwork; preserve the original and simplify only a duplicate. The featured KleanKutChaos file is the design source for this tutorial, and this tutorial does not claim that the pictured combination was physically tested with the listing files.
What you’ll need
- Wizard of Oz Crystal Ball SVG from the featured KleanKutChaos listing
- One factory-made tabletop dry-erase prize wheel with an intact weighted base, pointer, pegs, and maker instructions
- Removable adhesive craft vinyl approved for the wheel's exact face material in black, plum, moss, and antique gold
- Transfer tape matched to the selected vinyl
- Cricut-, Silhouette-, or similar cutting machine with a clean fine-point blade
- Compatible clean standard-grip cutting mat
- Cutting-machine software and a duplicate working copy of the selected design
- Copy paper, printer or pencil, ruler, flexible measuring tape, compass, and scissors
- Low-tack painter's tape, scraper, brayer, weeding tool, fine tweezers, and bright task light
- Wheel-maker-approved cleaner and lint-free cloths
- Low-odor dry-erase markers approved for the wheel surface and a clean eraser
- Index cards for a prize key and clearly written game rules
- Individually wrapped age-appropriate prizes or nonfood reward cards
- Lidded container for vinyl scraps and tiny weeded pieces
- Eye protection and a stable worktable with clear space around the wheel
How to make it
- 1
Inspect the wheel before decorating
Assemble and inspect the wheel exactly as its maker directs. Set it on a level, stable table and confirm that the base sits flat, the face spins freely, the pointer clicks normally, and every peg and fastener is secure. Reject or return a wheel that wobbles, binds, has sharp edges, or arrives with loose parts. Do not drill, sand, oil, bend, disassemble, or rebalance it.
- 2
Map every no-vinyl zone
Measure the wheel face without touching the pointer, pegs, rim, center hub, fasteners, or any factory label required for safe use. Trace a paper circle at full size and mark each moving part plus at least a quarter-inch clearance around it, or more if the maker requires. Reserve a clean handwritten area in every wedge.
- 3
Choose a simple prize system
Decide whether wedges award a small prize, a nonfood reward, a cooperative action, or a second spin. Keep instructions on a separate index-card key rather than filling the wheel with tiny vinyl text. Use only prizes appropriate to the participants' ages and needs, and plan an equal-value alternative for dietary, sensory, or accessibility requirements.
- 4
Build a full-size paper proof
Divide the paper circle into the wheel's existing wedges and cut paper shapes for the color blocks, celestial icons, and center medallion. Position the proof over the stationary wheel without tape touching moving parts. Spin the wheel by its intended grip and confirm that the proposed decoration never reaches the pointer, pegs, rim, hub, fasteners, or erase zones.
- 5
Simplify a duplicate of the crystal ball
Preserve the purchased original and edit only a duplicate. Keep the broad crystal-ball outline, winding road, four large traveler silhouettes, and a few stars. Remove hairline facial details, tiny flowers, isolated dots, narrow gaps, and fragile interior pieces. Thicken weak bridges so the finished medallion remains readable at the measured center size.
- 6
Design the wedge decorations
Create broad wedge-shaped color accents or small icons that fit inside the proven safe zones. Alternate colors for contrast, then repeat only sturdy stars, moons, or sparkles. Avoid lettering, numbered prize values, trademarked character names, and fine outlines. Keep one empty area on each wedge large enough for a dry-erase label.
- 7
Clean and surface-test
Wash and dry your hands, then clean only the decoration areas with the wheel maker's approved method. Let the face dry completely. Apply a small square of removable vinyl to a hidden stationary area, leave it for the vinyl maker's recommended test period, and remove it as directed. Stop if the coating clouds, stains, scratches, softens, or lifts.
- 8
Test-cut the smallest retained details
Place scraps of each exact vinyl on the mat and begin with the vinyl maker's recommended setting. Include the smallest star, traveler, road gap, and crystal-ball line at final size. Weed and transfer the samples to scrap material with a similar finish if available. Adjust one setting at a time or simplify further until every piece releases cleanly.
- 9
Cut and organize the vinyl
Cut the center medallion, wedge accents, and icons with the tested setup. Weed large waste areas first, then small openings while supporting narrow lines with the tool tip. Place each finished decal on a labeled paper map in application order. Recut any stretched star, torn bridge, incomplete line, or jagged edge instead of patching the visible design.
- 10
Apply the center medallion
Immobilize the wheel only by the safe method in its manual and keep the pointer untouched. Apply matched transfer tape to the crystal-ball decal, align it within the proven center zone, and use a painter's-tape hinge on the stationary face. Smooth from the hinge outward without pressing on the hub, fasteners, or bearings, then peel the tape back at a low angle.
- 11
Decorate the wedges one at a time
Rotate the wheel only by its intended grip to bring one wedge into a comfortable position, then let it stop completely. Apply the corresponding accent and icon inside the paper-proof boundary. Repeat around the wheel while maintaining equal clearance from pegs, pointer, rim, hub, and label areas. Never reach near a moving pointer or spin the wheel during application.
- 12
Let the vinyl settle
Leave the wheel upright, dry, and unused for the vinyl maker's recommended settling time. Keep it indoors and away from sun, moisture, heaters, children, and pets. Do not speed adhesion with a heat gun, hair dryer, iron, liquid sealer, spray coating, or aggressive burnishing. Inspect every edge under side light before the first game.
- 13
Label and function-test
Write short prize or action labels with the approved dry-erase marker, keeping ink away from vinyl edges and moving parts. With the table clear, give the wheel several normal spins exactly as its maker directs. Stop immediately if any vinyl catches, balance changes, the base shifts, the pointer binds, a peg loosens, or a label smears into the mechanism.
- 14
Run the game and reset safely
Place the wheel well back from the table edge and assign one adult or responsible facilitator to control turns, distribute prizes, and keep hands clear until the wheel stops completely. Follow the maker's participant and supervision guidance. Afterward, erase labels with the approved method, inspect all components, remove damaged vinyl, and store prizes and the wheel securely.
Practical finishing tips
- Use the wheel's factory wedge lines instead of trying to cover the full face; smaller decals are easier to align and less likely to affect movement.
- Give every wedge a large icon plus a separate prize key so the game remains readable for children and guests with different language or vision needs.
- Choose matte removable vinyl to reduce glare and make dry-erase labels easier to read under party lighting.
- Photograph the finished wheel and prize key before erasing it so the same game can be recreated later.
- Prepare two spare stars or moons in each color, but never layer a repair over a lifting decal near moving parts.
- Use nonfood rewards such as choosing the next song, adding a team point, or selecting a craft color when candy is not appropriate.
Troubleshooting
Stop using the wheel and keep the loose edge away from the pointer and pegs. Review surface compatibility, cleaning, temperature, transfer tape, and settling time. Remove the failing decal only as the makers direct, then test a different removable vinyl or use paper prize cards beside the undecorated wheel.
Stop immediately and remove every added item from the wheel face according to the vinyl maker's directions. Confirm the base, pointer, pegs, hub, and fasteners remain exactly as supplied. If normal balance does not return, discontinue use and contact the wheel maker; do not add counterweights or alter the mechanism.
Enlarge the center design, delete small stars and facial details, thicken the road and figure bridges, replace a dull blade, and repeat the test cut. A bold simplified silhouette will read better than patched miniature lines.
Support the stationary face, burnish the vinyl rather than the tape, and peel the tape back slowly at a very low angle. If the coating or decal starts to lift, stop and retest with lower-tack transfer tape approved for the vinyl.
Use only the wheel maker's approved marker and cleaning method, and test a small stationary area first. Keep cleaner away from vinyl edges and mechanics. If the surface retains ink, switch to reusable paper prize cards beside the wheel rather than using stronger solvents.
Take the wheel out of service and keep all loose parts away from children and pets. Follow the maker's inspection and support instructions. Do not glue, tape, bend, or substitute hardware, and do not resume play until the manufacturer confirms the wheel is safe.
Ways to make it yours
Replace prizes with group actions such as choose a read-aloud, add a class point, pick a movement break, or select the next craft color.
Use large moon and star symbols that correspond to a separate sign, allowing quick turns without food handling at the wheel.
Skip character silhouettes and use black, plum, moss, and antique-gold celestial icons for a year-round divination-inspired game-night wheel.
Leave the wheel completely unaltered and place removable paper prize cards in a separate numbered holder, using the factory wedge numbers only.
Keep crafting
- DIY Witchy Yellow Brick Road Trunk-or-Treat Backdrop With Vinyl — Build a freestanding, weather-aware trunk-or-treat scene with modular corrugated-plastic panels, a winding gold road, and witchy vinyl silhouettes cut on a home machine.
- DIY Witchy Halloween Countdown Flip Calendar With Cricut or Silhouette — Make a reusable tabletop Halloween countdown with sturdy flip cards, crisp vinyl decoration, and a dramatic witch-trio centerpiece.
- DIY Gothic Castle Halloween Wreath With Vinyl — Build an indoor black grapevine wreath with a suspended frosted-acrylic center, burgundy ribbon, and a bold gothic castle vinyl scene.
Inspiration & further reading
This is an original Klean Kut Halloween Crafts project inspired by approachable techniques shared across trusted craft and home sources. Explore Cricut vinyl cutting and application guide and Cricut transfer tape instructions for more ideas and technique background.