
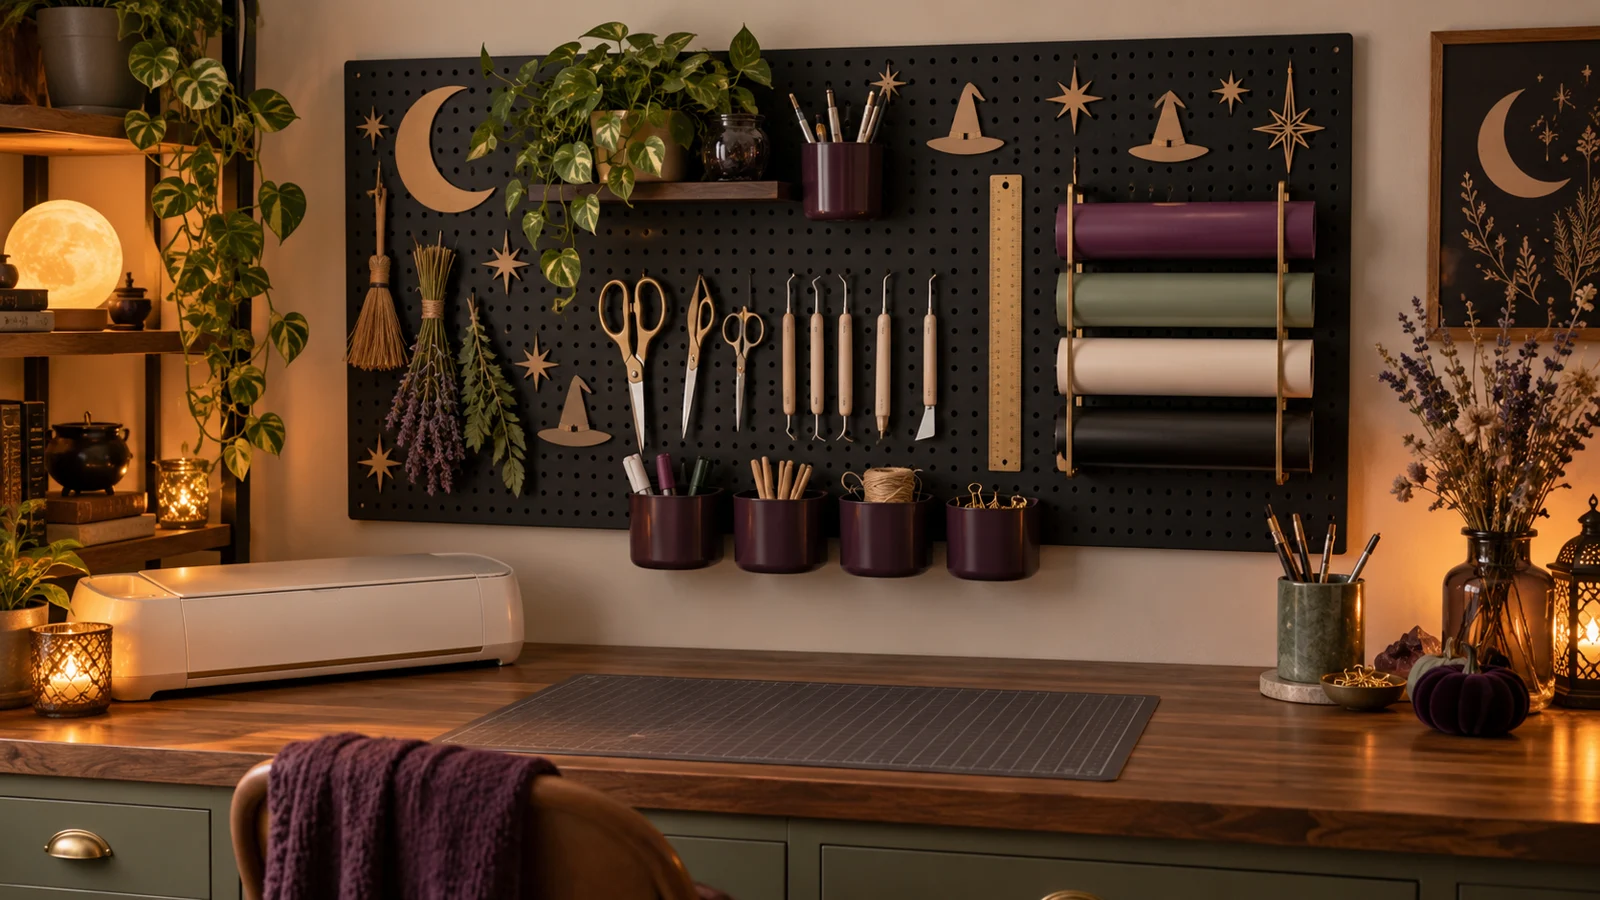
A good pegboard earns its wall space by making the tools you reach for every day visible without turning them into clutter. This version uses a restrained set of removable vinyl motifs around the open areas, small changeable labels beneath the storage zones, and a layout built from the real dimensions of your scissors, scrapers, weeding tools, rulers, tape, and vinyl rolls. The artwork gives the station personality, while the pegboard system remains easy to rearrange when your projects change.
This is an original project plan based on common adhesive-vinyl and manufacturer-approved pegboard installation methods. Wall material, stud position, anchors, board construction, coating, surface texture, hook style, load distribution, vinyl chemistry, blade wear, room humidity, and tool dimensions can all affect the result. Make adhesion, cut, transfer, layout, anchor, and load tests with the exact materials; follow the current directions from every pegboard, anchor, wall, vinyl, transfer-tape, cutter, and tool maker; and preserve the purchased artwork while simplifying only duplicate working files. The featured KleanKutChaos listing supplies the witch artwork, while the featured KleanKutChaos file is the design source for this tutorial. This tutorial does not claim that the pictured combination was physically tested with the listing files.
What you’ll need
- Witch of the Waste SVG bundle from the featured KleanKutChaos listing
- One wall-mountable pegboard and compatible rail, spacers, hooks, cups, shelves, and bins from one approved system
- Wall fasteners selected for the actual wall material, mounting rail, board, planned load, and manufacturer instructions
- Removable adhesive vinyl in warm cream, muted sage, plum, or another color that contrasts with the board finish
- Low- or standard-tack transfer tape approved for the selected vinyl and surface
- Cricut-, Silhouette-, or similar cutting machine with a sharp compatible fine-point blade
- Clean compatible cutting mat and cutting-machine software with duplicate working files
- Painter's tape, kraft paper, pencil, ruler, tape measure, level, and a nonpermanent wall-marking method
- Lint-free cloth and the pegboard maker's approved surface cleaner
- Electronic stud finder or another wall-assessment method appropriate to the building and used as directed
- Drill, driver, bits, screwdriver, and protective equipment specified by the board and fastener makers
- Small removable label blanks or vinyl rectangles for zone names and supply changes
- Lidded containers or guarded holders for blades, pins, awls, and other sharp tools
- The actual craft tools and supplies to be stored, weighed where the storage-system instructions require it
- Optional hook locks, cord clips, and closed bins confirmed compatible with the chosen pegboard system
How to make it
- 1
Choose one complete storage system
Start with a pegboard, mounting rail or spacers, hooks, cups, and shelves intended to work together. Read the current installation and load instructions before buying fasteners or planning the layout. Do not combine parts that merely look compatible, and exclude damaged boards, bent hooks, cracked cups, and improvised hanging hardware.
- 2
Assess the wall and work zone
Locate studs, utilities, trim, outlets, doors, and the full swing of nearby equipment using methods appropriate to the building. Choose a height that keeps the board clear of the cutting machine and work surface while allowing comfortable access. If the wall construction, hidden utilities, or anchor choice is uncertain, stop and consult a qualified installer.
- 3
Inventory every stored item
Group the real tools into cutting, weeding, measuring, transfer, pen, adhesive, and small-parts zones. Record dimensions and weight where required, then remove heavy machines, heat tools, open liquids, and anything the board maker does not approve. Plan closed or guarded storage for replacement blades, pins, and other sharps.
- 4
Mock up the board at full size
Trace the board and major accessories on kraft paper, tape the mock-up to the wall, and position tool outlines inside it. Keep frequently used light tools between shoulder and waist height, heavier approved supplies lower and near mounting points, and empty clearance around every peg hole needed for hooks. Photograph the final mock-up before taking it down.
- 5
Test the finish and removable vinyl
Clean a hidden board area only with the cleaner approved by its maker and let it dry. Apply a small vinyl-and-transfer-tape sample, leave it for the vinyl maker's recommended test period, then remove it slowly. Stop if the coating lifts, stains, glosses, dents, or holds residue; use cardstock tags or hanging labels instead of direct decals on an incompatible finish.
- 6
Select and simplify the witch artwork
Preserve the purchased files and edit only duplicates. Choose one upright silhouette or a few small accessory motifs, remove isolated specks and hairline details, thicken narrow bridges, and size the artwork for the solid spaces between storage zones. Keep every decal clear of peg holes, mounting points, safety labels, seams, and accessory contact areas.
- 7
Build a repeatable label system
Create short zone labels such as WEED, CUT, MEASURE, and TRANSFER in one legible type style. Set a consistent cap height and place each word on a removable label blank or solid board area that will not be rubbed by hooks. Add a small alignment rectangle to the working file if it helps every label sit on the same baseline.
- 8
Make a representative test cut
Cut the smallest motif, narrowest letter, and one label from scrap vinyl using the material maker's recommended starting setting. Weed it, transfer it to the successful surface sample, and check that fine parts remain attached without stretching. Simplify the file or enlarge the design rather than increasing pressure repeatedly on fragile details.
- 9
Cut and weed by zone
Arrange the approved motifs and labels in separate small sections instead of one board-sized sheet. Cut with the vinyl carrier against the mat as its maker directs, inspect the first section, and continue only after it releases cleanly. Trim generous handling borders and weed under bright light, keeping blade tips and vinyl scraps in closed containers.
- 10
Transfer the decals to the empty board
Work on the unmounted board only if its instructions allow flat handling; otherwise decorate it after secure installation. Use painter's-tape guides from the photographed mock-up, burnish the transfer tape as directed, hinge each section into place, and peel it back at a low angle. Reopen any accidentally covered peg hole immediately without cutting into the board finish.
- 11
Install the pegboard exactly as directed
Use the supplied rail, brackets, spacers, mounting pattern, and suitable wall fasteners in the sequence specified by the board maker. Maintain the required space behind the board for hooks and keep the rail level. Have a second adult support larger panels, wear the required eye protection, and never substitute adhesive strips for structural fasteners unless the board maker explicitly approves them.
- 12
Dry-fit and lock the accessories
Install empty hooks, cups, bins, and shelves in the photographed layout. Confirm that each accessory is fully seated, locked where the system provides a retainer, and easy to remove intentionally. Open and close nearby doors, drawers, and machine lids to verify that nothing collides with the board or can snag a person walking past.
- 13
Load from the bottom up
Add the heaviest approved items first in the lower zones, distributing weight across the board as the maker directs. Place sharp tools in guarded holders with points down or inside closed bins, keep small parts away from children and pets, and avoid stacking rolls or bottles where they can fall. Do not exceed any limit for the board, rail, fasteners, hook, cup, shelf, wall, or substrate.
- 14
Inspect, label, and maintain
After the initial loading period recommended by the hardware maker, recheck level, fasteners, board movement, hook seating, vinyl edges, and wall condition without adding unapproved force. Label the back of each removable bin, save the final cut settings and layout photo, and schedule periodic checks. Unload the board immediately if it shifts, bows, loosens, cracks, or pulls away from the wall.
Practical finishing tips
- Leave about one quarter of the board visually open so new tools can be added without rebuilding every zone.
- Keep the witch motif to one focal corner and repeat only tiny stars or herbs; the tools should remain easier to see than the decoration.
- Use hanging cardstock tags when a textured, powder-coated, or delicate board finish fails the vinyl test.
- Photograph each tool against the kraft-paper mock-up before mounting so future hook positions are easy to recreate.
- Store consumables by workflow rather than color: cutting, weeding, transfer, and cleanup zones reduce unnecessary reaching.
- Keep a small empty cup labeled RETURNS for hooks and tools that need to be put back after a project session.
Troubleshooting
Stop adding pressure or heat. Confirm that both cleaner and vinyl are approved for the coating, repeat the hidden-area test, and move the artwork to removable cardstock tags, smooth accessory cups, or a separate sealed sign if the board remains incompatible.
Remove the tape slowly at a low angle and stop at the first sign of finish damage. Use a lower-tack tape only if the vinyl maker approves it, reduce burnishing on the board, or abandon direct decals in favor of hanging labels.
Verify that the hooks match the exact pegboard system and are fully seated. Add only the maker's approved retainers, change the tool's removal angle, or choose a deeper compatible holder; never wire, glue, or bend a hook into an unapproved shape.
Unload it immediately and keep people away from the area. Inspect the board, rail, fasteners, substrate, and installation against the manufacturer's instructions, then involve a qualified installer if any component or wall condition is uncertain.
Move labels below their zones or attach them to the front of compatible bins. Test every label with the real tools in place before cutting replacements, and keep lettering large enough to read from the normal working position.
Return to the zone photo, remove rarely used items, and reserve the board for lightweight daily tools. Store bulky stock and backup supplies in drawers or shelving designed for their load instead of adding more hooks to the same panel.
Ways to make it yours
Use a manufacturer-approved desk connector or freestanding base, keep the center of gravity low, and decorate only after confirming the assembly cannot tip during normal tool removal.
Swap the character silhouette for small moons, stars, and moth shapes, then use silver-gray labels and deep-blue storage cups for a quieter night-sky look.
Assign cups to clips, chalk, bobbins, and measuring tools, with rotary cutters and pins stored only in closed or guarded holders approved for the board.
Keep the permanent zone map neutral and cut four small removable accent sets—pumpkins, snow stars, spring herbs, and summer moons—that can change without moving the tools.
Keep crafting
- DIY Witchy Sewing Notions Box With Layered Cricut Vinyl — Turn a plain wooden box into a practical witchy sewing organizer with a carefully simplified portrait, layered vinyl accents, and removable interior dividers.
- DIY Gothic Apothecary Drawer Labels With Removable Vinyl — Turn a plain mini-drawer cabinet into functional gothic storage with nine ornate frame decals, readable center labels, and a reusable placement jig.
- DIY Celestial Moth Magnetic Message Board With Cricut Vinyl — Turn a smooth metal memo board into useful celestial décor with a bold moth, moon phases, and a clear space for everyday notes.
Inspiration & further reading
This is an original Klean Kut Halloween Crafts project inspired by approachable techniques shared across trusted craft and home sources. Explore Cricut Vinyl Help Center, Cricut Transfer Tape Instructions, IKEA SKÅDIS pegboard installation and safety information and Wall Control Pegboard How-To and load guidance for more ideas and technique background.