
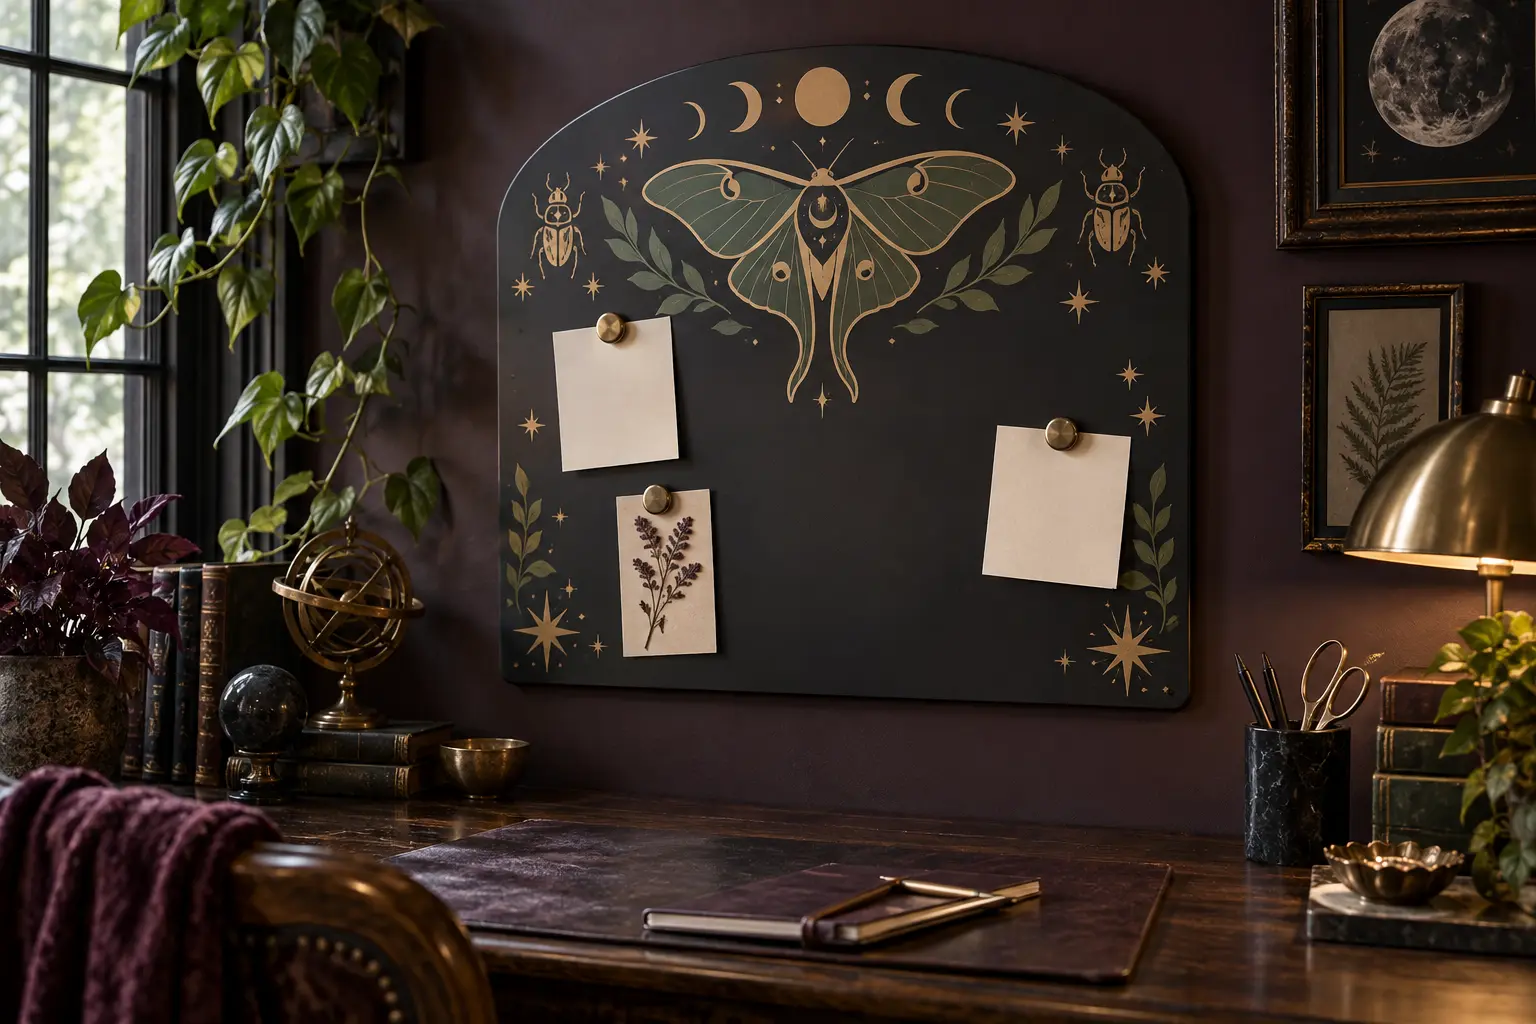
A magnetic memo board earns its wall space every day, so this project treats the artwork and the working area as equal priorities. A large celestial moth anchors the arch, moon phases create a calm upper border, and smaller beetles and stars frame a generous center where notes, swatches, and reminders can move without covering the whole design.
This is an original project plan based on common removable-vinyl application and factory-made magnetic-board use. Board coating, surface texture, magnetic strength, vinyl adhesive, transfer-tape tack, artwork detail, blade condition, mat grip, room temperature, humidity, wall construction, mounting hardware, and daily handling can all change the result. Make a full-size paper proof, test every exact material, and follow the current directions from the board, mounting-hardware, magnet, vinyl, transfer-tape, cutting-machine, blade, mat, wall, and medical-device makers. Preserve the purchased artwork and simplify only duplicate working files. The featured KleanKutChaos bundle supplies the decorative insect artwork; the featured KleanKutChaos file is the design source for this tutorial, and this tutorial does not claim that the pictured combination was physically tested with the listing files.
What you’ll need
- Celestial Insect SVG Bundle from the featured KleanKutChaos listing
- One factory-made smooth powder-coated ferromagnetic steel memo board with intact finish, rounded edges, complete mounting hardware, and maker instructions
- Removable adhesive craft vinyl approved for the board finish in antique gold, moss, plum, and cream
- Standard transfer tape matched to the selected vinyl
- Cricut-, Silhouette-, or similar cutting machine with a clean fine-point blade
- Compatible clean standard-grip cutting mat
- Cutting-machine software and a duplicate working copy of the chosen insect designs
- Large one-piece or securely enclosed memo-board magnets that comply with applicable safety standards
- Kraft paper or taped copy paper for a full-size board proof
- Printer or pencil, ruler, measuring tape, scissors, and low-tack painter's tape
- Scraper, brayer, weeding tool, fine tweezers, bright task light, and labeled paper envelopes
- Board-maker-approved cleaner and lint-free cloths
- Stud finder and wall-mounting tools only when the board maker and wall type require them
- Eye protection, a stable work surface, and a lidded container for vinyl scraps
How to make it
- 1
Inspect the board and its hardware
Unpack the factory-made board and confirm that its coating is smooth and intact, its edges are rounded, and every supplied bracket, spacer, and fastener is present. Test the front with one of the intended enclosed magnets. Reject or contact the maker about a board that is warped, sharp, rusted, chipped, weakly magnetic, or missing hardware.
- 2
Map the working and no-vinyl zones
Measure the visible face, curve, frame, mounting holes, standoffs, marker ledges, and any manufacturer labels. Reserve a generous central rectangle for notes and mark a border around every edge, hole, bracket, and accessory. Vinyl must never cover mounting points, hardware, warnings, or areas that a magnet needs to grip.
- 3
Build a readable celestial layout
Place one broad moth near the top, a short moon-phase arc above it, and no more than two beetles plus a few large stars around the sides. Keep the lower middle quiet for notes. Repeat colors in three places and avoid a dense all-over pattern that would make reminders hard to find.
- 4
Simplify duplicate artwork
Preserve the purchased files and edit only duplicate copies. Keep the moth body, wing outline, major eye spots, and bold celestial marks. Remove hairline veins, isolated dots, tiny antenna gaps, and narrow interior islands. Thicken weak bridges and make the smallest retained feature large enough to survive a test cut.
- 5
Make a full-size paper proof
Trace the usable board face onto kraft paper, including its curved top and every hardware clearance. Print the motifs tiled or cut rough paper silhouettes at finished size. Tape them to the paper proof, add blank note templates, and view the composition from normal working distance before cutting any vinyl.
- 6
Test the finish and adhesive
Clean one hidden stationary spot only with the board maker's approved method and let it dry completely. Apply a small piece of each exact vinyl, leave it for the vinyl maker's recommended test period, then remove it as directed. Stop if adhesive, cleaner, or pressure clouds, stains, scratches, softens, or lifts the coating.
- 7
Test-cut the smallest details
Place scraps of every vinyl color liner-side down on the mat and begin with the material maker's recommended setting. Include one antenna, wing gap, moon point, beetle leg, and small star at final size. Weed and transfer the samples to a comparable scrap surface if available. Enlarge or simplify anything that tears, stretches, or refuses to release cleanly.
- 8
Cut and organize by layer
Cut the moth body, wing accents, moons, beetles, and stars with the proven settings. Weed large waste areas first while supporting narrow bridges with the tool tip. Store each color and motif on its liner in a labeled envelope. Recut a damaged piece instead of hiding a split under another layer.
- 9
Dry-position the board flat
Lay the protected board face-up on a level padded surface if its maker permits. Place every weeded decal on its liner over the paper layout and use low-tack tape outside the graphics to mark centerlines and safe edges. Add the actual blank note templates again to confirm that the working area remains practical.
- 10
Transfer the large moth first
Apply matched transfer tape to the moth and use a painter's-tape hinge through its widest safe section. Remove only part of the liner, smooth from the hinge outward with light overlapping strokes, then expose the rest gradually. Peel the transfer tape back at a low angle while the board remains fully supported.
- 11
Add moons, beetles, and stars
Align the moon phases from their center outward, checking equal visual spacing rather than relying only on the curved frame. Add the beetles and larger stars next, then stop before the layout becomes crowded. Keep every decal inside the tested coating and clear of edges, holes, brackets, and the reserved note area.
- 12
Let the vinyl settle
Leave the board flat and undisturbed for the vinyl maker's recommended settling period. Keep it indoors and away from sun, moisture, heaters, children, pets, loose magnets, and airborne dust. Do not use a heat gun, hair dryer, iron, spray coating, liquid sealer, or aggressive burnishing to speed adhesion.
- 13
Mount or place it exactly as directed
Follow the board maker's instructions for the exact wall type, board weight, fasteners, spacing, and required number of attachment points. Use a qualified installer when the wall construction or load path is uncertain. If the product is freestanding, use only its supplied stand on a stable surface and never improvise a hanging system.
- 14
Complete a daily-use safety audit
Confirm that the board cannot rock, slide, rotate, or lift away from its mount. Count every magnet, verify that each enclosure is intact, and place notes without stacking so many layers that the magnets barely hold. Keep all magnets away from children, pets, implanted medical devices, magnetic cards, and sensitive electronics according to their makers.
Practical finishing tips
- Choose one dramatic moth at least seven inches wide instead of shrinking the bundle's most detailed artwork.
- Use blank paper rectangles on the proof so the decorative border is designed around real note sizes.
- Photograph the approved paper layout before cutting; the image becomes a reliable placement map.
- Cut moon phases as separate shapes so small spacing corrections do not stretch a long vinyl strip.
- Keep accent stars broad and sparse; tiny points collect dust and are more likely to lift with frequent note changes.
- Store spare magnets in a closed, labeled container well away from children, pets, electronics, and medical devices.
Troubleshooting
Stop and confirm that the coating is smooth, fully dry, and compatible with the adhesive. Review the maker-approved cleaning method, room temperature, vinyl age, and transfer-tape tack. If the surface is textured, use removable paper artwork held by safe enclosed magnets instead of forcing vinyl onto it.
Return to a duplicate file and divide the design into two or three overlapping sections through broad wing areas. Use a center hinge, expose the adhesive gradually, and smooth only a few inches at a time.
Enlarge the moth, delete the weakest veins, thicken bridges, replace a dull blade, and repeat the scrap test. A clean bold silhouette will read better than patched miniature detail.
Stop immediately and do not decorate that finish with adhesive vinyl. Contact the board maker if the coating is damaged, and switch to a no-adhesive paper insert or another compatible factory-finished board.
Reduce paper thickness and layers, verify that the board is genuinely ferromagnetic, and use only larger enclosed magnets approved by their maker. Do not stack small high-powered magnets or use loose magnetic pieces.
Remove the board and notes from use. Recheck the maker's fastener type, wall compatibility, bracket engagement, load rating, and installation sequence. Do not add improvised tape, wire, or a single extra screw; ask the manufacturer or a qualified installer for the correct remedy.
Ways to make it yours
Use only antique-gold moth and moon shapes on charcoal for a restrained year-round office board.
Replace the large moth with two simplified beetles and broad mirrored leaves, leaving the entire center open for project planning.
Keep the main celestial moth in removable vinyl and swap only a few large stars for cream autumn leaves or plum winter berries.
Cut the designs from heavy cardstock, mount them to larger one-piece magnets in accordance with the magnet maker's directions, and rearrange the artwork without applying adhesive to the board.
Keep crafting
- DIY Celestial Insect Shrink-Plastic Charm Garland — Turn mystical moth, beetle, bee, and dragonfly artwork into a lightweight gothic garland with a measured shrink test, clean printed detail, and securely closed hanging loops.
- DIY Gothic Apothecary Drawer Labels With Removable Vinyl — Turn a plain mini-drawer cabinet into functional gothic storage with nine ornate frame decals, readable center labels, and a reusable placement jig.
- DIY Witchy Halloween Countdown Flip Calendar With Cricut or Silhouette — Make a reusable tabletop Halloween countdown with sturdy flip cards, crisp vinyl decoration, and a dramatic witch-trio centerpiece.
Inspiration & further reading
This is an original Klean Kut Halloween Crafts project inspired by approachable techniques shared across trusted craft and home sources. Explore Cricut vinyl cutting and application guide, Cricut transfer tape instructions and U.S. Consumer Product Safety Commission magnet safety guidance for more ideas and technique background.