
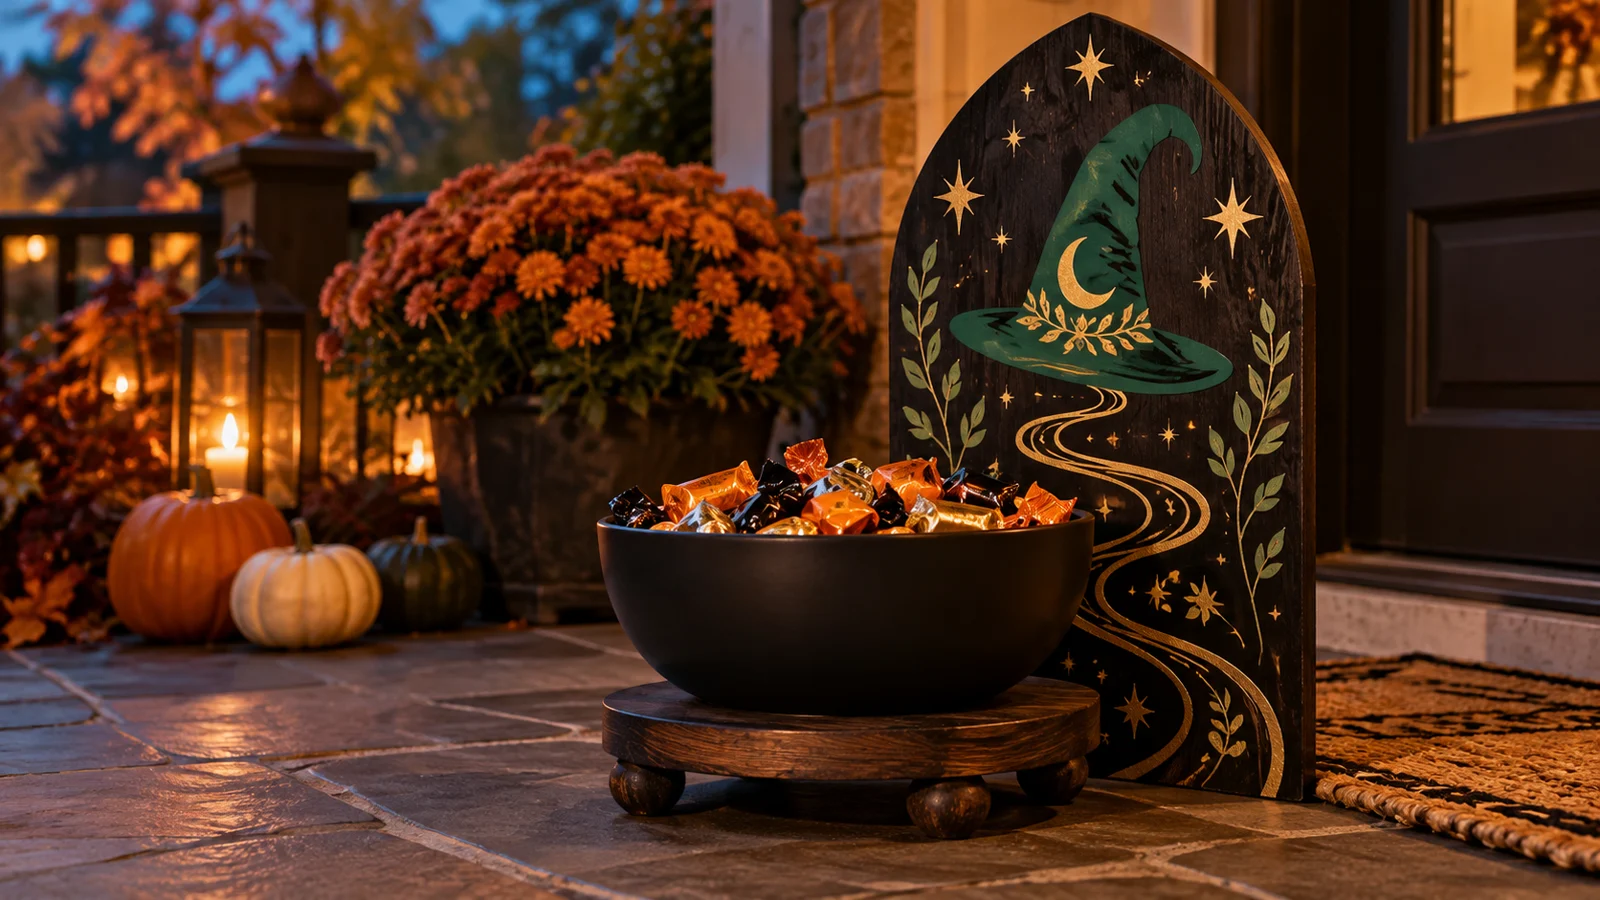
A good front-door candy station should feel festive without becoming one more thing guests can tip, snag, or reach around. This project treats the display as three practical pieces: a low commercial pedestal or riser, a removable washable bowl for wrapped treats, and a separate upright backboard that carries the vinyl artwork. The result reads as one dramatic witchy centerpiece, but the food-contact piece stays undecorated and every component can be cleaned, stored, or replaced on its own.
This is an original project plan based on common adhesive-vinyl and tabletop-display methods. Surface finish, vinyl chemistry, transfer-tape tack, cutter condition, design scale, riser stability, bowl shape, weather, temperature, humidity, and cure time can change the result. Test the exact vinyl, transfer tape, backboard, and cleaner; follow the current instructions from every material, cutter, blade, mat, bowl, riser, and display-stand maker; and preserve the purchased artwork by editing only duplicate working files. The featured KleanKutChaos listing supplies the friends-and-witch-hat artwork, while the featured KleanKutChaos file is the design source for this tutorial. This tutorial does not claim that the pictured combination was physically tested with the listing files.
What you’ll need
- Wizard of Oz Friends & Witch Hat SVG from the featured KleanKutChaos listing
- One low, commercially made cake stand, plant riser, or tabletop pedestal rated for more than the filled bowl's weight
- One removable smooth-sided candy bowl that sits fully inside the pedestal top and can be washed according to its maker's instructions
- One rigid smooth backboard, approximately 8×10 to 12×16 inches, made from sealed wood, acrylic, or another vinyl-compatible sign blank
- One stable tabletop easel, slotted sign holder, or maker-approved stand sized for the backboard
- Permanent or removable adhesive vinyl in two contrasting colors approved for the selected backboard and intended length of use
- Transfer tape matched to the vinyl's finish and tack level
- Cricut-, Silhouette-, or similar cutting machine with a compatible fine-point blade and cutting mat
- Cutting-machine software and a duplicate working copy of the purchased artwork
- Printer paper or kraft paper, painter's tape, ruler, flexible tape measure, pencil, and a level
- Lint-free cloth and the sign-blank maker's approved surface cleaner
- Scraper or burnishing tool, weeding tool, tweezers, and sharp craft scissors
- Thin nonslip shelf liner or clear bumper dots approved for the pedestal surface
- Individually wrapped candy and a separate lidded refill container
- Optional battery-operated LED puck placed behind the sign only when its maker permits the orientation and clearance
How to make it
- 1
Plan the visitor path first
Choose a table, bench, or porch shelf that does not narrow the doorway, stair landing, handrail, or accessible route. Measure the available depth and width with the door fully open, then reserve room for hands to reach the bowl without touching the sign. Keep the display away from candles, heaters, wet steps, pets, and trailing cords.
- 2
Select a stable pedestal and bowl
Use a low commercial riser with a flat top and a stated capacity comfortably above the filled bowl's weight. Set the empty bowl on it and confirm that the entire base is supported without rocking or overhang. Reject tall, narrow, cracked, collapsible, or improvised pedestals; the bowl must lift off independently for washing and refilling.
- 3
Fit the backboard and stand
Place the undecorated backboard in its intended easel or holder behind the pedestal. Confirm that the sign cannot touch the bowl, blocks no reach path, and remains stable when the bowl is removed. If the stand needs a wall or railing for safety, use only the mounting method approved by its maker rather than relying on the candy bowl as a counterweight.
- 4
Make a full-size paper mock-up
Trace the bowl, pedestal, backboard, and sign holder on kraft paper, then draw the proposed artwork at final size. Tape the paper design to the backboard and view the arrangement from the sidewalk and doorway. Keep a generous plain border around the sign edges and leave the lowest artwork above any point that could be rubbed by the bowl or stand.
- 5
Test the sign surface
Clean a hidden corner only with the blank maker's approved cleaner and let it dry fully. Apply a small sample of the chosen vinyl with the chosen transfer tape, leave it for the maker's recommended test interval, then inspect adhesion and removal behavior. Switch materials if the finish lifts, clouds, stains, scratches, traps bubbles, or holds residue.
- 6
Simplify a duplicate of the artwork
Keep the purchased file untouched and work from a copy. Choose the main friends-and-hat composition, remove detached specks and details too narrow for the final scale, thicken fragile bridges, and preserve the recognizable silhouette. Avoid adding tiny names or phrases that will be difficult to weed and unreadable from the doorway.
- 7
Separate the color plan
Assign the broad focal silhouette to one color and reserve the second for a few large accents such as stars, a border, or the winding-road shape. Keep layers non-overlapping when possible so the sign stays flat and the transfer process remains predictable. Add registration marks outside the finished design only if they can be removed without lifting the artwork.
- 8
Run a representative test cut
Cut the smallest star, tightest inner corner, and narrowest bridge from scrap vinyl using the material maker's recommended starting setting. Weed and transfer the sample onto the successful surface-test area. Enlarge or simplify the working file if corners pull up, lines distort, or the transfer tape is too aggressive; do not compensate with repeated excessive pressure.
- 9
Cut and weed in manageable sections
Cut each color separately with enough carrier border for handling. Weed large negative areas first, then enclosed details under bright light, checking every section against the on-screen preview. Place scraps directly in a closed container so small vinyl pieces cannot migrate into the candy bowl or become accessible to children or pets.
- 10
Prepare alignment guides
Mark the backboard's horizontal and vertical centers with removable painter's-tape tabs placed outside the decal area. Reposition the paper mock-up, measure from two fixed edges, and record the final offsets. For a large design, create a tape hinge across the transfer sheet so only half the carrier is exposed at a time.
- 11
Transfer the focal layer
Burnish the approved transfer tape onto the first vinyl layer, turn it carrier-side down, and peel the liner back slowly at a low angle. Align the taped hinge with the recorded guides, lower the design from the hinge outward, and burnish from the center toward the edges. Peel the transfer tape back close to the surface; pause and reburnish if any vinyl lifts.
- 12
Add the accent layer
Allow the first layer to settle for the interval stated by its maker, then align the second color with the paper mock-up or removable registration marks. Keep the new transfer tape from pressing repeatedly over finished vinyl unless its maker approves that contact. Remove every guide and inspect from both close range and the visitor's viewing distance.
- 13
Assemble the display safely
Let the completed sign rest for the vinyl maker's full settling period before placing it in the stand. Add only the minimum nonslip liner or bumper dots permitted for the pedestal, set the empty bowl in the center, and gently push the table from several directions. Lower or relocate anything that slides, rocks, flexes, or becomes unstable when the bowl is lifted.
- 14
Fill, inspect, and maintain
Wash and dry the removable bowl according to its maker, return it to the pedestal, and fill it only with individually wrapped treats. Keep a lidded refill supply elsewhere so the display is never overloaded. Before each use, inspect the sign, stand, pedestal, nonslip material, and vinyl edges; bring the arrangement indoors for rain, strong wind, or temperatures outside the material makers' stated ranges.
Practical finishing tips
- A low, wide pedestal creates the same elevated look as a tall stand with far less tipping leverage.
- Keep the bowl completely undecorated so it can be removed, washed, and replaced without exposing vinyl edges to food or repeated handling.
- Use one large focal silhouette and a few broad accents; tiny layered details disappear in porch lighting and slow the weeding process.
- Photograph the finished alignment before removing the painter's-tape guides so a damaged accent can be recut in the same position.
- Place refill candy in a separate lidded container and replenish in small amounts rather than creating a heavy, top-filled bowl.
- If the display will be outdoors, treat every component as temporary décor and move it inside whenever weather or temperature exceeds its maker's guidance.
Troubleshooting
Return the transfer tape to the design and burnish again from both sides. Confirm that the tape tack matches the vinyl, then peel the liner away at a low angle rather than lifting the design upward. Replace an incompatible transfer tape instead of forcing delicate pieces.
Stop lowering the transfer sheet and lift only the unapplied portion. Burnish outward from the last adhered edge in short strokes. For persistent bubbles, recut the focal layer in two naturally separated sections rather than puncturing a visible finished surface.
If it has not been burnished, lift the transfer sheet and realign from the center guides. If the adhesive has bonded, do not stretch or repeatedly peel the vinyl; remove and recut the accent or intentionally widen the spacing so the offset looks designed.
The sign and bowl are not a safe shared support system. Move the sign to a properly sized independent stand, lower its height, or mount it by the stand maker's approved method before the display is used.
Empty the bowl and verify that both bases are flat, dry, and fully supported. Add only an approved thin nonslip liner or bumper arrangement that keeps the bowl level; replace the pedestal if the rim, finish, or diameter prevents stable contact.
Bring the sign indoors, let it return to the material maker's approved temperature and dryness, and inspect for contamination or surface failure. Recut the affected area only after a new adhesion test; do not seal over failing vinyl unless every product maker approves that combination.
Ways to make it yours
Use a compact tabletop photo stand and small wrapped-candy bowl on an indoor console, keeping the same independent supports and clear reach path.
Replace the bowl with battery tea lights or lightweight faux pumpkins approved for the pedestal, keeping heat, flames, and loose batteries out of the arrangement.
Put removable broad accents on an acrylic backboard so the witchy layer can be replaced with leaves after Halloween, provided the surface test confirms clean removal.
Set the low pedestal on a secured vehicle cargo surface only while parked, place the sign in an independently weighted approved holder, and remove the entire display before the vehicle moves.
Keep crafting
- DIY Witchy Crystal Ball Halloween Prize Wheel With Cricut Vinyl — Turn a factory-made dry-erase prize wheel into reusable witchy party décor with removable vinyl wedges, celestial icons, and a crystal-ball centerpiece.
- DIY Witchy Yellow Brick Road Trunk-or-Treat Backdrop With Vinyl — Build a freestanding, weather-aware trunk-or-treat scene with modular corrugated-plastic panels, a winding gold road, and witchy vinyl silhouettes cut on a home machine.
- DIY Witchy Yellow Brick Road Book Nook With Layered Cardstock — Build a moody storybook book nook with layered cardstock scenery, a winding gold road, and safely separated battery lighting.
Inspiration & further reading
This is an original Klean Kut Halloween Crafts project inspired by approachable techniques shared across trusted craft and home sources. Explore Cricut Transfer Tape instructions, Cricut Vinyl cutting and application guidance, Silhouette adhesive vinyl material guidance and U.S. Consumer Product Safety Commission Art and Craft Safety Guide for more ideas and technique background.