
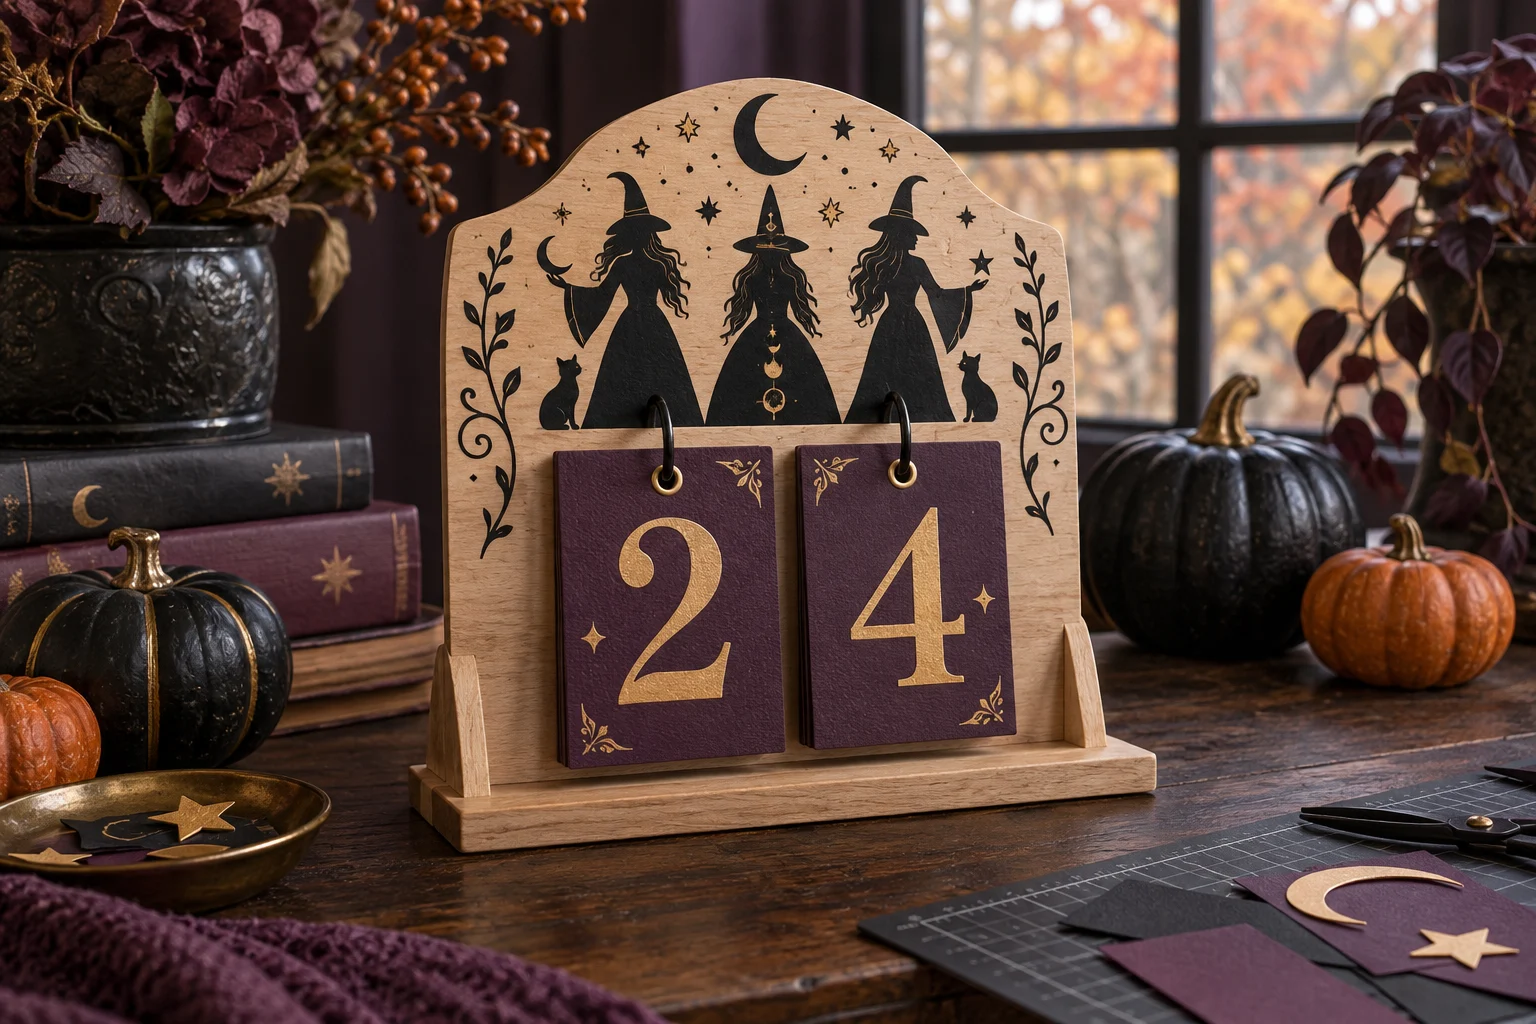
This reusable tabletop calendar turns the last month before Halloween into part of the décor. A factory-made, predrilled wood flip-calendar blank carries two independent cardstock number decks, while a simplified witch-trio cut file becomes the focal vinyl panel above them. The left deck holds 0 through 3 and a blank card; the right deck holds 0 through 9, so the calendar can display every countdown from 31 to 00 without a new project next year.
This is an original project plan based on common cardstock-cutting and adhesive-vinyl methods. Wood finish, card thickness, grain direction, paint cure, vinyl adhesive, transfer-tape tack, blade condition, mat grip, ring diameter, hole placement, humidity, and storage all affect the result. Make the full-size paper proof and exact-material tests before decorating the final blank, and follow the current directions from every paint, wood, cardstock, vinyl, transfer-tape, machine, blade, mat, punch, ring, and adhesive maker. The featured KleanKutChaos file supplies the decorative witch-trio artwork; this tutorial simplifies it for a bold tabletop silhouette and does not claim that the pictured material combination was physically tested with the listing design.
What you’ll need
- Halloween Witch Trio Portrait cut file from the featured KleanKutChaos listing
- One stable unfinished wood tabletop flip-calendar blank with a wide base, two factory-drilled hanging positions, and removable binder rings
- Five sheets of heavyweight smooth cardstock in deep plum, black, or burnt orange, matched to the cutting-machine guidance
- One sheet of metallic or matte cardstock for large numerals and small corner accents
- Black permanent adhesive craft vinyl approved for sealed painted wood
- Transfer tape matched to the chosen vinyl
- Water-based craft paint, compatible primer when required, and a clear finish only if approved for both the paint and vinyl plan
- Cricut-, Silhouette-, or similar cutting machine with a clean fine-point blade
- Compatible clean light- or standard-grip cutting mats for the chosen cardstock and vinyl
- Printer, copy paper, ruler, pencil, low-tack painter's tape, and scissors for full-size proofs
- Weeding tool, fine tweezers, scraper, brayer, and bright task light
- Single-hole punch sized for the calendar rings, plus a cardstock scrap for testing hole clearance
- Acid-free paper adhesive or thin double-sided adhesive sheets approved for the chosen cardstock
- Fine sanding sponge, tack cloth or paint-maker-approved dust removal method, soft lint-free cloth, and drop cloth
- Small tray for rings and hardware, eye protection, and a lidded scrap container
How to make it
- 1
Choose a stable calendar blank
Select a factory-made tabletop blank that stands level, has smooth finished edges, and uses removable rings rather than requiring you to drill near the card area. Check that the base is deep enough to resist tipping when all cards hang forward. Reject loose joints, splinters, cracks, warped panels, sharp hardware, or rings that do not close fully.
- 2
Measure the real hanging area
Remove the rings and measure from each hole center to the base, the space between holes, and the clear width around the support legs. Plan two card decks with at least a quarter inch of space between them and enough bottom clearance to flip freely. Record the decorative area above the rings before opening the SVG.
- 3
Build the countdown system on paper
Cut two scrap-paper cards at final size. Mark the left deck as 0, 1, 2, 3, and blank, and the right deck as 0 through 9. Punch test holes using the measured center points, hang the cards, and confirm that 31, 24, 10, 07, 01, and 00 can all be displayed without overlapping or touching the base.
- 4
Simplify the witch trio
Open a duplicate of the featured SVG and preserve the original. Keep the three large outer silhouettes, the broad hat shapes, and only the strongest hair and clothing contours. Remove facial lines, thin curls, tiny jewelry, isolated specks, and narrow interior cuts that would become fragile at the chosen width. Weld intentional overlaps and close broken paths.
- 5
Make a full-size placement proof
Print or cut the simplified trio and the two card outlines at 100 percent. Tape them temporarily to the unpainted stand, install the paper cards, and view the calendar from seated and standing height. Keep the art clear of ring holes, moving cards, legs, seams, and edges. Reduce the trio if any vinyl contour would sit on an uneven joint.
- 6
Prepare and finish the wood
Disassemble only the removable hardware and photograph its order. Lightly sand the decorating surfaces in the grain direction if the blank maker allows, remove dust by the paint maker's method, and apply compatible primer and thin paint coats. Keep paint out of holes, ring closures, joints, and card-swing areas. Let the finish cure for the full label time before vinyl application.
- 7
Design sturdy number cards
Create identical rounded rectangles sized from the paper test. Add one ring hole to each card in exactly the same position. Cut five left-deck cards and ten right-deck cards from heavyweight cardstock. Cut large numerals separately from contrasting cardstock, leaving generous margins so every number remains legible when cards overlap slightly.
- 8
Test-cut both materials
Use scraps of the exact cardstock and vinyl. Begin with the machine maker's recommended setting, then check that cardstock releases without fuzzy edges and vinyl cuts cleanly without slicing through its liner. Adjust one variable at a time, use the correct mat for each material, and replace a dull blade instead of adding excessive pressure.
- 9
Cut, flatten, and pair the cards
Brayer each cardstock sheet evenly onto the clean mat and cut the cards. Remove the mat by turning it face down and curling it away from the cardstock rather than bending the cards. Keep the left and right decks in separate labeled stacks. Recut any card with a torn hole, lifted surface, deep score, or distorted corner.
- 10
Apply the numerals consistently
Use a simple alignment jig cut from scrap cardstock so every numeral sits at the same height and horizontal center. Bond the numerals with a thin, even layer of approved paper adhesive or an adhesive sheet. Keep glue away from holes and edges, press each card flat under clean release paper as directed, and allow the full dry time before stacking.
- 11
Cut and weed the decorative vinyl
Cut the simplified witch trio without mirroring because it will be applied to the front of the stand. Weed the large background first, then remove the few planned interior openings under bright light. Recut stretched hats, broken hair contours, or detached figure edges rather than trying to disguise damage on the painted wood.
- 12
Transfer the trio with a center hinge
Confirm that the paint is fully cured, then clean the flat decorating area only as the finish maker allows. Apply compatible transfer tape, position the art with the paper-proof measurements, and make a vertical painter's-tape hinge through the center. Apply one half at a time, burnishing outward, then peel the transfer tape back at an acute angle.
- 13
Punch, sequence, and hang the decks
Test the punch on a finished scrap stack before touching the cards. If the machine-cut holes need slight correction, punch one card at a time using the same center guide; never force a thick stack. Arrange the left deck blank, 3, 2, 1, 0 and the right deck 9 through 0 so the next count is easy to reach, then close both rings completely.
- 14
Run a complete flip-through
Set the calendar on a level surface away from the edge and flip through every useful combination from 31 to 00. Check that cards clear the base, rings stay closed, numerals remain upright, the stand does not rock, and no card rubs the vinyl. Store unused cards behind their active deck and flip only one card at a time with a hand steadying the base.
Practical finishing tips
- Use the same alignment jig for all fifteen numeral cards; tiny placement differences become obvious when two decks sit side by side.
- Choose a high-contrast palette you can read easily from across the room, such as antique gold on plum or cream on matte black.
- Keep the witch trio at least half an inch above the ring hardware so moving cards cannot scrape narrow vinyl details.
- Photograph the paper proof and completed card order before assembly; both images are quick references after seasonal storage.
- Place thin clean release sheets between finished cards during drying so adhesive squeeze-out cannot bond the decks together.
- Store the calendar upright in a dry box with the rings closed and cards supported, not crushed under heavier decorations.
Troubleshooting
Stop flipping and compare the card length and hole position with the paper test. Recut the affected deck shorter or with the hole moved slightly upward. Do not trim hanging cards freehand while they remain on the rings.
Moisture, heavy wet adhesive, grain direction, or one-sided decoration may be causing tension. Press the cards flat under clean release paper as the adhesive allows, or remake them with a dry adhesive sheet and sturdier compatible cardstock.
The cardstock may be too light, the hole too close to the edge, or the ring too small. Recut the complete matching deck from heavier approved stock with more material above the hole, and use a larger smooth ring that closes fully.
The finish may be uncured, textured, dusty, or incompatible with the adhesive. Remove only as the finish and vinyl makers permit, allow more cure time, run an exact-surface test, and recut a bolder version rather than adding heat or sealer over failing vinyl.
Enlarge or simplify the trio, replace a dull blade, and repeat the material test. Preserve broad hat, hair, and dress contours while deleting fragile interior lines. Do not stretch a lifted contour back into position.
Return all extra cards behind the decks and place the calendar on a deeper level surface. If it still tips, retire the blank and move the cards to a manufacturer-rated stand with a wider base; do not add loose counterweights.
Ways to make it yours
Use the same two decks to display the current October date instead of days remaining, and add a removable cardstock label stored behind the cards.
Delete every interior cut and use three solid witch shapes with one crescent moon for faster cutting and much easier weeding.
Make a second set of evergreen-and-burgundy cards and add a removable ornament medallion so the same stand can count down through December without changing the permanent witch panel.
Skip adhesive vinyl and cut the trio from black cardstock, mounting it as a removable panel with maker-approved paper adhesive on a sealed flat insert.
Keep crafting
- DIY Gothic Apothecary Drawer Labels With Removable Vinyl — Turn a plain mini-drawer cabinet into functional gothic storage with nine ornate frame decals, readable center labels, and a reusable placement jig.
- DIY Gothic Witch Book Box With Vinyl & Metallic Paint — Turn a plain book-shaped wooden box into an aged black, plum, and gold keepsake with an ornate witch cameo on the cover.
- DIY Cute Bat Magnetic Bookmarks for Halloween Reading — Turn six playful bat cut files into slim magnetic bookmarks with hidden paired magnets, reinforced paper hinges, and book-friendly rounded edges.
Inspiration & further reading
This is an original Klean Kut Halloween Crafts project inspired by approachable techniques shared across trusted craft and home sources. Explore Cricut vinyl cutting and application guide and Cricut transfer tape instructions for more ideas and technique background.