
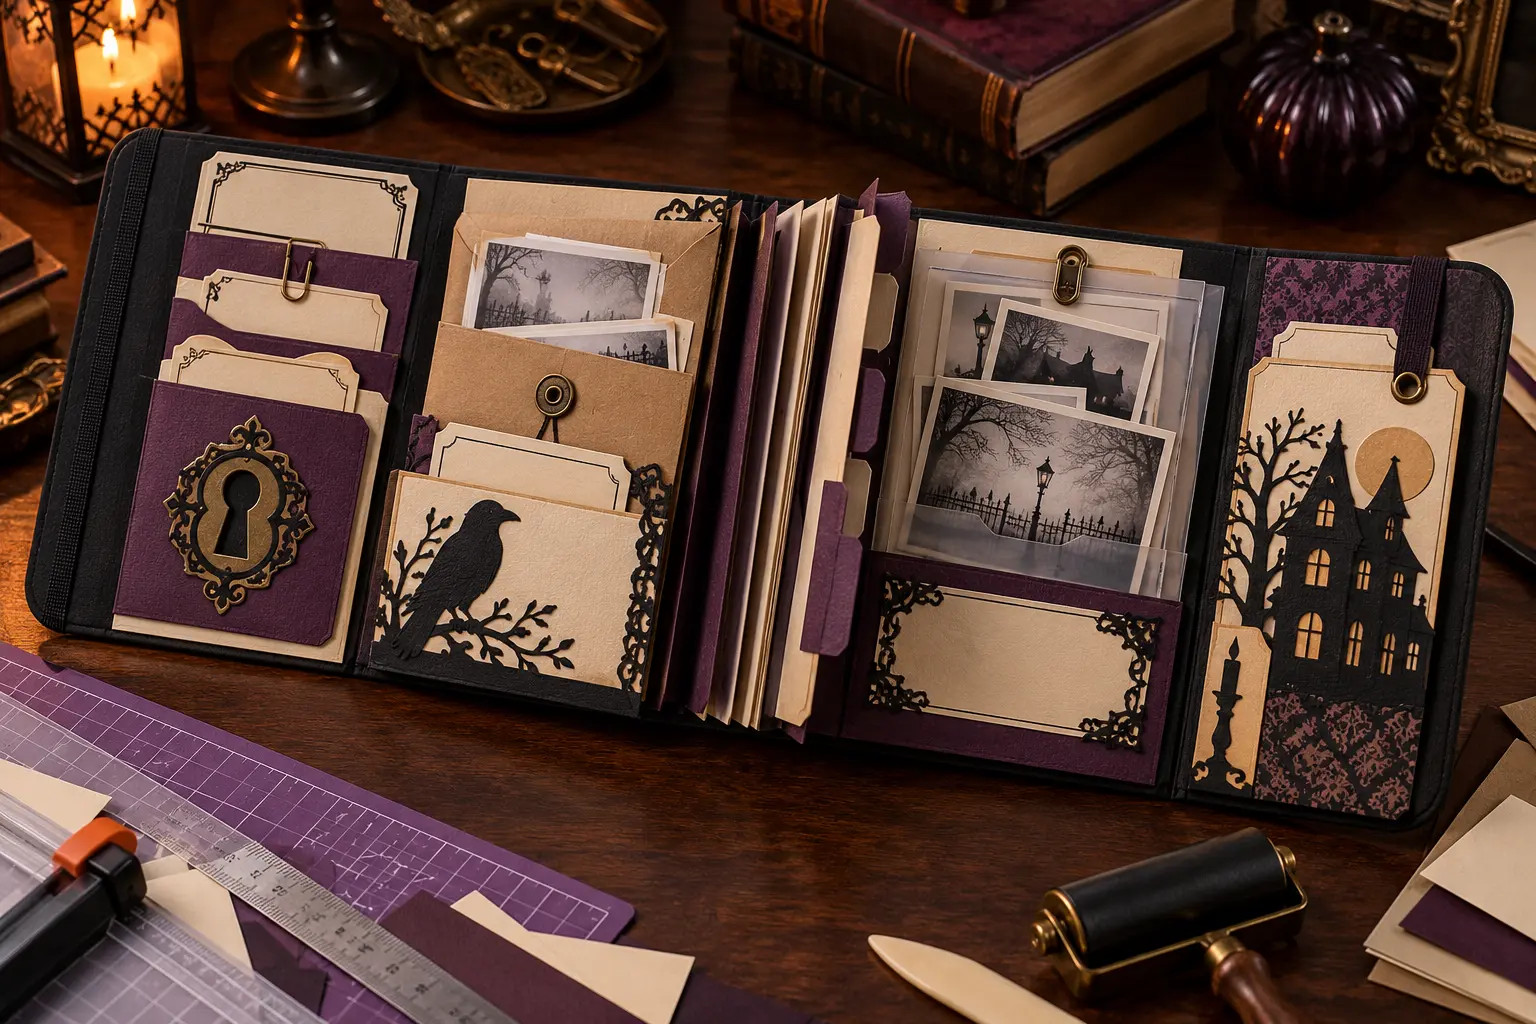
A good mystery night produces a surprising amount of paper: invitation copies, character notes, maps, photographs, sealed clues, answer cards, and the pieces that should stay hidden until later. This landscape folio gives each group a labeled home while keeping the finished object theatrical enough to sit on the welcome table. The construction uses two separate book-board covers joined by a flexible cloth spine, so it opens flat without forcing a stack of cardstock through a rigid hinge. Inside, gusseted pockets hold bulkier envelopes, tabbed dividers separate rounds, and an acetate sleeve protects the one photograph or map that guests need to study repeatedly.
This is an original project plan based on ordinary bookbinding, paper-pocket, home-printing, and cutting-machine methods. Board thickness, paper grain, book cloth, adhesive moisture, printer feed, ink, blade, mat, software version, registration sensor, room humidity, and drying time can all change the result. Make a plain-paper prototype and one complete material test before cutting the final set. The KleanKutChaos listing supplies decorative Victorian mystery artwork only; write, purchase, or commission any actual game, clues, photographs, names, dates, and solution separately. The featured KleanKutChaos file is the design source for this tutorial, and this tutorial does not claim that the pictured combination was physically tested with the listing files.
What you’ll need
- Victorian Mystery SVG Bundle from the featured KleanKutChaos listing
- Two pieces of acid-free book board or sturdy chipboard, each approximately 7 by 10 inches, plus one narrow spine strip if your binding method requires it
- Book cloth or medium-weight cotton backed with paper, large enough to wrap both covers; use a commercially prepared book cloth when possible
- Acid-free PVA bookbinding adhesive, small foam roller or glue brush, wax paper, scrap board, and flat weights for drying
- Four to six sheets of 65–80 lb cardstock in cream, kraft, black, and deep plum for pockets, dividers, envelopes, and layered motifs
- One sheet of printer-compatible matte white cardstock for Print Then Cut accents; verify the weight against both printer and cutter limits
- One clear acetate or polyester sheet intended for craft pockets, plus acid-free double-sided tape approved for the materials
- Cricut, Silhouette, or similar cutting machine with current software, a clean fine-point blade, and the mat specified for the selected paper
- Home inkjet printer with adequate ink, ordinary copy paper for calibration, and the manufacturer-approved feed path for the chosen cardstock
- Paper trimmer, metal ruler, self-healing cutting mat, bone folder, pencil, eraser, scoring stylus or scoring board, and craft knife
- Low-tack painter's tape, brayer, scraper, tweezers, small scissors, corner rounder if desired, and removable-label paper for temporary category names
- One length of 1/4-inch flat elastic for a closure, or a ready-made archival document band; avoid exposed magnets around children and electronics
- Prepared clue envelopes, copies of photographs or maps, blank index cards, and a written inventory for the activity you plan to store
- Safety glasses and any protective equipment required by the cutter, knife, adhesive, and material makers
How to make it
- 1
Plan the contents before the cover
List every item the folio must hold and sort it into no more than five groups, such as invitation, opening evidence, round one, round two, and solution. Measure the largest envelope and the thickest finished stack. The closed folio should be at least half an inch taller and wider than the largest insert, while the spine allowance must match the actual filled thickness rather than an empty-paper guess.
- 2
Prototype the interior in copy paper
Fold full-size pocket and divider mockups from ordinary paper. Place sample envelopes and photo copies inside, stack the sections between two scrap boards, and close the bundle with a strip of paper around the spine. Adjust the gusset depth and number of dividers until the folio closes without bowing or crushing the contents.
- 3
Map the cover and hinge gaps
Cut two equal cover boards and square every corner. Arrange them face down on the back of the book cloth with a flexible spine space between them; for separate front and back boards, begin with a gap of roughly three board thicknesses, then confirm it with the exact cloth and a scrap hinge test. Mark a consistent wrap margin around the outside.
- 4
Make a binding-material test
Glue a small board scrap to the chosen cloth, wrap one edge, and dry it under wax paper and a flat weight. Reject any combination that stains, frays badly, delaminates, stays tacky, or warps after the adhesive maker's stated cure time. If using homemade fabric book cloth, follow a dedicated book-cloth method rather than applying wet glue directly to unbacked fabric.
- 5
Cover the boards
Apply a thin even coat of adhesive to one board at a time, position it on the cloth marks, and burnish gently from the center outward. Trim the outer cloth corners with enough material left to cover the board tips, then wrap opposite edges in pairs. Keep glue out of the hinge gaps, wipe only as the adhesive maker directs, and dry the assembly flat under clean wax paper and distributed weight.
- 6
Line the inside covers
Cut two cream or plum cardstock liners slightly smaller than the exposed board faces. Score a narrow flex line beside each hinge, dry-fit the liners, then adhere them without bridging stiff paper across the moving joint. Close and reopen the folio while the adhesive is still workable only if the maker permits, making sure the spine bends smoothly and the boards remain parallel.
- 7
Prepare the artwork at useful sizes
Open duplicate working copies of the purchased keyhole, house, candle, and ornamental designs. Keep the original files unchanged. Choose two or three broad motifs for the cover and section cards; at final size, remove only isolated details that would be too small to cut cleanly. Avoid turning every fine illustrated line into a fragile cardstock sliver.
- 8
Build a plain-paper Print Then Cut test
In your cutter software, flatten any printed accents according to the current app instructions and keep every element inside the allowed print area. Print on ordinary paper through the software's normal Print Then Cut flow, preserving the registration marks exactly. Calibrate if prompted, then cut the test and check the offset before loading expensive cardstock.
- 9
Print and cut the final accents
Load matte printer-compatible cardstock through the approved feed path and print one sheet at a time. Let the ink dry completely without covering registration marks. Place the sheet on the specified mat in the software-indicated orientation, smooth it with a brayer, run the verified material setting, and lift the mat away from the paper to reduce curl.
- 10
Make the accordion pockets
For each bulky section, cut a pocket front and two gusset strips. Score the strips into narrow accordion folds, burnish them with a bone folder, and attach one fold to the pocket front and one to the backing panel. Keep adhesive away from the expanding channel. Load the intended envelopes into the dry pocket and confirm that the gussets open without tearing.
- 11
Add dividers and restrained labels
Cut dividers about one quarter inch shorter than the cover and stagger broad tabs across the top edge. Use removable labels for category names until the activity order is final. Place one decorative motif near the lower outside corner of each divider so the artwork does not crowd the tab, registration edge, or any clue guests need to read.
- 12
Assemble the acetate study sleeve
Cut acetate slightly larger than the intended photo or map, round sharp corners, and attach three edges to a cardstock backing with narrow archival tape, leaving the top open. Do not laminate irreplaceable originals. Use copies of personal photographs and keep names, addresses, school details, or other private information out of party materials shared beyond the intended group.
- 13
Arrange the interior before gluing
Set the dry pockets, dividers, sleeve, and envelope stack inside the open cover. Keep everything at least half an inch from the hinge movement and outer edges. Close the folio gently with the contents in place; if it springs open or the covers bow, reduce the stack or increase the gusset and spine allowance before anything is permanently mounted.
- 14
Mount the sections from back to front
Adhere the deepest pocket or divider panel first, then work toward the front so your hands do not crush finished sections. Use thin, complete adhesive coverage on paper-to-paper joints and the material maker's recommended tape for acetate. Insert clean release paper between layers and let each major assembly dry flat before adding the next.
- 15
Add the cover focal and elastic closure
Layer one large keyhole, house, or candle motif on the front cover, keeping it clear of the hinge and outer wrap edges. For the closure, use a ready-made document band or attach flat elastic only with a proven bookbinding method that is mechanically captured beneath the liner; do not rely on a dot of surface glue. The band should hold the folio closed without bending the boards.
- 16
Load, number, and rehearse
After every adhesive has cured, number the removable envelopes and make a separate inventory that lists what belongs in each pocket. Load copies rather than valuable originals, close the folio for fifteen minutes, and reopen it to check for ink transfer, adhesive seepage, snagged corners, and overfilled gussets. Rehearse the exact sequence before guests arrive, keeping the solution section physically separate until needed.
Practical finishing tips
- Keep the decorative palette to black, cream, kraft, and one plum accent so mixed paper sources still feel intentional.
- Use broad silhouettes on the cover and reserve more detailed printed artwork for protected divider cards.
- Write the final pocket inventory before permanently labeling tabs; mystery-night plans tend to change during rehearsal.
- Store a blank copy of every card and envelope outside the folio so a lost or marked piece can be replaced quickly.
- Pull paper from the cutting mat by curling the mat away from the sheet, not the sheet away from the mat.
- A removable elastic document band is easier to replace than a closure built into the spine and avoids putting magnets near electronics.
Troubleshooting
Stop adding layers and let the cover dry under clean release paper and evenly distributed flat weight for the full adhesive cure time. Warping usually comes from too much moisture or unbalanced layers; line both boards with similar paper and adhesive coverage rather than trying to bend them back by hand.
The board gap may be too narrow or a liner may bridge the joint. Test the correct gap with scrap board and cloth. If the final cover has already cured with a locked hinge, remake it rather than forcing the cloth until it tears.
Return to ordinary copy paper, clean the sensor only as the cutter maker directs, calibrate the machine, use a matte nonreflective sheet, and keep the registration marks unaltered. Do not manually resize a printed page or print from a saved PDF outside the software workflow.
Confirm every gusset fold alternates direction and that adhesive is only on the outer tabs. Add a cardstock backing panel or reduce the number of envelopes; a paper pocket should organize light contents, not brace a thick stack.
Remove the contents and compare the filled stack with the spine prototype. Replace the band with a slightly longer one only if the boards remain flat. If the covers bow, reduce the contents or rebuild with a wider spine instead of tightening the elastic.
Increase the motif size, simplify isolated details, use a fresh test cut, and peel the mat away from the paper. A larger printed accent can preserve fine linework better than forcing it into separate cardstock layers.
Ways to make it yours
Fill the pockets with duplicate photographs, public records, and questions about places or dates, keeping originals and sensitive personal data out of the game copy.
Use one divider per chapter group and add removable quote cards, character relationships, and prediction envelopes without revealing the solution section early.
Cut the keyhole, house, and candle as one-color cardstock silhouettes and handwrite the tabs, avoiding Print Then Cut while keeping the same pocket construction.
Scale the folio for 4-by-6-inch cards, use two shallow pockets, and close it with a replaceable document band; prototype at full size because smaller gussets become fragile quickly.
Keep crafting
- DIY Horror Movie Ticket Stub Accordion Album With Cricut or Silhouette — Build a sturdy accordion album that turns horror-movie ticket stubs into a dramatic shelf display with fitted pockets and a vinyl-decorated cover.
- DIY Gothic Paper-Doll Halloween Costume Planner With Cricut Print Then Cut — Turn gothic outfit illustrations, color swatches, and fabric notes into large reusable magnets on a framed Halloween costume-planning board.
- DIY Gothic Apothecary Drawer Labels With Removable Vinyl — Turn a plain mini-drawer cabinet into functional gothic storage with nine ornate frame decals, readable center labels, and a reusable placement jig.
Inspiration & further reading
This is an original Klean Kut Halloween Crafts project inspired by approachable techniques shared across trusted craft and home sources. Explore Cricut: How to Print Then Cut in Design Space, Cricut Printable Vinyl Instructions and U.S. Consumer Product Safety Commission Art and Craft Safety Guide for more ideas and technique background.