
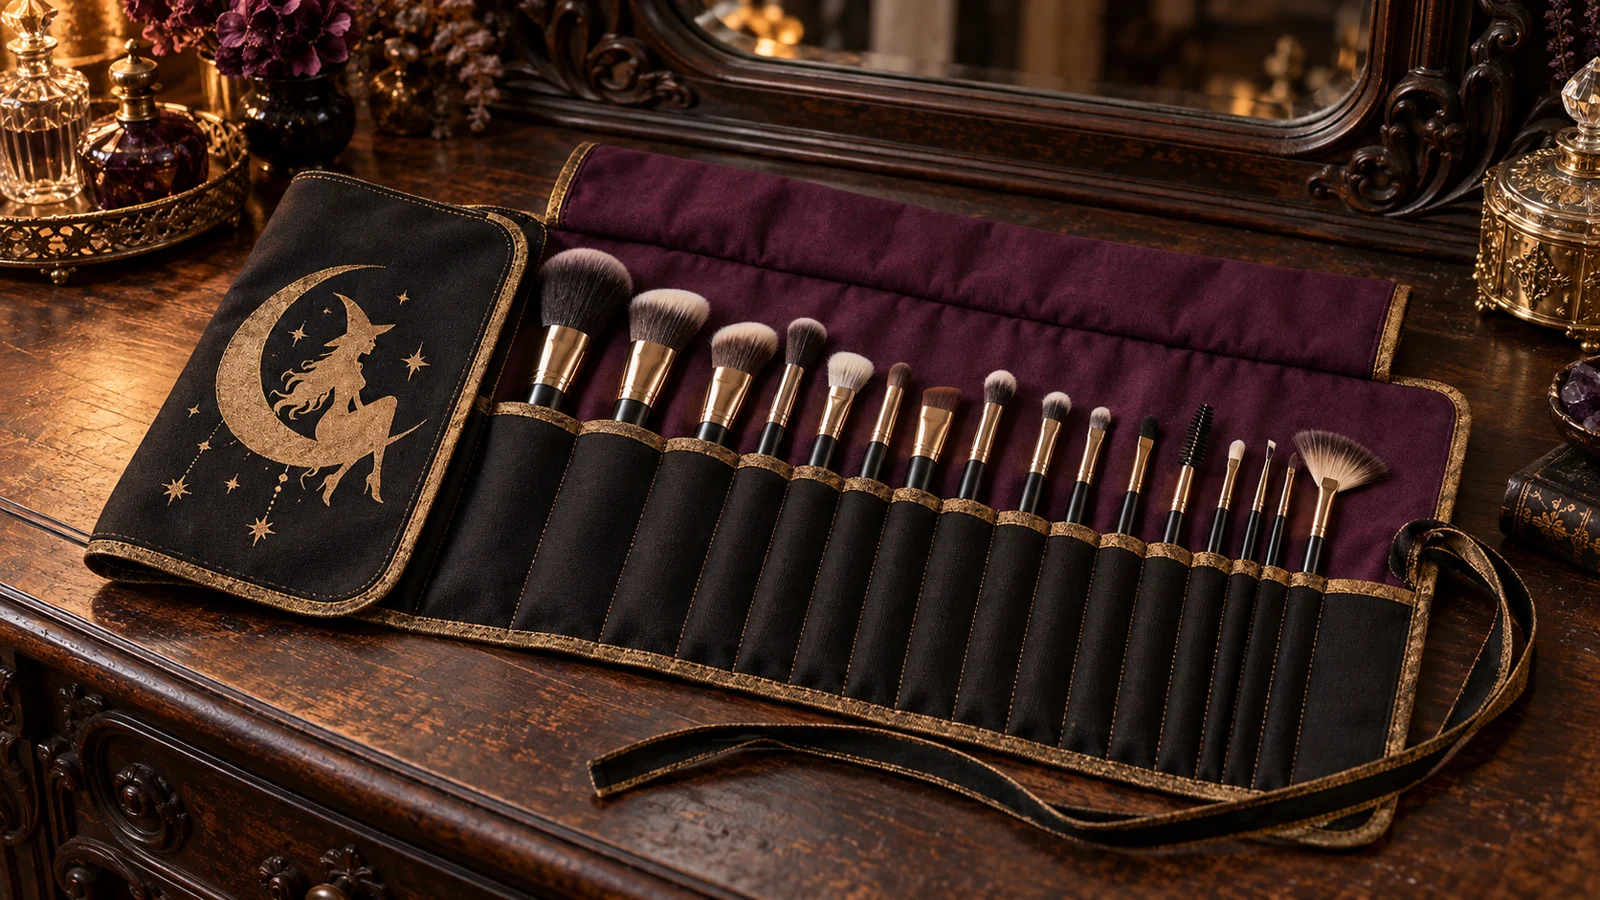
A useful brush roll does more than look pretty: it keeps handles from tangling, prevents clean bristles from rubbing against the contents of a makeup bag, and opens flat so every tool is visible. This version uses a sturdy cotton outer layer, a washable lining, a fold-over bristle guard, and pockets sized from the brushes you actually own. The retro witch artwork stays on the flat outer panel, where it can be pressed before any lining, padding, or pocket seams are added.
This is an original project plan based on common lined-roll sewing and heat-transfer-vinyl methods. Fabric fiber, weave, pretreatment, dye, interfacing, thread, needle, seam allowance, press temperature, pressure, vinyl chemistry, blade condition, brush dimensions, and laundering can all change the result. Make wash, cut, stitch, and press tests with scraps from the exact materials; follow the current directions from every fabric, interfacing, thread, vinyl, cutter, press, and sewing-machine maker; and preserve the purchased artwork while simplifying only duplicate working files. The featured KleanKutChaos listing supplies the witch artwork, while the featured KleanKutChaos file is the design source for this tutorial. This tutorial does not claim that the pictured combination was physically tested with the listing file.
What you’ll need
- Marilyn Monroe Halloween Witch SVG from the featured KleanKutChaos listing
- Prewashed black cotton canvas or medium-weight cotton twill for the outer panel, confirmed compatible with the selected HTV and press
- Prewashed tightly woven cotton in deep plum or another washable lining fabric
- Optional thin sew-in stabilizer or fusible interfacing approved for both fabrics and kept out of the HTV pressing step unless its maker permits the heat
- Coordinating cotton fabric for the pocket strip and fold-over bristle guard
- Matte heat-transfer vinyl in antique gold, warm cream, or another high-contrast color
- Cricut-, Silhouette-, or similar cutting machine with a sharp compatible fine-point blade
- Clean compatible cutting mat and cutting-machine software with a duplicate working file
- Heat press or EasyPress, firm pressing surface, and protective sheet only as their makers direct
- Sewing machine with needle, presser foot, thread, and stitch settings recommended for the chosen fabric stack
- Kraft paper, ruler, pencil, seam gauge, and the clean makeup brushes the roll is being sized to hold
- Fabric scissors or rotary cutter, self-healing mat, quilting ruler, clips, removable fabric marker, and seam ripper
- Cotton twill tape or sewn fabric ties, or an optional closure approved for the finished fabric thickness
- Weeding tool, tweezers, lint roller, bright task light, and a lidded container for blades and scraps
How to make it
- 1
Inventory clean, fully dry brushes
Choose the brushes the roll must hold and remove duplicates you rarely use. Lay them from widest to narrowest with space between ferrules and measure the tallest brush, widest handle, and total row width. Add one or two empty pockets for future tools, but keep the finished roll compact enough to close without crushing bristles.
- 2
Choose washable, press-compatible fabrics
Read the fiber labels and care directions for every layer. Prewash washable fabric without fabric softener when the fabric and HTV makers recommend it, then dry and press it according to the fabric instructions. Reject coatings, laminates, unknown synthetics, or heat-sensitive finishes from the HTV panel unless their makers explicitly approve the planned temperature and pressure.
- 3
Test the full material stack
On labeled scraps, test seam quality, marker removal, interfacing, HTV cut settings, press settings, carrier removal, flexing, and the planned wash method. Let the sample settle for the vinyl maker's stated period before bending or washing it. Choose a combination only if the stitches stay balanced, the fabric remains flat, the vinyl bonds cleanly, and no dye, adhesive, shine, scorch, or residue appears.
- 4
Draft a full-size roll pattern
On kraft paper, draw the finished brush row, a fold-over guard that extends beyond the tallest bristles, an outer panel, lining, pocket strip, seam allowances, turning opening, and tie placement. Wrap the paper around the actual brush set without creasing bristles, then trim excess width and mark where the final roll naturally closes.
- 5
Simplify the witch artwork
Preserve the purchased file and edit only a duplicate. Choose a broad witch-hat portrait and remove tiny facial hatching, isolated dots, hairline curls, and narrow interior islands that will not weed reliably at the available flap size. Keep one main silhouette plus a small crescent or star accent, and confirm the intended use follows the listing license.
- 6
Cut and label every fabric piece
Cut the outer panel, lining, pocket strip, guard, ties, and any approved stabilizer with the grain oriented consistently. Transfer only essential construction marks to the wrong side using a removable tool proven on scrap. Keep the flat outer panel separate from heat-sensitive lining, pocket, and closure pieces until the HTV application is complete.
- 7
Test-cut, mirror, and weed the HTV
Cut the smallest retained hat point, eye opening, curl, crescent, and star from the exact vinyl. Adjust the duplicate artwork instead of forcing fragile details. For conventional carrier-backed HTV, mirror every color exactly as the vinyl maker directs, place the material in the specified orientation, cut with the proven setting, and weed under bright light.
- 8
Press the flat outer panel
Mark the final seam and fold zones on the wrong side so the artwork stays clear of edges, ties, and bulky topstitching. Lint-roll and preheat the outer fabric only as the heat guide directs, position the mirrored design on a firm flat surface, and apply the specified temperature, time, pressure, and peel method. Let it cool or settle before inspecting every edge.
- 9
Make the pocket strip and guard
Finish the exposed top edge of the pocket strip with a narrow double fold or the fabric maker's approved method. Prepare the fold-over guard so its finished edge is soft and smooth. Keep stiff seams, hook-and-loop tape, snaps, and rough embellishments away from the area that touches bristles.
- 10
Fit pocket widths to the real handles
Place the clean brushes on the lining, cover the lower handles with the pocket strip, and mark channel lines one at a time. Give large face brushes more width and small detail brushes less, adding enough ease for removal without letting handles slide out. Test the guard fold before stitching so it covers bristles without bending them.
- 11
Stitch channels and stress points
Sew the pocket strip to the lining with the tested stitch length, backstitching or bar-tacking only where the machine and fabric makers permit. Start at the center and work outward so accumulated width has somewhere to move. Test each channel with its assigned brush and unpick any pocket that pinches a ferrule or allows a tool to fall through.
- 12
Attach the ties and assemble the roll
Baste finished ties to the approved outer edge with their loose ends secured inside. Layer outer panel and lining as the pattern requires, keeping the pocket and guard flat, then sew around the perimeter while leaving the planned turning opening. Clip or grade seam allowances only where appropriate, turn carefully, shape corners without puncturing them, and press seams using settings safe for the nearest material.
- 13
Close, topstitch, and inspect
Close the turning opening with a neat machine or hand stitch and topstitch the perimeter if the fabric stack allows it. Keep the press away from the finished HTV unless its maker specifically permits repressing. Check that no needle fragments, loose threads, raw edges, rough fasteners, exposed adhesive, or vinyl edges can contact bristles or skin.
- 14
Load, roll, and set a care routine
Insert only clean, completely dry brushes, fold the guard over the bristles, and roll from the narrow end without pulling the ties tight enough to distort handles. Store the roll in a clean, dry place. Empty it for laundering, follow the strictest care directions among the fabric, thread, interfacing, and HTV makers, and let both roll and brushes dry fully before reloading.
Practical finishing tips
- Press the artwork while the outer panel is completely flat; completed seams and pocket bulk make pressure uneven and can imprint the fabric.
- A single large hat-and-profile silhouette will weed and flex more cleanly than a small detailed portrait.
- Number the paper pattern pockets and assign each one a brush so the same layout can be rebuilt later.
- Angle the outermost pocket channels slightly inward if the paper test shows edge brushes slipping during rolling.
- Use fabric clips around vinyl-decorated areas instead of pins that could puncture the finished HTV.
- Keep the roll for one person's brushes and store it away from loose powders, damp sinks, and direct heat.
Troubleshooting
Stop and compare the material combination, surface, temperature, time, pressure, and peel method with the current heat guide. Do not guess with extra heat. Repeat the entire application on scrap and recut the outer panel if the fabric is scorched, shiny, distorted, or chemically incompatible.
Return to the duplicate file, enlarge the silhouette, remove hatching and isolated islands, and thicken narrow bridges. Replace a dull blade and repeat the smallest-feature test before recutting the full motif.
Remove the brush rather than forcing its ferrule through. Unpick that channel, move the stitch line outward, and retest with the intended brush. If the pocket strip lacks width, replace it instead of stretching or cutting the lining.
Deepen the pocket strip in a revised pattern, narrow only the loose channels, and extend the guard. Do not add exposed elastic, rough hook-and-loop tape, or adhesive where it can snag bristles or collect cosmetic residue.
Check whether the pocket strip was stretched, channel seams were sewn in one direction, the interfacing is too stiff, or seam allowances are uneven. Remove only the affected stitching, square the layers, and rebuild with the tested stack; do not iron directly over completed vinyl.
Unload it immediately and keep brushes elsewhere. Clean brushes and the roll separately according to their makers' directions, then dry everything completely in a clean area. Discard or replace materials that retain odor, staining, damaged coatings, or visible growth.
Ways to make it yours
Apply the simplified witch motif to a factory-made cotton brush roll only after confirming its complete material stack, seams, and closures are compatible with the HTV maker's heat settings.
Use one oversized warm-cream silhouette on black canvas, six essential pockets, and a simple tie closure for the easiest cutting and smallest packed size.
Resize the channels for clean, dry art brushes and keep it completely separate from cosmetic tools, wet media, solvent-contaminated supplies, and food-use brushes.
Add a separate washable fabric luggage tag to the tie rather than placing text among the portrait details or on a surface that touches brushes.
Keep crafting
- DIY Gothic Acrylic Vanity Tray With Reverse Vinyl — Turn a clear acrylic tray into dramatic gothic vanity décor with a large reverse-applied group scene protected beneath the tray floor.
- DIY Witchy Sewing Notions Box With Layered Cricut Vinyl — Turn a plain wooden box into a practical witchy sewing organizer with a carefully simplified portrait, layered vinyl accents, and removable interior dividers.
- DIY Spooky Baby Closet Dividers With Cricut Vinyl — Turn smooth blank closet dividers into a practical first-Halloween size sorter with bold, easy-to-weed spooky baby silhouettes.
Inspiration & further reading
This is an original Klean Kut Halloween Crafts project inspired by approachable techniques shared across trusted craft and home sources. Explore Cricut Everyday Iron-On instructions, Cricut heat-transfer blank preparation and American Academy of Dermatology makeup-brush cleaning guidance for more ideas and technique background.