
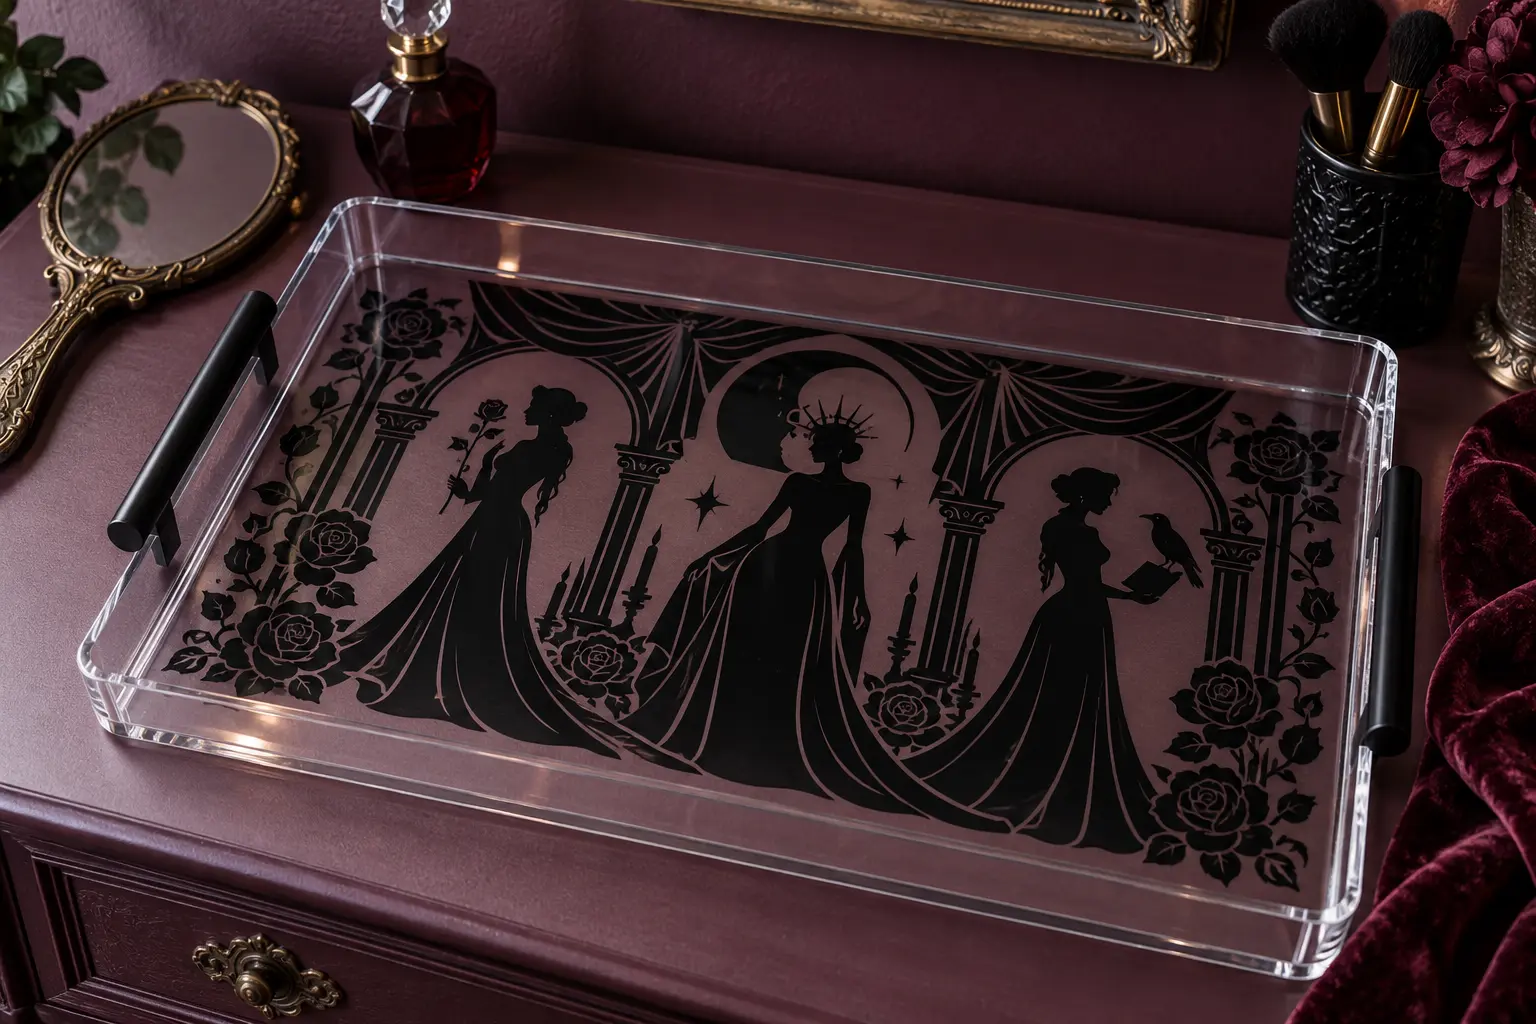
This project turns a plain clear acrylic organizer into a polished gothic vanity display. The featured three-character group is simplified and cut at roughly 11 by 15 inches, then applied to the underside of the tray so bottles and brushes never scrape the vinyl directly. Seen through the clear top, the black scene gains crisp depth while low-profile clear feet keep the finished decal off the furniture.
This is an original project plan based on common adhesive-vinyl and acrylic-sign methods. Acrylic formula and finish, molded stress, cleaner chemistry, vinyl adhesive, transfer tape, blade condition, mat grip, artwork detail, tray hardware, foot placement, temperature, humidity, and object weight all affect the result. Make the full-size paper proof and exact-material test before committing the tray, and follow the current directions from the tray, acrylic, vinyl, transfer-tape, cutting-machine, blade, mat, handle, and bumper manufacturers. The featured KleanKutChaos file supplies the decorative group artwork; this tutorial does not claim that the pictured material combination was physically tested with the listing design.
What you’ll need
- Frank, Magenta and Columbia Group Cut File from the featured KleanKutChaos listing
- One new 12-by-18-inch clear acrylic vanity or organizer tray with factory-finished rounded edges and securely installed handles
- Black permanent adhesive craft vinyl approved for smooth acrylic and indoor use
- Transfer tape matched to the chosen vinyl
- Four clear low-profile self-adhesive silicone feet rated for acrylic and more than the finished stationary load
- Cricut-, Silhouette-, or similar cutting machine with a clean fine-point blade
- Compatible 12-by-24-inch cutting mat, or standard mats if the design will be divided into panels
- Printer, copy paper, scissors, ruler, pencil, and low-tack painter's tape for the full-size proof
- Weeding tool, fine tweezers, bright task light, scraper, and soft felt-edged squeegee
- Mild soap, lukewarm water, two clean soft microfiber cloths, and a lint-free drying area
- A matching acrylic offcut or inconspicuous underside corner permitted for testing
- Parchment or clean release liner for staging weeded sections
- Kitchen scale, tray-maker load instructions, and a shallow bin for testing the layout with lightweight objects
- Eye protection and cut-resistant gloves if recommended for handling the chosen acrylic tray
- Optional removable burgundy felt liner cut smaller than the vinyl-free center area for alternate styling
How to make it
- 1
Define a safe stationary use
Use the finished tray as a vanity-top organizer for a few lightweight, closed cosmetics, brushes, jewelry dishes, or empty display bottles. Do not plan to serve food or drinks, hold hot tools, carry open liquids, or lift a loaded tray unless the tray maker explicitly rates that use and load. Choose a stable dresser surface away from edges, sinks, heaters, sunlight, children, and pets.
- 2
Inspect the tray and hardware
Check the acrylic floor, corners, handles, screws, seams, and factory edges under bright light. Reject a tray with cracks, chips, sharp areas, loose handles, clouding, deep scratches, or stress marks around hardware. Measure the usable flat underside between the feet, handle fasteners, and curved edges, then record the tray's stated load limit and empty weight.
- 3
Plan the protected underside layout
Turn the empty tray upside down on a folded microfiber cloth. Trace the exact underside on paper and mark every handle screw, molded curve, existing foot, label, and raised ridge. Keep the vinyl at least half an inch from edges and hardware and reserve four clean corners for the new feet. Aim for an artwork area about 11 by 15 inches rather than filling every millimeter.
- 4
Simplify the group artwork
Open a duplicate of the SVG and preserve the original. Keep the three broad figure silhouettes, the strongest corset, cape, hair, and pose contours, and only a few large interior openings. Remove facial detail, eyelashes, hairline fabric texture, tiny jewelry, isolated specks, narrow gaps, and any line that becomes fragile at full size. Weld intentional overlaps and close broken paths.
- 5
Make a full-size paper proof
Print the simplified artwork at 100 percent, tile the sheets, and trim the outer silhouette. Place the proof beneath the upright tray to preview the final top view. Check that all three figures read clearly, the composition sits level between the handles, and no important contour crosses hardware or a future foot. View it from standing height before adjusting the file.
- 6
Test cleaning, cutting, and adhesion
Cut a small sample containing a broad fill, narrow curve, inside corner, and small opening. Wash the matching acrylic test surface with mild soap and lukewarm water, rinse, and dry with a soft microfiber cloth as the acrylic maker directs. Apply the sample with the chosen tape, let it rest for the stated time, and check for haze, scratching, bubbles, edge lift, cleaner reaction, or difficult tape release.
- 7
Mirror the final artwork
Because the decal will sit on the underside but be viewed through the top, mirror the complete design before cutting so the finished scene retains the listing's intended orientation. Confirm the mirrored width and height against the paper underside map. If the machine cannot cut the full layout, divide it at natural gaps between figures and add temporary alignment marks outside the final art.
- 8
Test-cut and cut the vinyl
Place the vinyl liner-side down on the compatible mat and load it square under the rollers. Run a test cut in an unused corner; the vinyl should separate cleanly while the liner remains intact. Adjust only within the material and machine guidance, replace a dull blade instead of using excessive pressure, then cut the full mirrored design or its planned panels without leaving the machine unattended.
- 9
Weed from broad areas inward
Trim around the design while keeping a stable liner border. Remove the large exterior vinyl first, followed by spaces between figures, then the smallest interior openings under bright light. Hold delicate curves against the liner with tweezers or a fingertip. Recut any stretched, nicked, or detached detail rather than creating a visible patch under the clear tray.
- 10
Clean and mark the underside
Protect the upright tray interior from dust, then turn the tray upside down on a clean folded cloth. Clean only the flat decorating area with the tray maker's approved method and let it dry completely. Use low-tack tape beyond the decal zone to mark the horizontal and vertical centers. Never use a razor, abrasive pad, ammonia cleaner, acetone, strong solvent, or unapproved alcohol on acrylic.
- 11
Apply the center section first
Add compatible transfer tape and burnish gently from the vinyl side and liner side. Position the mirrored design face down on the tray underside and align its center marks. Create a painter's-tape hinge, peel back part of the liner, and smooth from the center outward with a soft felt-edged tool. Keep hard scraper edges and fingernails from contacting bare acrylic.
- 12
Finish the transfer and panel seams
Lower the remaining vinyl gradually while maintaining light, even tension. If the design uses panels, align the next section to the strongest figure contour or temporary registration marks, leaving the exact intentional gap planned in the proof. Peel transfer tape back across itself at an acute angle and pause whenever a line rises. Remove temporary marks only after every permanent shape is secure.
- 13
Add feet and allow the vinyl to settle
Inspect every edge in reflected and transmitted light. Do not add heat, resin, sealer, paint, or a second adhesive over the vinyl. Apply the four clear feet only to clean vinyl-free corner zones and only when their maker approves acrylic. Set the upside-down tray in a protected level area for the full vinyl and bumper settling time so neither decal nor feet bear weight prematurely.
- 14
Complete a low-load styling test
Turn the tray upright with both hands supporting its sides and place it on the chosen stable surface. Add the lightest closed objects one at a time while checking for floor flex, rocking, foot movement, handle looseness, trapped grit, or vinyl lifting. Keep the artwork visible by clustering brushes and bottles around the outer third, and remove the tray from use immediately if the acrylic, hardware, feet, or decal changes.
Practical finishing tips
- Measure the underside, not the top opening. Molded acrylic trays often narrow slightly toward the bottom.
- Black vinyl viewed through clear acrylic looks especially crisp over a pale, plum, or mirrored dresser surface.
- Use a 12-by-24-inch mat when available so the group remains one continuous transfer with no visible alignment seams.
- Photograph the full-size paper proof through the tray before cutting; it becomes a fast centering reference at application time.
- Keep the protective film on every acrylic area that does not need vinyl until the application surface is ready.
- Lift the empty tray by its body with two hands. Treat handles as decorative unless their maker provides an appropriate load rating.
Troubleshooting
The design may still be too detailed, the blade may be dull, or the cut may be incomplete. Enlarge or simplify the weak contours, repeat the test cut, and recut the affected panel. Do not stretch a lifted line back into place.
The artwork was not mirrored before the underside cut. Remove the vinyl only as its maker allows, clean the acrylic with the approved method, mirror the complete file, and recut. Flipping the tray over is not a practical repair because it exposes the decal and reverses the tray form.
Burnish the vinyl to the acrylic through the tape, then peel the tape slowly back at an acute angle. If the vinyl still follows it, stop and test a lower-tack compatible transfer tape on the acrylic sample rather than increasing force or heat.
Pause before removing all the tape and smooth outward with a soft acrylic-safe tool. Lift only an unbonded edge if the vinyl maker permits repositioning. Replace a creased or stretched section; do not puncture bubbles with a blade or needle.
Stop before applying the next section. Return to the paper proof and align from a broad figure contour or shared baseline rather than a tiny detail. Recut a distorted panel; adding thin filler slivers usually makes the seam more obvious.
Remove every object and turn the tray over on a soft cloth. Check that all four feet match, sit outside the vinyl, and remain fully bonded. Replace the approved feet as a complete set or retire a warped tray; never stack loose pads to compensate.
Ways to make it yours
Use a factory-made smoke-tinted tray and matte black or metallic pewter vinyl after verifying that the contrast and adhesive pass the same material test.
Remove all interior clothing lines and keep only the three outer figure shapes for faster weeding and a cleaner year-round gothic look.
Cut a loose, hemmed felt or velvet liner that sits inside the tray without adhesive, stays clear of handles, and can be removed before cleaning.
Apply the same reverse-vinyl method to a factory-finished acrylic sign blank and place it in a manufacturer-rated tabletop stand instead of using it as an organizer.
Keep crafting
- DIY Gothic Castle Halloween Wreath With Vinyl — Build an indoor black grapevine wreath with a suspended frosted-acrylic center, burgundy ribbon, and a bold gothic castle vinyl scene.
- DIY Gothic Candelabra Canvas Pillow With Metallic HTV — Turn a plain black canvas pillow cover into polished gothic décor with a large silver candelabra cut from metallic heat-transfer vinyl.
- DIY Gothic Corset Halloween Favor Boxes With Cricut or Silhouette — Turn sturdy cardstock, tiny eyelets, and satin ribbon into structured gothic corset favor boxes for Halloween parties, movie nights, or dramatic place settings.
Inspiration & further reading
This is an original Klean Kut Halloween Crafts project inspired by approachable techniques shared across trusted craft and home sources. Explore Cricut vinyl cutting and application guide, Cricut transfer tape instructions, PLASKOLITE OPTIX acrylic care FAQ and ORAFOL ORACAL 651 craft vinyl for more ideas and technique background.