
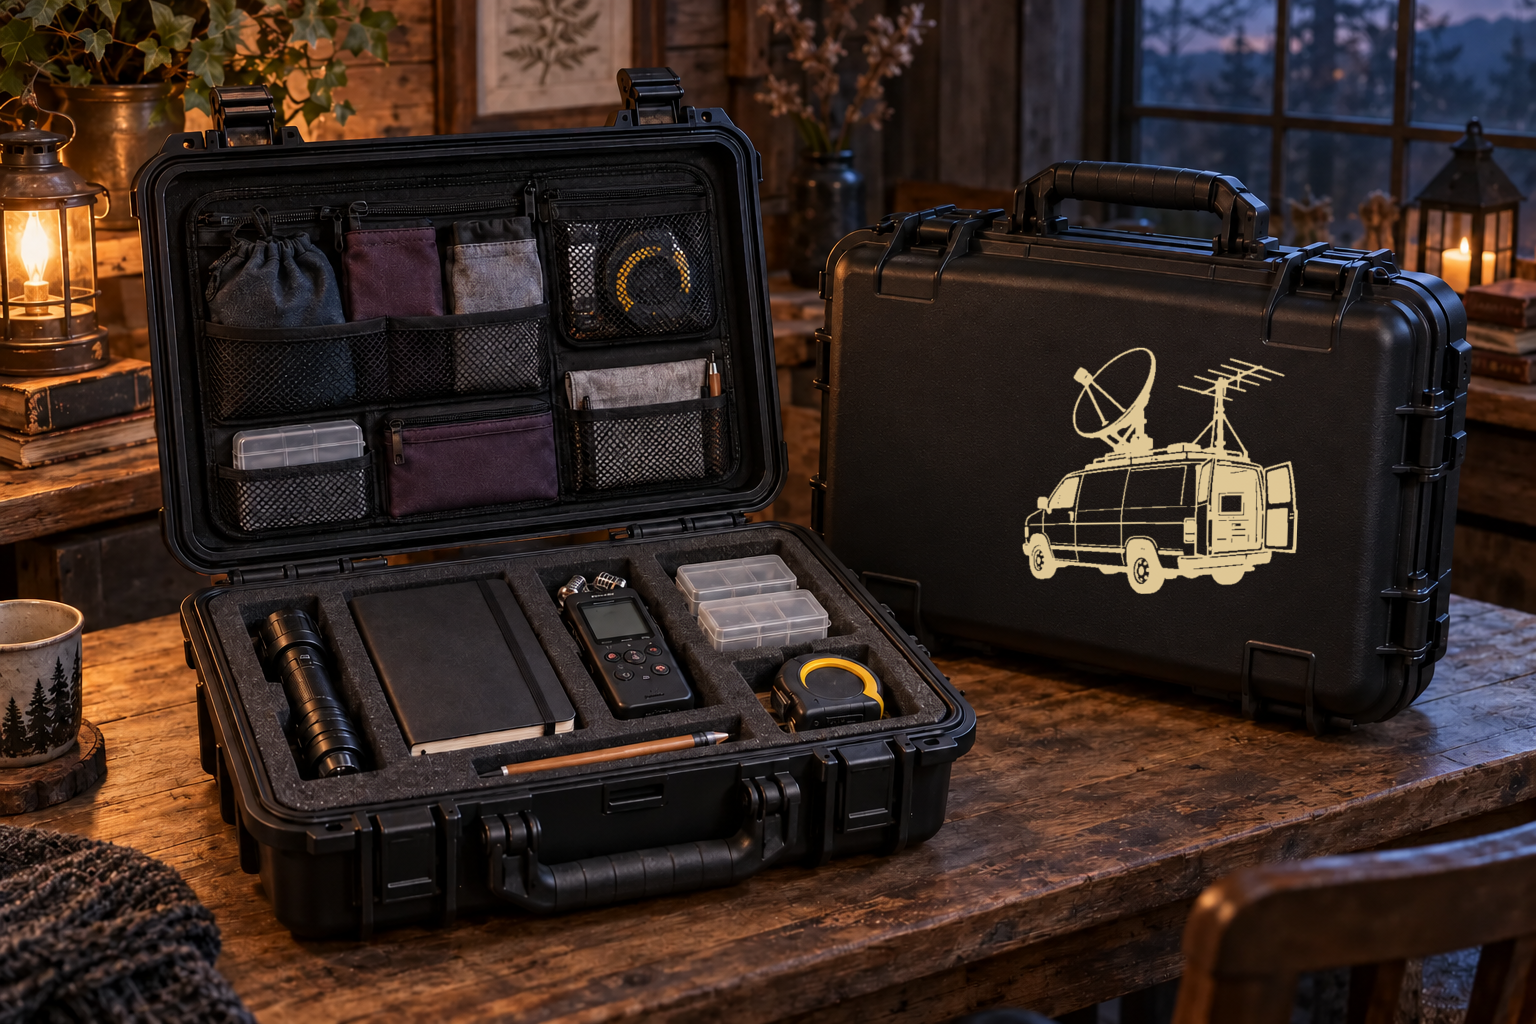
A useful field case protects ordinary recording and observation tools while making every item easy to see, count, and return. This project starts with a complete factory-made hard-shell case whose hinges, latches, handle, gasket, pressure valve if present, and removable foam or dividers already work correctly. The exterior uses the satellite-surveillance van illustration from the featured KleanKutChaos file, cut as one warm-bone vinyl graphic on the broad front panel. Decoration stays inside one verified smooth exterior area; hardware, edges, seams, vents, valves, labels, feet, interior surfaces, and equipment-contact zones remain bare.
This is an original organization and decoration plan based on ordinary home-cutter and pressure-sensitive-vinyl methods. Case plastic, coatings, molded texture, surface energy, curvature, gasket design, foam, adhesive, transfer tape, blade, mat, temperature, humidity, battery chemistry, and equipment instructions can all change the result. Follow the current directions for the exact case, divider system, electronics, batteries, vinyl, cutter, mat, cleaner, and transfer tape, and test the real exterior finish in a hidden area. The KleanKutChaos listing supplies the featured digital artwork only. The hero mockup applies the original satellite-surveillance van source artwork from the KleanKutChaos Kittl project to the photographed case; it does not substitute a generated paranormal graphic. This tutorial does not claim that the pictured combination was physically tested or that any device detects or verifies paranormal activity.
What you’ll need
- Paranormal Investigation SVG Bundle 2 from the featured KleanKutChaos listing, using its original satellite-surveillance van design
- One complete factory-made hard-shell equipment case with intact hinges, latches, handle, gasket, feet, pressure valve if present, original foam or divider system, and current use and cleaning directions
- Only equipment you already use and understand, such as a compact flashlight, plain notebook, pencil, small audio recorder, and maker-approved measuring device; omit mystery, damaged, recalled, or improvised electronics
- Individual rigid battery cases approved for every spare cell; never place loose batteries, mixed chemistries, damaged cells, or exposed terminals in the case
- Two or three permanent adhesive craft-vinyl colors explicitly compatible with the case's exact cool smooth exterior finish
- Transfer tape matched to the selected vinyl; use strong-grip tape only when its maker requires it
- Cricut, Silhouette, or similar cutting machine with current software, a clean fine-point blade, and the mat specified for the vinyl
- Plain paper or removable drafting film for a full-size lid template and equipment map
- Flexible measuring tape, ruler, pencil, low-tack painter's tape, and removable notes
- Weeding hook or tweezers, scraper or felt squeegee, small scissors, and scrap vinyl for test cuts
- Low-lint cloths and only the mild cleaner approved by both the case and vinyl makers
- Small fabric pouches or divider cups approved for the original case system, plus removable paper inventory cards
- A stable, dry, brightly lit work surface large enough to support the open case without stressing its hinges
- Safety glasses and any hand or eye protection required by the cutter, blade, cleaner, case, batteries, or equipment makers
How to make it
- 1
Choose a complete protective case
Select a commercially made case sized for the actual equipment, with sound hinges, positive latches, a comfortable handle, intact gasket, flat feet, and the original foam or divider system. Confirm that its maker permits adhesive decoration on the planned exterior panel. Reject cracked, warped, brittle, deeply textured, sticky, peeling, recalled, improvised, or unknown-material cases.
- 2
Read every equipment instruction
Gather the current manuals for the case, electronics, batteries, charger, foam, vinyl, cleaner, cutter, mat, and transfer tape. Record temperature, moisture, storage, ventilation, transport, cleaning, and battery limits. If two instructions conflict, use a different combination rather than guessing.
- 3
Inventory only useful field tools
List the items that truly need protection and remove duplicates, props, leaking markers, food, liquids, candles, blades, loose metal objects, and damaged electronics. Give every remaining item a name, quantity, battery status, and approximate size on a paper inventory card.
- 4
Inspect every functional part
Open the empty case on a level surface and inspect hinges, hinge stops, latches, handle mounts, gasket, vents or pressure valve, labels, feet, shell, foam, and dividers. Operate each latch and handle exactly as directed. Stop if the shell flexes abnormally, hardware binds, foam crumbles, the gasket is displaced, or any safety label is unreadable.
- 5
Dry-fit the largest equipment first
Place the largest powered-off item into the original divider or foam system, then add smaller pieces without forcing the lid. Keep screens, buttons, microphones, ports, lenses, antennas, and battery compartments free of pressure. Close and latch the case only when its maker permits the trial, then reopen it and check for compression marks or movement.
- 6
Configure the supplied interior system
Adjust removable dividers or pluck only pre-scored foam by the exact case instructions. Preserve the specified wall thickness, hinge clearance, lid space, valve airflow, and finger access. Do not cut the shell, gasket, structural foam, electronics, or batteries, and do not use loose fill, expanding foam, spray adhesive, or mystery padding.
- 7
Give batteries isolated storage
Place each spare battery in its own compatible rigid terminal-covering case and separate it from metal tools. Keep chemistries and states of charge organized as their makers direct. Chargers and power banks belong only in compartments with the ventilation and transport conditions their makers require; never charge anything inside a closed case.
- 8
Map every no-vinyl zone
Trace the exterior lid at full size and mark latches, hinge lines, handle travel, seams, gasket edge, valve or vent, labels, feet, ribs, deep texture, curved corners, stacking features, and any area touched during carrying as off-limits. Add the larger of a half-inch buffer or the clearance required by the case and vinyl makers.
- 9
Test the actual case finish
Clean a hidden smooth exterior spot by the case maker's method and let it become fully dry and room temperature. Apply small samples of every vinyl and the chosen transfer tape, then inspect or remove them after the makers' stated interval. Stop if adhesion is weak or the shell clouds, stains, softens, lifts, or releases pigment.
- 10
Measure one calm art panel
Measure only the tested area inside all buffers. Tape a full-size paper template to the closed empty case and carry it briefly by the handle to confirm the design is not covered by a hand, rubbed by clothing, or folded across a rib. Keep the layout smaller than the usable panel so decal edges remain protected.
- 11
Plan the van as one practical decal
Use the satellite-surveillance van from the purchased file as the only focal graphic. Size it with generous negative space around the dish, roof antennas, vehicle outline, wheels, and open rear door so the complete design reads clearly without touching any rib, latch, label, seam, or handle area.
- 12
Prepare a durable working copy
Duplicate the purchased artwork and preserve the original download. Choose one motif with a clear outer contour, then remove weapons, tiny text, isolated dots, hairline gaps, and detail smaller than the vinyl maker recommends. Combine it only with shapes you created or are licensed to use.
- 13
Run a representative test cut
Cut a scrap containing part of the satellite rim, antenna crossbars, wheel opening, door edge, and one narrow body-panel line. Confirm that the blade cuts the vinyl cleanly without slicing the liner. Adjust one machine setting at a time and replace a worn blade or damaged mat instead of forcing pressure.
- 14
Cut, weed, and compare
Cut the van illustration, then weed from the outside inward while the liner stays flat. Secure every small scrap where children and pets cannot reach it. Compare the weeded piece with the software preview and source file so the dish, antennas, vehicle body, wheels, equipment screen, and rear door still match the purchased design.
- 15
Clean only the exterior art panel
Remove all equipment, batteries, foam pieces that are meant to lift out, and inventory cards. Wipe only the verified exterior panel with the approved cleaner on a barely damp low-lint cloth, keeping liquid out of seams, hinges, latches, valves, labels, gasket, and interior. Let the case dry completely.
- 16
Prepare a controlled hinge
Close and latch the empty case only if its maker permits exterior work in that position, then support it on a stable surface without clamping or stressing the shell. Position the van with its full-size paper guide, add a low-tack tape hinge, and confirm the dish, antennas, wheels, and rear door remain clear of every no-vinyl zone.
- 17
Apply the exact van artwork
Align the satellite-surveillance van with the paper guide and hinge it with low-tack tape. Apply it as one manageable section without stretching, keeping the full vehicle, dish, antennas, wheels, and rear door inside the verified boundary. Never bridge a rib, cover hardware, trim against the case, or add heat or sealant unless every maker explicitly allows it.
- 18
Cure the empty case undisturbed
Leave the case empty, dry, and positioned exactly as the vinyl maker requires for the full cure interval. Keep it away from children, pets, direct sun, heaters, liquids, and foot traffic. After curing, inspect every decal edge plus all hinges, latches, seams, labels, valves, feet, and handle movement.
- 19
Repack, close, and perform a final check
Return the dry factory foam or dividers, then load powered-off equipment and protected batteries according to the paper map. Count every item, confirm nothing presses a control or port, close the lid without force, and operate each latch and the handle. Before every trip, repeat the inventory and remove anything damaged, wet, hot, swollen, leaking, loose, or no longer permitted by its maker.
Practical finishing tips
- Photograph the packed case and print a small inventory card; the picture makes it easier to notice a missing cable, battery case, or notebook before leaving.
- Use the satellite-surveillance van as one strong focal decal instead of adding unrelated paranormal symbols around it; the lid remains easier to clean and the featured file stays recognizable.
- Warm-bone vinyl gives the original black-and-white line artwork enough contrast on a matte-black case without changing the design.
- Keep a paper log in the case for time, location, weather, equipment settings, and ordinary environmental explanations; organized notes are more useful than decorative labels on every tool.
- Store spare batteries in purpose-made cases with terminals isolated and check each maker's transport and temperature guidance before traveling.
- Remove equipment before cleaning the shell, and wipe only by the case and vinyl makers' approved methods—never spray toward hardware, seams, valves, or decal edges.
Troubleshooting
Stop and identify the exact plastic or coating. Many rugged cases use textured or low-surface-energy materials that are poor adhesive-vinyl candidates. Do not add primer, glue, heat, or aggressive cleaner; use a maker-approved removable nameplate or choose a different compatible case.
Stop immediately and remove the remaining tape by the approved method without widening the damage. Repeat the hidden-area test with a lower-tack compatible tape or abandon direct shell decoration. Do not cover a damaged coating with more vinyl.
Remove that piece only by a method approved for the shell, reduce the design to fit the flat tested panel, and recut it. Never stretch the dish, antennas, wheels, or vehicle body into a groove or slice vinyl in place against the case.
Open the case, power equipment off, and remove the last item added. Recheck the maker's lid-space and divider guidance and reduce the load. Do not compress screens, controls, ports, batteries, antennas, the gasket, or the pressure valve to force closure.
Set the case down and reopen it on a stable surface. Reconfigure only the supplied dividers or maker-approved foam while preserving required clearances. Replace crumbling or incompatible inserts; do not wedge items with loose cloth, paper, or expanding foam.
Do not touch, charge, transport, or return it to the case. Move people away and follow the battery and device makers' current emergency and disposal guidance. Remove the case from service if leakage, heat, or residue has affected it.
Ways to make it yours
Reduce the complete satellite-surveillance van proportionally and cut it in warm-bone vinyl for a faster layout with no stacked colors.
Use a smaller complete document case for a notebook, pencils, printed maps, and a flashlight, following that case's own capacity and battery-storage directions.
Use large simplified witch-sister silhouettes on removable inventory cards inside transparent sleeves rather than placing small labels directly on electronics or battery compartments.
Frame a plain project name on a separate maker-approved removable nameplate using the new baroque-border bundle, keeping all original labels and functional hardware visible.
Keep crafting
- DIY Dark Fantasy Charging Station With Cricut Vinyl — Turn a ready-made passive charging dock into a surreal woodland-tech organizer with cut vinyl while keeping chargers, device vents, cable paths, and airflow completely unobstructed.
- DIY Victorian Mystery Case-File Folio With Cricut Print Then Cut — Build a reusable Victorian mystery case-file folio with chipboard covers, accordion pockets, clue envelopes, tabbed dividers, and atmospheric Print Then Cut details.
- DIY Gothic Costume Emergency Kit Tin With Cricut Vinyl — Turn a smooth hard-shell tin into a compact gothic costume emergency kit with a simplified portrait decal and safely organized repair supplies.
Inspiration & further reading
This is an original Klean Kut Halloween Crafts project inspired by approachable techniques shared across trusted craft and home sources. Explore Cricut Vinyl instructions, Cricut Transfer Tape Instructions and U.S. Consumer Product Safety Commission Art and Craft Safety Guide for more ideas and technique background.