
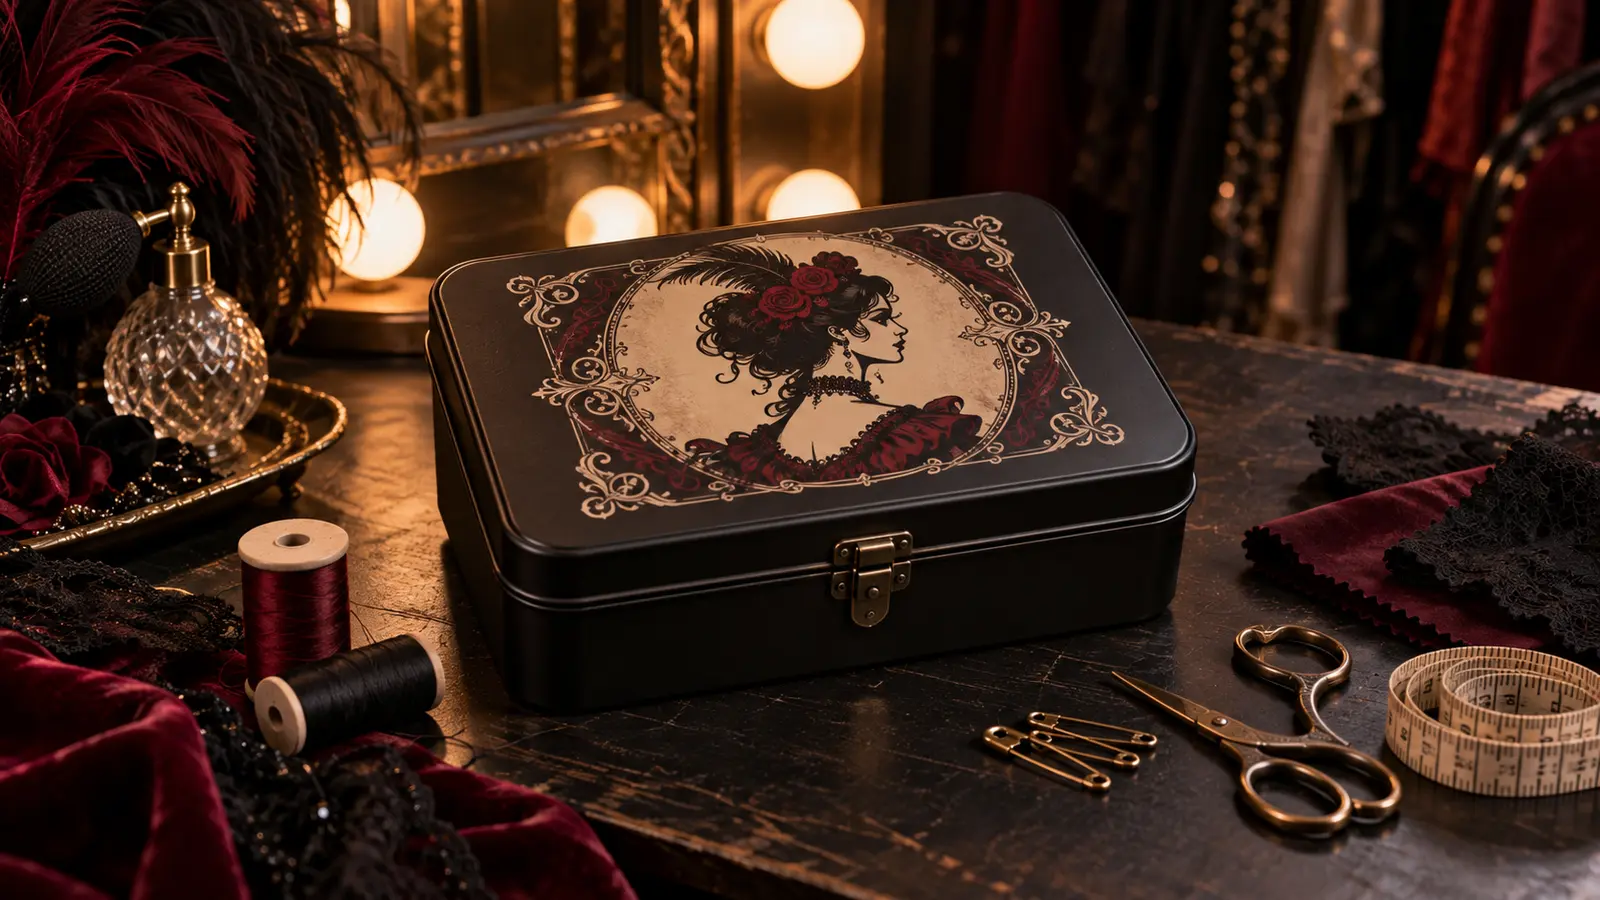
A costume mishap is much easier to handle when fashion tape, thread, spare fasteners, and a measuring tape live in one dependable box. This project turns a compact hard-shell tin into a dressing-room repair kit with a dramatic cream-and-burgundy portrait decal on the lid. The vinyl stays on one smooth exterior panel, safely away from the latch, hinges, rolled edges, and feet, while the inside remains clean and practical for removable supply pouches.
This is an original project plan based on common adhesive-vinyl methods for smooth hard surfaces. Tin coatings, factory paint, texture, cleaners, vinyl chemistry, transfer tape, room temperature, design scale, handling, and cure or rest time can all change the result. Test the exact tin and vinyl in an inconspicuous area, follow the current instructions for every box, cleaner, material, cutter, blade, mat, and transfer product, and edit only a duplicate working copy of the purchased artwork. The featured KleanKutChaos listing supplies the portrait artwork; the featured KleanKutChaos file is the design source for this tutorial. This tutorial does not claim that the pictured combination was physically tested with the listing files.
What you’ll need
- Frank N Furter Portrait SVG from the featured KleanKutChaos listing
- One sound rigid metal or hard-shell costume-repair tin with a smooth maker-approved exterior lid
- Cream and burgundy adhesive vinyl approved for the tin's exact coating and intended indoor use
- Transfer tape matched to the selected vinyl finish
- Cricut-, Silhouette-, or similar cutting machine with the blade and mat specified for the vinyl
- Cutting-machine software and a duplicate working copy of the purchased artwork
- The tin maker's approved cleaner, plus lint-free cloths
- Paper or cardstock for a full-size placement template
- Ruler, low-tack painter's tape, removable surface-safe marker, and a small square
- Weeding tool, scraper or burnisher, tweezers, scissors, and bright task lighting
- Optional removable zip pouches or small lidded organizers that fit without forcing the tin closed
- Basic repair supplies such as thread cards, blunt-tipped needle case, measuring tape, fashion tape, and spare buttons
- Closed safety pins, guarded seam ripper, and small scissors with a sheath or closed protective case
- Manufacturer-labeled mini products only; avoid loose liquids, aerosols, flammables, and unmarked chemicals
- A paper inventory card with emergency contacts, garment-care notes, and replacement dates written by hand
How to make it
- 1
Choose a sound, decoration-safe tin
Select a rigid commercial tin or hard-shell repair case with an intact lid, secure latch, smooth exterior coating, and enough depth for the intended supplies. Reject rust, sharp edges, cracked paint, loose hinges, weak handles, distorted seams, damaged closures, or any box whose maker prohibits adhesive decoration.
- 2
Plan a genuinely useful kit
List the costumes the kit will support and choose only supplies you know how to use. Group sewing, fastening, measuring, and temporary garment-repair items into separate removable pouches. Keep medicines, cosmetics, food, batteries, hot tools, loose blades, aerosols, solvents, and flammable products in their own purpose-built storage.
- 3
Map every no-vinyl zone
Open and close the empty tin while marking the hinge arc, latch travel, handle mounts, rolled edges, feet, seams, labels, vents, and stacking surfaces on a paper diagram. Reserve a generous border around each feature. The decal must stay entirely on one flat, non-moving lid panel.
- 4
Check the coating and cleaning rules
Read the tin's finish and care information and the vinyl maker's surface guidance. Clean only with a product approved for that coating; rubbing alcohol can damage some painted, powder-coated, lacquered, printed, or plastic surfaces. Let the lid become completely dry and room temperature before testing.
- 5
Test adhesion discreetly
Cut a small sample containing one solid curve and one fine opening. Apply it to an inconspicuous area only if the tin maker permits, using the official transfer method. After the stated rest time, check for lifting, staining, softened paint, adhesive residue, or coating removal. Stop and choose a different blank or material if the test is not clean.
- 6
Make a full-size paper mock-up
Print or sketch the portrait at final size and tape it temporarily to the closed lid. View the box from the front and above, then confirm that the composition remains level without approaching the latch, hinge, lip, or corner radius. Leave enough open space for hands to grip the case without rubbing the vinyl.
- 7
Simplify a duplicate artwork file
Keep the purchased file untouched and work from a copy. Isolate the bold portrait silhouette and a few broad costume details, remove detached specks, open cramped negative spaces, and thicken fragile bridges. Preserve the theatrical expression while eliminating tiny features that would be difficult to weed or keep adhered on a handled box.
- 8
Plan two side-by-side colors
Assign cream to the main portrait and burgundy to two or three large accent shapes. Use inset or side-by-side pieces with a narrow exposed-background gap so one vinyl does not overlap another unless both material makers explicitly approve layering. Add two temporary square registration marks outside the finished design when they will simplify alignment.
- 9
Run a final test cut
Place the vinyl on the mat in the orientation specified by its maker and cut the smallest facial opening, one curl, and one registration mark. The blade should cut the vinyl cleanly without deeply scoring the liner. Adjust one setting at a time, then repeat until the sample weeds without stretching or tearing.
- 10
Cut and weed both layers
Cut each color on its own liner. Weed large negative spaces first, then stabilize narrow bridges with a finger on the liner while lifting waste at a low angle. Compare both finished layers with the on-screen preview and recut any torn curl, incomplete eye, or distorted accent rather than patching loose fragments on the tin.
- 11
Build the transfer-tape stack
Apply the transfer tape using the material maker's method, starting from one edge or the center and burnishing outward. Flip and burnish the liner side. Trim the carrier into a manageable rectangle while preserving registration marks and a straight top edge for alignment.
- 12
Align and hinge the first color
Place the paper template on the closed empty tin, mark only the approved removable center guides, and replace it with the cream carrier. Anchor one edge with painter's tape to form a hinge. Recheck the no-vinyl borders, lift the carrier, remove the liner without touching the adhesive, and lower the decal gradually while smoothing from the taped edge outward.
- 13
Burnish, release, and add the accent
Burnish the first color from the center outward, then peel the transfer tape slowly back close to the lid at the angle recommended by its maker. If vinyl lifts, return the tape and burnish again. Align the burgundy accents with the paper guide or registration marks, apply them the same way, and remove temporary marks without scratching the finish.
- 14
Rest, inspect, and pack the kit
Leave the tin open and undisturbed for the vinyl maker's full rest or cure interval. Inspect every edge, operate the latch and hinges, and confirm that no decal section enters a moving or gripping zone. Load guarded tools and sealed supplies into removable organizers, close the lid without pressure, add the inventory card, and review the kit before every event.
Practical finishing tips
- A simplified portrait with broad negative spaces reads more clearly on a small lid than a literal copy of every fine line.
- Use the lightest transfer-tape tack that reliably moves the selected vinyl so the tin's coating is not pulled unnecessarily.
- Side-by-side colors avoid uncertain vinyl-on-vinyl adhesion and make a damaged accent easier to replace later.
- Keep an exact-size paper inventory under the removable pouches so missing supplies are obvious during restocking.
- Photograph the alignment measurements before transfer so a damaged layer can be recut at the same scale.
- Store the kit indoors at normal room conditions; extreme heat, cold, moisture, or car storage can affect both adhesive and repair supplies.
Troubleshooting
Return the tape to its original position and burnish from the liner side and then the face. Peel more slowly and closer to the surface. If the test sample also fails, verify material compatibility rather than increasing force on a delicate coating.
Stop immediately and do not decorate the tin with adhesive vinyl. Remove only what the tin maker says is safe, then switch to a removable decorated insert, luggage tag, or manufacturer-approved sleeve instead of testing stronger adhesive.
Enlarge the design, thicken weak bridges, open small counters, or delete isolated marks in the duplicate file. Recut the complete affected color so the portrait remains clean and balanced.
Do not stretch the carrier to force alignment. Lift it before full contact when the material allows, return to the measured centerline, or widen the intentional background gap in the duplicate file and recut the accent.
Remove items and reorganize them into thinner purpose-built pouches. Never force the latch, bend the lid, compress guarded scissors, or place tools where they load the hinge or press against the decorated panel.
Ways to make it yours
Use only the cream portrait silhouette, enlarge the main shapes, and omit the smallest makeup and jewelry details for one cut and one transfer.
Apply the artwork to a manufacturer-approved magnetic sheet or commercial tag sized for the tin when the metal is magnetic and the maker allows accessories; keep it clear of the latch and hinges.
Use a smaller rigid case with only guarded sewing tools and a one-color portrait, then confirm current venue and transportation rules before carrying scissors, needles, or seam rippers.
Repeat one simplified cream accent on a separate commercial luggage tag rather than applying adhesive vinyl directly to a fabric garment bag.
Keep crafting
- DIY Gothic Halloween Costume Garment Bag With Cricut HTV — Personalize a fabric garment bag with a dramatic gothic cut file, a press-safe layout, and practical details that protect Halloween costumes between events.
- DIY Gothic Halloween Director’s Chair Back With Cricut HTV — Make a removable director’s-chair back with a carefully simplified gothic HTV design, press-safe seam clearance, and a fit check that protects the chair’s structure.
- DIY Gothic Corset Halloween Favor Boxes With Cricut or Silhouette — Turn sturdy cardstock, tiny eyelets, and satin ribbon into structured gothic corset favor boxes for Halloween parties, movie nights, or dramatic place settings.
Inspiration & further reading
This is an original Klean Kut Halloween Crafts project inspired by approachable techniques shared across trusted craft and home sources. Explore Cricut Vinyl cutting and application guidance, Cricut Transfer Tape instructions, Silhouette Matte Removable Vinyl material guidance, Silhouette Transparent Transfer Paper guidance and U.S. Consumer Product Safety Commission Art and Craft Safety Guide for more ideas and technique background.