
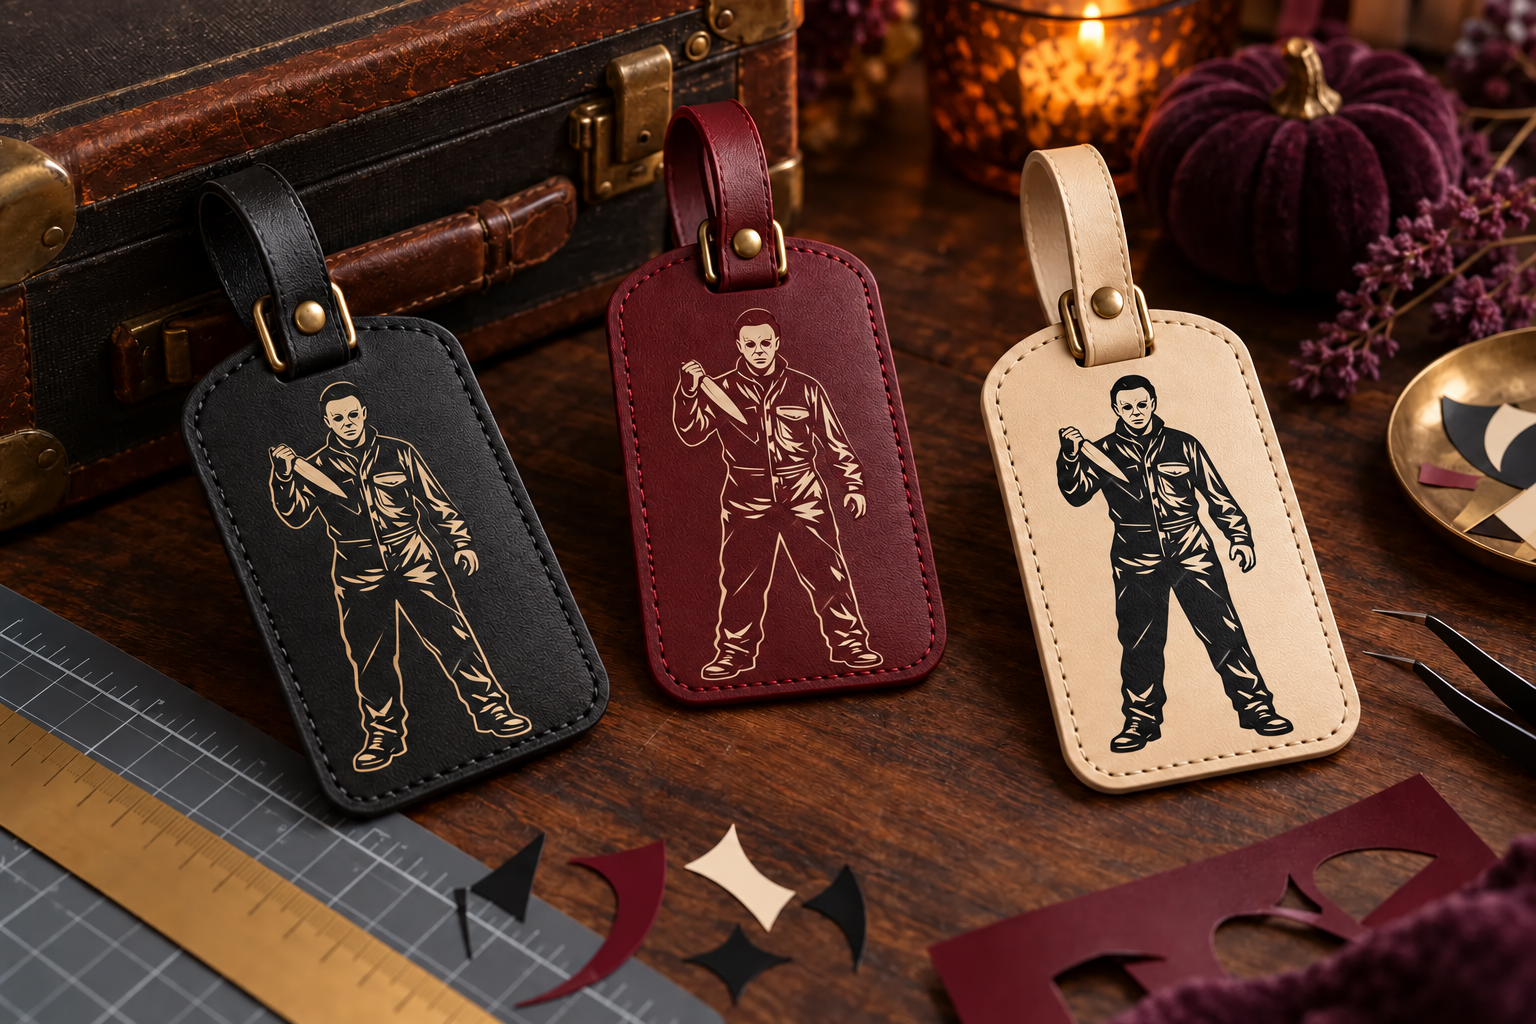
A luggage tag has very little room for decoration, which makes a strong silhouette more useful than a crowded scene. This project begins with a complete factory-made faux-leather tag that already has finished edges, a secure loop, and a protected ID window. A simplified masked-villain motif goes on one smooth exterior panel only; the strap, buckle, rivets, seams, edge paint, reverse window, and identity card remain untouched. The result is easy to spot on a carousel without printing private information on the visible side.
This is an original project plan based on ordinary home-cutter and heat-transfer-vinyl methods. Faux-leather chemistry, backing, edge paint, adhesive, hardware, tag construction, HTV formula, carrier sheet, blade, mat, press temperature, pressure, and travel handling can all change the result. Use only a tag whose maker explicitly permits heat-applied decoration and follow the current instructions for every exact blank, HTV, cutter, mat, and heat tool. Make a complete sample on a matching spare blank before decorating the travel set. The KleanKutChaos listing supplies the featured digital artwork only. The featured KleanKutChaos file is the design source for this tutorial, and this tutorial does not claim that the pictured combination was physically tested with the listing file.
What you’ll need
- Michael Myers Halloween SVG from the featured KleanKutChaos listing, used as the source for one simplified masked-villain silhouette
- Two or three complete factory-made faux-leather luggage-tag blanks whose makers explicitly allow the selected heat-transfer vinyl and pressing method
- At least one matching spare blank for a full material and press test
- Thin everyday heat-transfer vinyl approved for the exact faux-leather surface, in one contrasting color per tag
- Cricut, Silhouette, or similar cutting machine with current software, a clean fine-point blade, and the mat specified for the HTV
- Heat press or iron approved by both the tag and HTV makers, with accurate temperature control and a firm heat-safe pressing surface
- The cover sheet, pressing cloth, pad, or platen protector required by the material instructions; do not substitute an unknown barrier
- Heat-resistant tape only if the HTV maker permits it for the chosen carrier and faux leather
- Ruler, paper, pencil, removable notes, and full-size paper templates of each tag face
- Weeding hook or tweezers, small scissors, scraper, and scrap HTV for test cuts
- Low-lint cloth and only the surface cleaner approved by the luggage-tag maker
- Blank identity cards sized for the factory window plus a permanent pen or home printer approved for that card stock
- A privacy-conscious contact plan, such as first initial and last name plus a phone number or dedicated travel email
- Heat-resistant gloves and any eye or hand protection required by the cutter, heat tool, tag, or HTV makers
How to make it
- 1
Choose a travel-ready tag blank
Select a complete tag with intact stitching, sealed edges, a secure factory loop, smooth exterior panel, and a covered ID window on the reverse. The maker must specifically allow heat-applied decoration at settings compatible with the chosen HTV. Reject mystery faux leather, glued craft shapes, peeling coatings, cracked windows, loose rivets, unfinished edges, or blanks sold only for adhesive vinyl.
- 2
Inspect the construction before heating
Flex the loop gently, check every stitch and rivet, and confirm the ID card can be inserted and removed without stressing the window. Note any hidden reinforcement, foam, adhesive, plastic stiffener, or metal beneath the front panel. If the maker does not identify the construction or approved pressing face, choose a different blank.
- 3
Map the no-press zones
Trace the tag at full size and mark the strap, buckle, rivets, stitching, edge paint, window, card slot, folds, seams, labels, and raised layers as off-limits. Add the larger of a half-inch buffer or the clearance required by the tag and HTV makers. The heat platen must sit entirely on a flat single-layer decoration zone.
- 4
Plan a privacy-safe identity card
Decide what a finder actually needs to return the bag. Put only the minimum contact information you are comfortable sharing behind the covered window, and leave the visible decorative face free of an address. Proof the phone number or dedicated email before printing or writing the final card.
- 5
Measure the usable art panel
Measure only the flat area inside every marked buffer. Cut a plain-paper rectangle at that size, place it on the tag, and bend the tag as it would move on a handle. Reduce the rectangle until it cannot cross stitching, curl around an edge, touch hardware, or disappear under the loop.
- 6
Press a complete spare first
Use a matching spare blank and the exact heat stack specified by the tag and HTV makers. Apply a one-inch test shape within the approved zone at the lowest jointly permitted temperature, time, and pressure. Let it cool as directed, then inspect the face, backing, edges, adhesive, window, and hardware. Stop if the material glosses, shrinks, wrinkles, smells, softens, transfers color, delaminates, or warps.
- 7
Prepare a working copy of the artwork
Duplicate the purchased file and preserve the original download. Isolate one clear head-and-shoulders silhouette, then remove background specks, hairline gaps, and tiny facial marks that would be fragile at tag scale. Keep the expression readable through a few bold negative spaces rather than many narrow cuts.
- 8
Size and mirror the HTV layer
Fit the simplified motif inside the verified paper safe zone, keeping its width and height locked proportionally. Mirror the design horizontally for back-side cutting unless the HTV maker specifies a different workflow. Keep one color per tag for the thinnest, most flexible result.
- 9
Run a representative test cut
Place a scrap of the same HTV shiny carrier side down or in the orientation required by its maker. Cut one eye opening, outer curve, and narrow shoulder detail. Confirm that the vinyl layer cuts cleanly while the carrier stays intact, adjusting one setting at a time rather than increasing pressure blindly.
- 10
Cut and weed the final motifs
Cut each mirrored design, then weed from the outside inward on a bright, stable work surface. Secure every tiny scrap where children and pets cannot reach it. Hold the carrier against the paper template and confirm that the intended openings remain and the finished shape still fits the safe zone.
- 11
Clean and support the tag
Remove the ID card and any removable strap parts only when the tag maker instructs it. Clean the approved front panel lightly and let it dry completely. Support the flat decoration area on the maker-approved pad or platen without crushing the window, bending the tag, or placing hardware under the pressing face.
- 12
Position without crossing structure
Place the weeded carrier inside the traced safe zone and secure it only by the permitted method. Check from every edge that no vinyl or carrier crosses stitching, edge paint, a rivet, loop base, fold, or raised layer. Keep the reverse ID window and card slot empty and outside the heated stack.
- 13
Press by the two makers' shared limits
Use the temperature, dwell time, pressure, cover sheet, and sequence jointly allowed by the tag and HTV instructions. If the instructions conflict, do not press that combination. Keep hands and cords clear, heat only the flat approved panel, and never compensate for weak adhesion by adding unapproved temperature or pressure.
- 14
Cool and peel correctly
Move the tag only as the makers permit and let it cool flat for the stated warm-, cool-, or cold-peel interval. Peel the carrier back over itself while watching each edge. If a section lifts, lay it down and use only the documented repress procedure; do not improvise with a heat gun, open flame, or extra-long press.
- 15
Condition before handling
Leave the decorated tag flat, empty, and undisturbed for the full cooling or conditioning interval required by the materials. Keep it away from sun, heaters, moisture, children, and pets. Inspect both faces for warping, bubbling, hard ridges, lifted edge paint, adhesive seepage, or damage around the window and seams.
- 16
Make and insert the ID card
Write or print the verified contact details on the fitted card, allow ink to dry, and insert it behind the factory window without forcing the slot. Confirm that the card is readable when intentionally opened but that private information does not show from the decorative face during normal handling.
- 17
Reattach and test the loop
Install the original strap exactly as its maker directs. Attach the tag to an unladen bag handle, then tug and rotate it by hand to confirm the loop closes, hardware stays seated, the tag cannot slide through the handle, and the HTV does not rub directly against the strap or bag.
- 18
Perform a final travel check
Pack the bag only within its maker's limit and repeat the movement test. Make sure the tag cannot enter a wheel, zipper, telescoping handle, conveyor-contact point, or loose strap path. Photograph the finished tag and keep a separate record of the bag and contact card; remove the tag from service if any seam, loop, window, edge, or decal begins to fail.
Practical finishing tips
- Use one large mask opening and two bold shoulder angles; tiny eyes, teeth, wrinkles, and hair strands are difficult to weed and easier to snag.
- Assign one vinyl color to each traveler or bag type so the set is recognizable without putting names on the exposed face.
- Keep the carrier trimmed close enough to fit the approved flat panel, but leave a safe margin that prevents loose vinyl from shifting during placement.
- Make a paper photograph mockup on the actual suitcase before cutting; a motif that looks large on screen can disappear against a full-size bag.
- Carry a spare identity card in a travel document folder so a smeared or outdated insert can be replaced without disturbing the HTV.
- Clean cured tags only by the blank maker's method; never soak them, scrub decal edges, or use solvent, alcohol, acetone, or an unapproved sealant.
Troubleshooting
Stop and let it cool on the heat-safe surface. The temperature, time, pressure, barrier, or material pairing is incompatible. Do not press the travel tags; switch to blanks explicitly rated for the required HTV or use removable paper art inside a clear factory window.
Return to the working copy and enlarge the negative spaces, thicken narrow bridges, or remove the smallest facial marks. Recut with a verified material setting and a clean blade rather than pulling harder on fragile pieces.
Lay the carrier back down without stretching the warm faux leather. Use only the maker-documented repress time, barrier, and peel method. If the spare test never bonded reliably, abandon that material combination instead of escalating heat.
Do not bend it flat by force or attach it to luggage. A hidden layer may have distorted. Retire the damaged blank and retest a maker-approved construction with a compatible lower-impact pressing method.
Remove the tag from the bag and recut a smaller motif with a larger loop-side buffer. Do not trim HTV while it is on the tag or wrap vinyl around the edge to save the design.
Replace it with a correctly sized card and reduce the information to the minimum useful details. Never cut, heat, stretch, or pry the factory window; choose another blank if the window no longer functions smoothly.
Ways to make it yours
Use identical one-color silhouettes on alternating black and warm-bone blanks, then distinguish the bags with a tiny original moon, star, or stripe placed inside the same safe zone.
Add one small strip of maker-approved reflective HTV only when both the tag and film instructions allow the same heat stack, keeping it separate from the main silhouette and every structural edge.
When the blank maker forbids heat but permits pressure-sensitive vinyl, use a simplified permanent-vinyl motif and follow that vinyl's surface, cure, and travel-use directions without pressing, heating, or sealing it.
Make two tags with mirrored original fog or crescent accents, leave the identity cards blank, and include the maker instructions so the recipient can add only the contact details they choose to share.
Keep crafting
- DIY Gothic Halloween Costume Garment Bag With Cricut HTV — Personalize a fabric garment bag with a dramatic gothic cut file, a press-safe layout, and practical details that protect Halloween costumes between events.
- DIY Gothic Moth Travel Jewelry Roll With Cricut HTV — Sew a padded black-canvas jewelry roll with a zipped pocket, earring strip, ring tab, and antique-gold moth details cut from heat-transfer vinyl.
- DIY Gothic Reticule Wristlet Purse With Cricut HTV — Turn a sturdy cotton drawstring pouch into a practical gothic wristlet with one clean HTV focal design, a reinforced clip-on strap, and a carefully tested press plan.
Inspiration & further reading
This is an original Klean Kut Halloween Crafts project inspired by approachable techniques shared across trusted craft and home sources. Explore Cricut Everyday Iron-On instructions, Cricut Heat Guide and U.S. Consumer Product Safety Commission Art and Craft Safety Guide for more ideas and technique background.