
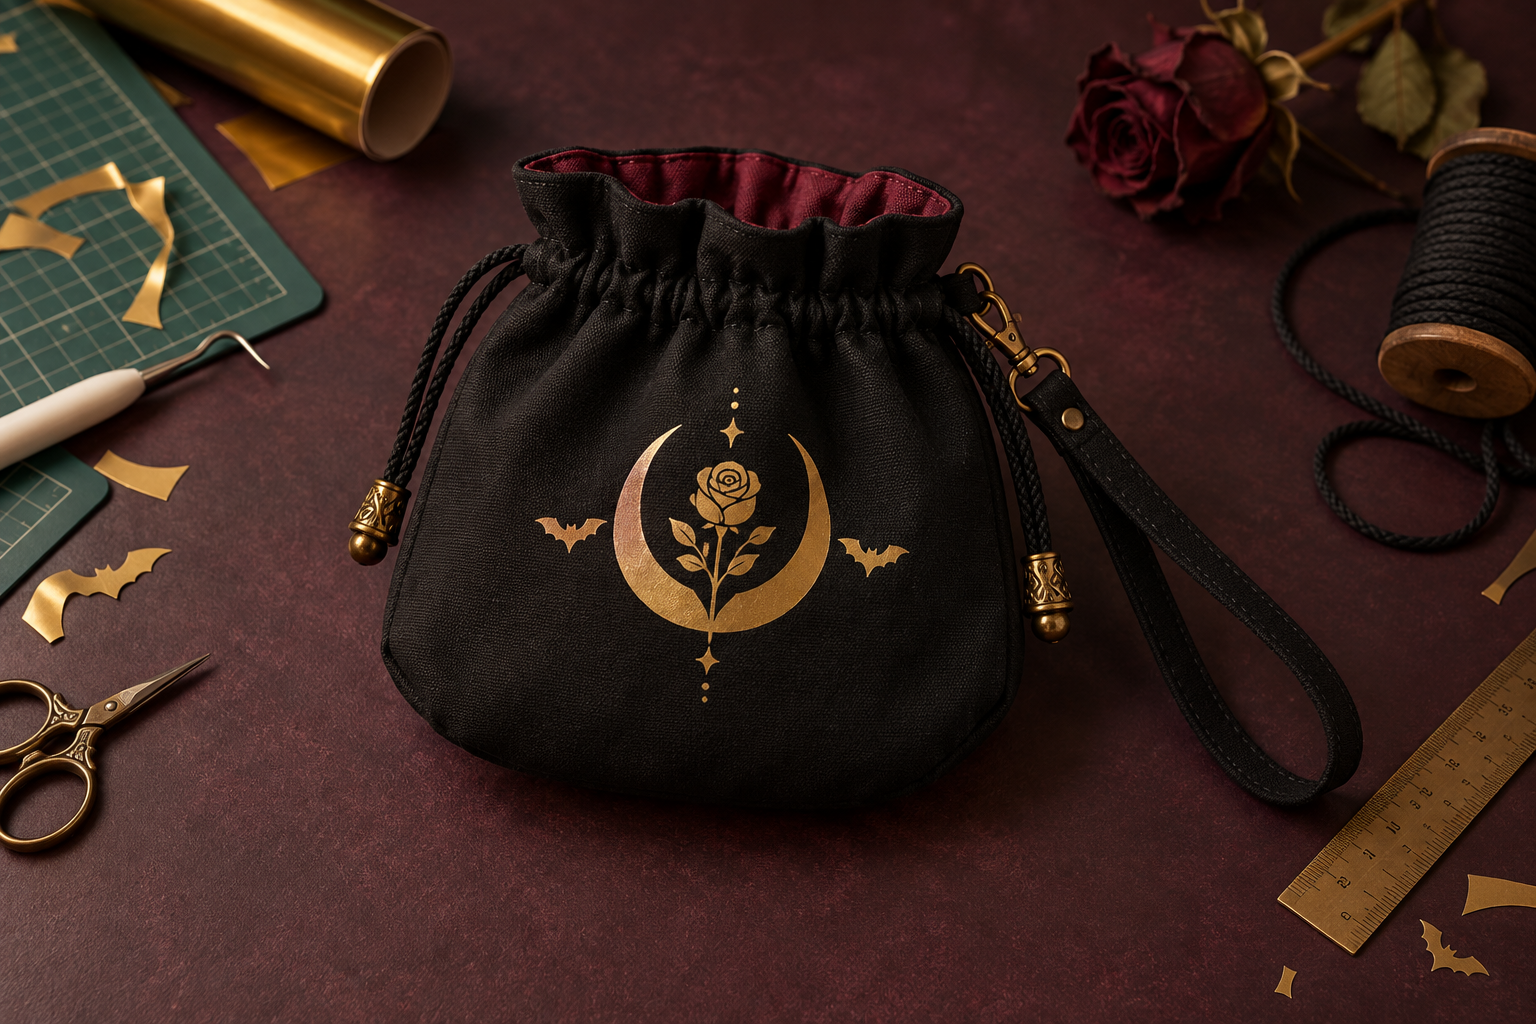
A compact drawstring wristlet is useful when a costume has no pockets, but the decoration should never interfere with the casing, seams, or strap. This project starts with a ready-made, washable cotton-canvas pouch that already has a reinforced side loop. One broad heat-transfer-vinyl motif sits on the flat front panel, while a removable wrist strap clips to the existing loop. The result is a small evening bag for a phone, cards, and keys—not a load-bearing purse or a toy.
This is an original project plan based on ordinary home-cutter, HTV, and garment-pressing methods. Pouch fiber content, dyes, coatings, seams, lining, padding, wrinkles, heat tool, platen size, pressure, HTV formula, blade, mat, and artwork detail can all change the result. Test the exact pouch and vinyl combination in an inconspicuous area or on a matching fabric swatch, and follow the current time, temperature, pressure, peel, and care directions supplied by both material makers. The KleanKutChaos listing supplies the featured reticule artwork; the featured KleanKutChaos file is the design source for this tutorial. This tutorial does not claim that the pictured combination was physically tested with the listing files.
What you’ll need
- Reticule Pouch SVG Bundle from the featured KleanKutChaos listing
- One ready-made black cotton or cotton-canvas drawstring pouch, approximately 6 by 8 inches or larger, with a smooth uncoated front panel, intact casing, and a sewn reinforced side loop intended for a wrist strap
- Removable wrist strap with a small swivel clasp that fits the pouch's existing reinforced loop; use the pouch maker's load guidance
- One sheet of quality heat-transfer vinyl approved for the pouch fiber content; matte or metallic antique gold gives good contrast on black fabric
- Cricut, Silhouette, or similar cutting machine with current software, a clean fine-point blade, and the mat specified for the chosen HTV
- Heat press, EasyPress-style tool, or household iron approved by the HTV maker, plus its specified pressing surface and protective sheet if required
- Seam gauge or ruler, tailor's chalk, paper, pencil, low-tack heat-resistant tape if approved, lint roller, and clean pressing cloth if specified by the material maker
- Weeding hook or tweezers, small scissors, brayer or scraper, and a matching fabric swatch or spare pouch for a complete heat test
- Piece of plain cardstock or a thin pressing form sized to slide inside the pouch and keep the seams and drawstring casing outside the active press area
- Safety glasses and any protective equipment required by the cutter, heat tool, and material manufacturers
How to make it
- 1
Inspect the blank and hardware
Read the pouch fiber label and care instructions before designing. Check the casing, seams, lining, cord, side loop, and strap clasp for loose stitching, sharp edges, corrosion, or damage. Reject a pouch with an adhesive coating, vinylized surface, mystery fiber, heat-sensitive trim, or a decorative loop that is not meant to carry a wrist strap.
- 2
Map the truly flat press area
Lay the empty pouch flat without stretching it and slide the cardstock form inside. Measure the smooth front panel between the side seams and below the drawstring casing. Mark a safety box that stays at least three quarters of an inch from side and bottom seams and at least one inch below the casing, grommets, knots, or hardware.
- 3
Choose one strong motif
Open a duplicate working copy of the purchased files and keep the originals unchanged. Select one reticule, crescent, rose, bat, or floral design with a clear outer silhouette. A single motif about 3.5 to 4.5 inches wide will weed and press more reliably than several tiny illustrations crowded across a small bag.
- 4
Simplify only fragile cut details
At final size, inspect every interior opening and narrow bridge. Remove isolated specks that would not survive weeding, or place the detailed art inside a simple solid arch or oval backing. Do not redraw the listing into a different product or assume every illustrated line must become a separate HTV sliver.
- 5
Make a paper-size proof
Print or cut the design from ordinary paper at the intended size, place it inside the marked safety box, close the drawstring, and attach the wrist strap. Hold the pouch naturally and confirm that the motif stays visible, level, and clear of every fold, seam, cord, and clasp.
- 6
Run a full material test
Use the actual heat tool, HTV, protective layer, pressure, and a matching fabric swatch or spare pouch. Follow the HTV maker's current guide exactly. Let the test cool according to its specified peel method, then flex and lightly wash it only after the stated cure interval. Stop if the fabric scorches, shines, shrinks, bleeds dye, melts, or the vinyl fails to bond.
- 7
Prepare the mirrored cut
Set the design to the measured final width and mirror it for standard carrier-backed HTV unless the material maker says otherwise. Place the vinyl on the mat in the orientation specified by its maker, confirm the correct material setting and blade, and send only the tested design to cut.
- 8
Cut and weed patiently
Run a small corner test cut first. After the setting is confirmed, cut the full motif and weed from the carrier without pulling narrow bridges sideways. Keep intentional centers in letters or decorative openings, trim the carrier to a comfortable border, and discard any piece that tears or stretches out of shape.
- 9
Prepare the pouch for heat
Empty the pouch, lint-roll the front, and place the cardstock or approved pressing form inside so the front panel is flat and isolated from the back. Move cords, knots, lining folds, seams, grommets, and hardware completely outside the heat-tool footprint. Preheat only if the HTV and pouch makers instruct it.
- 10
Center and secure the motif
Use the paper-map measurements to place the carrier shiny side up within the safety box. Check the top edge against the casing rather than the uneven gathered opening. If the material maker permits heat-resistant tape, use two small pieces on the carrier edge; never tape over exposed vinyl.
- 11
Press by the exact material guide
Apply the heat tool with the specified temperature, time, pressure, protective layer, and motion. Keep the platen level and fully on the flat panel. Do not press over seams, cord, casing, clasp, grommets, or a synthetic lining, and do not increase heat or time simply because an edge looks imperfect.
- 12
Peel at the correct temperature
Move the hot tool to its heat-safe stand and allow the carrier to reach the maker's stated hot, warm, or cold peel condition. Peel slowly at a low angle while watching the smallest details. If a section lifts, replace the carrier and use only the maker-approved repress instructions.
- 13
Finish and cool flat
Complete any recommended reverse press only if the pouch construction and material guide allow it. Remove the pressing form after the fabric has cooled enough to handle, then leave the pouch open and flat for the full cure interval. Avoid stretching, loading, washing, or cinching it early.
- 14
Attach and test the wrist strap
Clip the removable strap only to the pouch's sewn reinforced loop. Close the clasp fully and tug gently over a padded surface. Add a phone-sized nonbreakable test weight within the pouch maker's rating, lift it a few inches, and watch the loop, stitching, cord, and clasp. Never attach hardware through plain fabric, the drawstring itself, or a heat-applied decoration.
- 15
Load for real use
After curing, pack only lightweight essentials and close the drawstring without rubbing the cords across the vinyl. Keep sharp keys in a small sleeve, avoid overfilling, and carry the strap around the wrist without swinging the bag. Recheck the clasp and loop before every outing.
- 16
Clean without guessing
Follow the strictest care instructions among the pouch and HTV makers. Remove the strap before washing if its maker allows, turn the pouch inside out when directed, and avoid chlorine bleach, dry cleaning, high heat, ironing directly on the motif, or abrasive scrubbing unless the exact products permit them.
Practical finishing tips
- Choose a pouch with a broad uninterrupted front panel; a beautiful blank with bulky center seams is still a poor HTV surface.
- Metallic HTV shows pressure marks easily, so a complete swatch test matters more than adding extra heat after the fact.
- Use one color and one motif for the cleanest result; every additional layer adds alignment, bulk, and heat exposure.
- Keep a paper copy of the final size and press settings with the leftover vinyl so a damaged pouch can be remade consistently.
- Photograph the fiber label and material packaging before discarding them; the care and press instructions are part of the project.
- A removable strap makes cleaning easier and lets the pouch return to a simple drawstring bag after Halloween.
Troubleshooting
Stop and let the piece reach the correct peel temperature. Replace the carrier, confirm that the pouch is lint-free and supported by a flat form, then follow only the HTV maker's repress guidance. If the fabric is coated, deeply textured, or heat-damaged, switch to a different blank rather than escalating heat.
Judge alignment against the flat casing seam or the measured safety box, not the ruffled top edge. If it has not been pressed, reposition the carrier using the paper proof. Once bonded, do not try to peel hot vinyl from the fabric; remake the pouch if the result is unusable.
Increase the final motif size, remove isolated specks, use a fresh test cut, and weed while the carrier remains flat. Do not compensate for a poor cut with extra press heat.
The platen was not level. Rework the layout so every part of the motif fits on one genuinely flat panel, or use a smaller design. Do not stack improvised hard objects inside the pouch where they can create a dangerous unstable pressing surface.
Let it cool completely before judging. Puckering can come from stretched fabric, excess pressure, excess heat, or pulling the carrier too sharply. Compare with the test swatch and remake on a fresh blank with the verified settings; repeated heating can make the distortion worse.
Empty the pouch and stop using the strap. Confirm that the loop was designed for a wrist strap and that the clasp fits without side-loading. Replace incompatible hardware or use the pouch as a drawstring bag only; do not reinforce it with glue or a hole punched through plain fabric.
Ways to make it yours
Use matte black HTV on charcoal canvas for a low-contrast motif that appears mainly when light crosses the surface.
Use the artwork on a removable gift tag clipped to the cord, keeping the paper tag large enough to handle and well away from young children.
Choose a professionally made velvet-effect pouch only if its maker explicitly approves heat decoration; otherwise apply the design to a separate cotton tag and attach it to the drawstring.
Repeat one motif and vinyl color on a cotton zip pouch and luggage tag, testing every blank separately because fiber content and coatings can differ.
Keep crafting
- DIY Gothic Moth Travel Jewelry Roll With Cricut HTV — Sew a padded black-canvas jewelry roll with a zipped pocket, earring strip, ring tab, and antique-gold moth details cut from heat-transfer vinyl.
- DIY Retro Witch Makeup Brush Roll With Cricut HTV — Sew a washable roll-up organizer that keeps makeup brushes separated, protected, and easy to pack, then finish the outer flap with a simplified retro witch HTV design.
- DIY Gothic Costume Emergency Kit Tin With Cricut Vinyl — Turn a smooth hard-shell tin into a compact gothic costume emergency kit with a simplified portrait decal and safely organized repair supplies.
Inspiration & further reading
This is an original Klean Kut Halloween Crafts project inspired by approachable techniques shared across trusted craft and home sources. Explore Cricut Everyday Iron-On instructions, Cricut Heat Guide and U.S. Consumer Product Safety Commission Art and Craft Safety Guide for more ideas and technique background.