
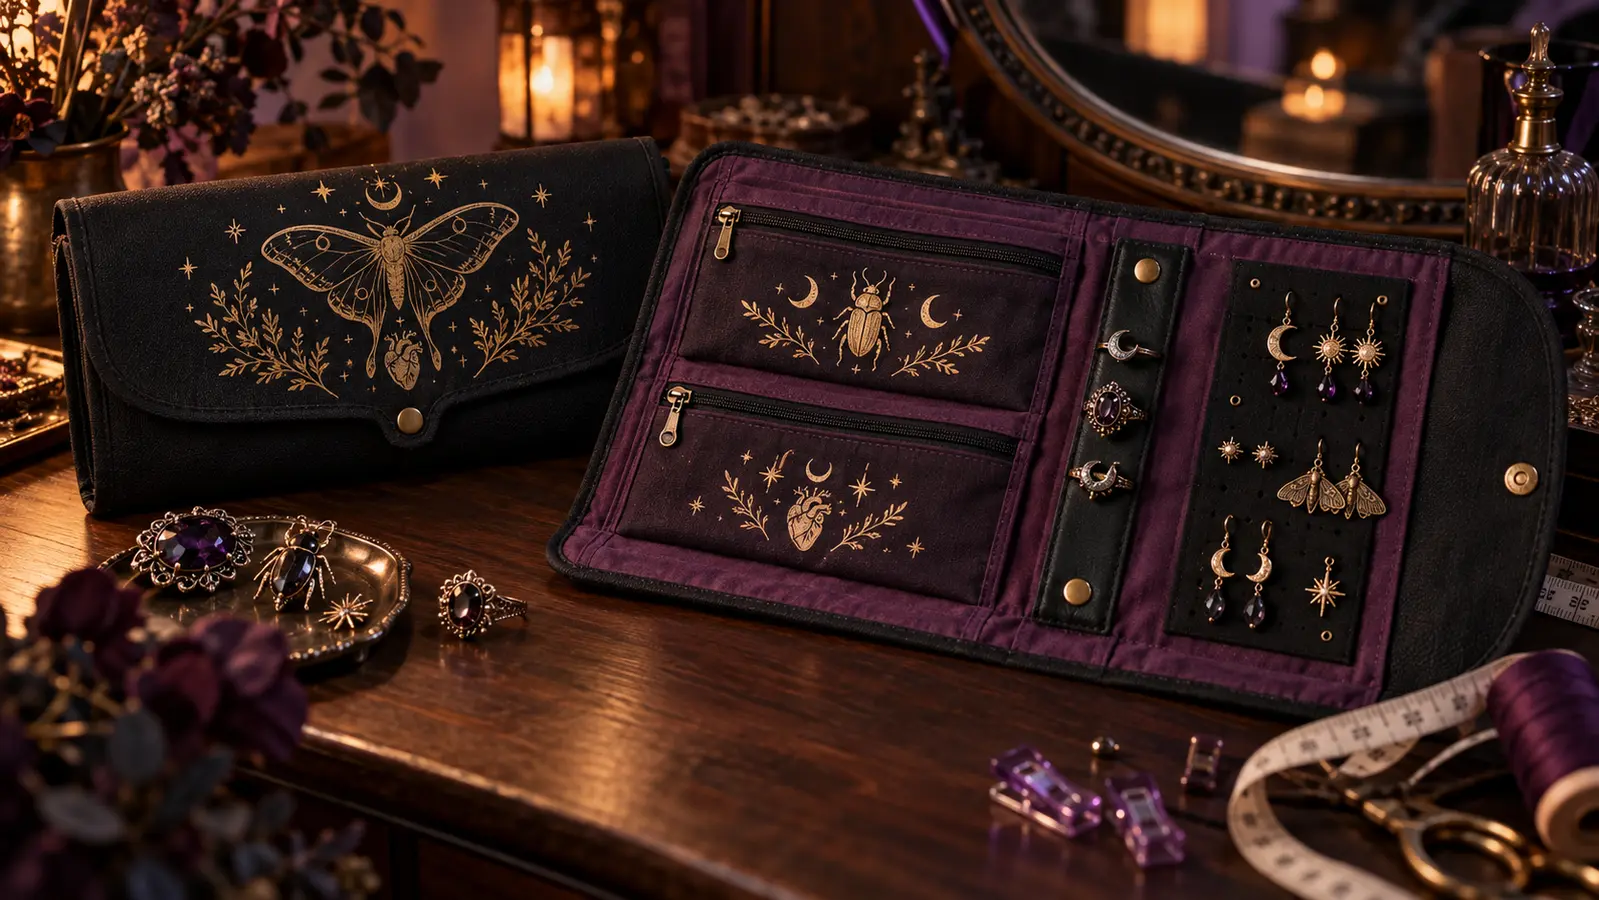
A jewelry roll should protect small pieces without becoming another shapeless pouch at the bottom of a suitcase. This version opens flat to reveal one lined zip pocket, a soft ring tab, an earring strip, and a divided slip pocket. When it is time to pack, the padded organizer folds into thirds and closes with a snap tab. Antique-gold moth, beetle, and heart motifs give the practical black-and-plum construction the look of an old specimen cabinet without putting vinyl where jewelry or hardware will rub it.
This is an original project plan based on ordinary lined-bag sewing and heat-transfer-vinyl methods. Fabric fiber, finish, dye, interfacing, zipper tape, thread, needle, press, HTV chemistry, design scale, heat, pressure, peel timing, and laundering can all change the result. Make a complete fabric-and-HTV test swatch, follow the current instructions for the exact fabric, vinyl, cutter, mat, blade, press, zipper, interfacing, sewing machine, needle, and closure, and edit only a duplicate working copy of the purchased artwork. The KleanKutChaos listing supplies the motif artwork; the featured KleanKutChaos file is the design source for this tutorial. This tutorial does not claim that the pictured combination was physically tested with the listing files.
What you’ll need
- Heirloom Brooch SVG Bundle from the featured KleanKutChaos listing
- One 12-by-18-inch piece of tightly woven black cotton canvas for the exterior, plus extra for a test swatch
- One 12-by-18-inch piece of quilting cotton for the lining and coordinating pocket pieces
- Lightweight fusible woven interfacing approved for both fabrics and the planned heat application
- Thin sew-in fleece or low-loft batting for padding; avoid bulky foam near the fold lines
- Metallic or matte heat-transfer vinyl approved for the exact cotton canvas and press
- Cricut-, Silhouette-, or similar cutting machine with current software, compatible fine-point blade, and mat
- Heat press and firm pressing surface specified by the HTV maker, plus its required protective sheet or pressing cloth
- One 8- or 9-inch nylon-coil zipper and a zipper foot made for the sewing machine
- Two small sew-on snaps or one low-profile snap set approved for the chosen fabric layers
- Polyester all-purpose thread, sharp compatible machine needle, hand-sewing needle, and thimble
- Fabric scissors or rotary cutter, cutting mat, acrylic ruler, seam gauge, marking tool, and fabric clips
- Paper for full-size templates, painter's tape for the paper rehearsal, and a pencil
- Optional soft ribbon or narrow cotton tape for a tied closure instead of snaps
- Costume jewelry for the final fit check; do not use irreplaceable pieces during construction
How to make it
- 1
Set the finished size and folding map
Plan an organizer about 10 by 16 inches when open and roughly 10 by 5½ inches when folded into thirds. Draw the outline, two vertical fold zones, seam allowance, closure tab, and every interior component at full size on paper. Keep a generous buffer around the outer seam, fold lines, zipper, snaps, and all planned stitching.
- 2
Rehearse the jewelry layout on paper
Place ordinary costume pieces on the paper mock-up: earrings on a narrow strip, rings on a soft snap tab, chains inside the zip pocket, and flat brooches in the divided slip pocket. Fold the paper around the tallest item. Enlarge or relocate any component that creates a hard lump directly under a fold or closure.
- 3
Prewash and test every fabric layer
Prewash and dry washable fabrics without fabric softener when their makers allow it, then press them flat. Fuse a small interfacing sample to scrap canvas and add the planned padding and lining behind it. Check for shrinkage, dye transfer, shine, scorching, bubbling, or excessive stiffness before cutting the project pieces.
- 4
Cut and label the construction pieces
Using the paper plan, cut one exterior and one lining panel with identical seam allowances, one slightly smaller padding layer, the zipper-pocket pieces, one slip-pocket piece, an earring strip, a ring tab, and a closure tab. Mark top, bottom, center, fold zones, component boundaries, turning gap, and right sides with removable fabric-safe marks.
- 5
Stabilize only the areas that need it
Fuse interfacing to the wrong side of the exterior and to pocket or tab pieces that require support, following the interfacing maker's temperature, time, pressure, cooling, and steam directions. Keep bulky layers out of seam allowances and fold zones. Let fused pieces cool flat before checking their dimensions again.
- 6
Prepare a simplified HTV layout
Open a duplicate of the purchased files and select one moth for the exterior flap plus one small beetle or heart for a pocket. Remove isolated specks, widen fragile bridges, and simplify dense engraved lines until every element suits the planned finished size. Keep the motifs away from seam, fold, zipper, snap, and jewelry-contact zones.
- 7
Mirror and run a material test cut
Mirror every iron-on mat when the chosen material requires it, place the carrier in the orientation specified by its maker, and test a small moth detail before cutting the final layout. The blade should cut the HTV cleanly while leaving the carrier intact. Adjust one setting at a time and recut instead of forcing a poorly cut sample to weed.
- 8
Weed and press a complete swatch
Weed the sample at a low angle, preserving fine bridges, then apply it to the layered fabric swatch with the exact current heat-guide settings for the HTV, cotton canvas, and press. Use the required preheat, pressure, protective layer, peel timing, and back pressing. Reject the combination if it scorches, puckers, shines, lifts, or weakens the interfacing.
- 9
Apply the motifs before sewing
Press the approved moth onto the flat exterior flap and the smaller accent onto its pocket piece before zippers, snaps, batting, or thick seams are present. Use paper templates to confirm orientation, especially because the flap will fold. Allow the pieces to cool or rest for the full material-maker interval and inspect every edge.
- 10
Build the lined zipper pocket
Install the nylon-coil zipper between its pocket pieces using the sewing-machine maker's approved zipper foot and stitch settings. Topstitch clear of the coil, square the pocket, and baste it to the lining within the marked zone. Keep the zipper pull inside the finished perimeter before securing the side and lower pocket edges.
- 11
Make the earring strip and ring tab
Fold, stitch, turn, and press the narrow fabric strips according to the fabric's care limits. Add only the maker-approved holes or loops needed for earrings, keeping enough space between pairs to prevent tangling. Sew one end of the padded ring tab firmly to the lining and add its snap only after testing that the closed tab is soft, flat, and not overfilled.
- 12
Add the divided slip pocket
Hem the slip-pocket top, align it with the paper plan, and stitch its sides and lower edge to the lining. Add one or two vertical divisions sized for flat costume brooches or pendants. Backstitch at every pocket opening and keep each stitch line outside the HTV motif and away from the fold zones.
- 13
Baste padding and rehearse the folds
Center the thin batting on the wrong side of the exterior and baste or quilt it only as its maker recommends. Stack the exterior and completed lining temporarily, fold the organizer around empty paper shapes that match the planned jewelry, and confirm that the three sections meet without forcing. Trim padding from fold zones if the maker permits and the roll remains protective.
- 14
Sew, turn, and topstitch the shell
Place exterior and lining right sides together, tuck the closure tab inward at its marked edge, clip the perimeter, and sew with the planned seam allowance while leaving the turning gap open. Grade bulky seams, clip only permitted curves, turn carefully, shape corners with a blunt tool, press within all material limits, close the gap, and topstitch the perimeter without crossing hardware.
- 15
Install the closure after a final fit
Fold the empty roll exactly as planned and mark the closure position without pulling the tab tight. Add sew-on snaps by hand or install approved low-profile hardware with the specified tools and reinforcement. If hardware would crush or puncture the layers, substitute a stitched ribbon tie. Cycle the closure several times and check both faces for abrasion or distortion.
- 16
Load, inventory, and pack the roll
Use only clean, dry costume jewelry for the first trial. Pair earrings, close chains inside the zip pocket, secure rings on the tab, and place flat pieces in the slip compartments. Fold without compression, shake the closed roll gently over a table, then reopen and confirm nothing migrated, snagged the lining, pressed against HTV, or created a sharp pressure point.
Practical finishing tips
- Use a broad single-line moth rather than a miniature engraved illustration; fewer cut bridges make the HTV easier to weed and flex.
- Press artwork while every fabric piece is flat. Zippers, snaps, seams, and padding can create uneven pressure or damage a heat plate.
- Put valuable or delicate jewelry in its own rigid case; a handmade roll is best for sturdy costume pieces and short supervised trips.
- A contrasting lining makes dropped earring backs easier to see, while a tight weave is less likely to catch prongs than loose fabric.
- Photograph the empty compartment map and keep a printed copy inside the zip pocket so every piece has a known place on the return trip.
- If the roll will be washed, make every component washable and follow the most restrictive care instruction among the fabric, interfacing, thread, HTV, zipper, and closure.
Troubleshooting
Increase the motif size, thicken narrow bridges, remove isolated specks, replace tightly packed hatching with broader negative space, and repeat a test cut with a sound compatible blade before cutting the final piece.
Stop and compare the exact canvas, finish, vinyl, press, surface, heat, pressure, peel timing, and cooling sequence with their current instructions. Rebuild the swatch and recut the complete motif; do not patch a failed edge on the finished organizer.
Check that the pocket pieces were cut on grain, the zipper was not stretched, the correct foot was used, and the seam allowances match. Remove the affected stitching with the machine unplugged and rebuild the pocket flat before attaching it to the lining.
Empty it and identify the thickest collision. Reduce padding only where permitted, move hard pieces away from fold lines, use fewer compartments, or pack less jewelry. Never tighten the closure enough to bend posts, crush stones, or strain the seams.
Remove them and inspect both the findings and fabric. Use a denser strip, add maker-approved reinforced holes, or place the pair in a small closed pouch. Do not force sharp hooks through loosely woven lining.
Remove only as the hardware maker permits, reinforce a new test tab, and relocate the hardware farther from the edge. A stitched ribbon tie is a safer fallback when the fabric stack cannot support a snap cleanly.
Ways to make it yours
Replace the zipper pocket with two overlapped envelope pockets secured by hook-and-loop only when the closure maker approves it for fabric and the jewelry cannot snag on the hook side.
Add a removable dense-felt insert that fits inside a slip pocket so sturdy costume brooches can be pinned to the insert without puncturing the main lining.
Sew long cotton-tape ties into one side seam and omit metal snaps, keeping the tie ends short enough that they cannot tangle with the zipper or jewelry.
Use leftover lining and one simplified beetle motif to make a separate flat trinket mat, following the same swatch, pressing, and seam-safety checks.
Keep crafting
- DIY Retro Witch Makeup Brush Roll With Cricut HTV — Sew a washable roll-up organizer that keeps makeup brushes separated, protected, and easy to pack, then finish the outer flap with a simplified retro witch HTV design.
- DIY Gothic Costume Emergency Kit Tin With Cricut Vinyl — Turn a smooth hard-shell tin into a compact gothic costume emergency kit with a simplified portrait decal and safely organized repair supplies.
- DIY Gothic Halloween Costume Garment Bag With Cricut HTV — Personalize a fabric garment bag with a dramatic gothic cut file, a press-safe layout, and practical details that protect Halloween costumes between events.
Inspiration & further reading
This is an original Klean Kut Halloween Crafts project inspired by approachable techniques shared across trusted craft and home sources. Explore Cricut Everyday Iron-On instructions, Cricut Design Space mirroring guidance, Cricut EasyPress instructions, Brother guidance for changing a sewing-machine needle and U.S. Consumer Product Safety Commission Art and Craft Safety Guide for more ideas and technique background.