
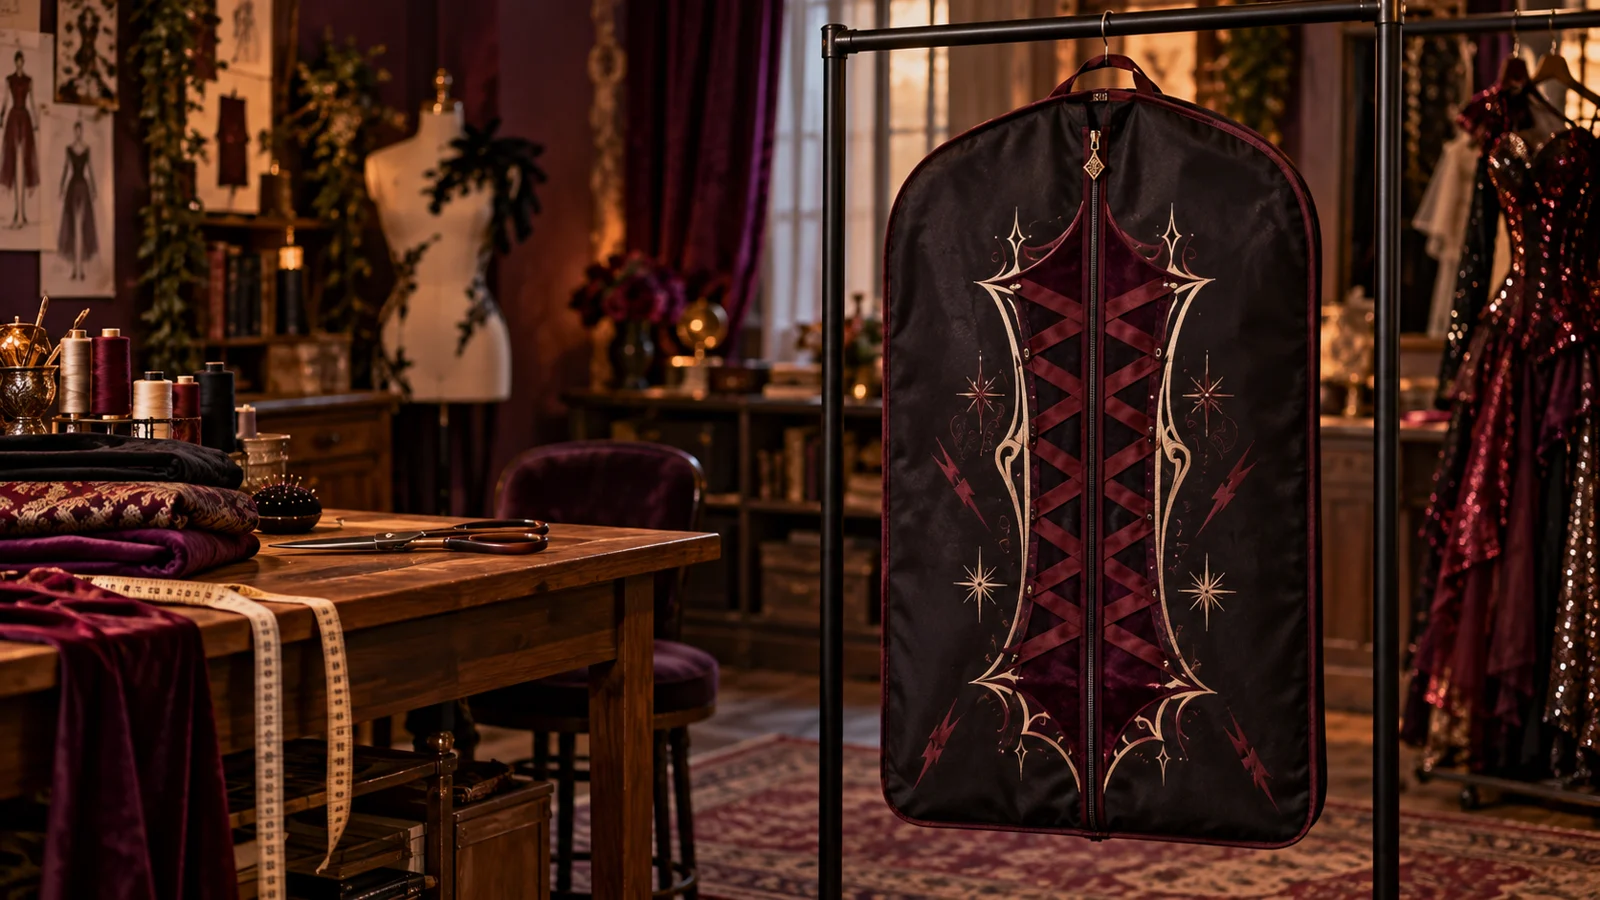
A costume garment bag is one of those backstage tools that becomes more valuable every season. It keeps makeup, dust, and snagging hardware away from a finished look, makes the right outfit easy to identify on a crowded rack, and gives a dramatic cut file a useful home beyond a shirt. This version treats the front panel as a measured heat-transfer surface while protecting the zipper, seams, coatings, clear windows, and internal layers from the press.
This is an original project plan based on common heat-transfer-vinyl and garment-storage methods. Garment-bag fiber content, coatings, interfacing, lining, zipper construction, seams, dye, HTV chemistry, press model, pressure, artwork density, and local humidity can all change the result. Test the exact blank, vinyl, and heat tool; follow the current instructions for every bag, fabric, HTV, cutter, mat, and press; and preserve the purchased artwork by editing only duplicate working files. The featured KleanKutChaos listing supplies the full-body artwork, while the featured KleanKutChaos file is the design source for this tutorial. This tutorial does not claim that the pictured combination was physically tested with the listing files.
What you’ll need
- Frank N Furter Full-Body SVG from the featured KleanKutChaos listing
- One breathable fabric garment bag with a readable fiber-content and care label, a smooth press area, and dimensions suited to the costume
- Heat-transfer vinyl explicitly compatible with the garment-bag fabric; use one flexible finish or two layerable finishes approved by the HTV maker
- Cricut-, Silhouette-, or similar cutting machine with the blade and mat specified for the chosen HTV
- Cutting-machine software and a duplicate working copy of the purchased artwork
- Heat press, EasyPress-style tool, or iron permitted by both the HTV and bag makers
- Firm pressing mat or pad approved for the heat tool and sized to fit inside the bag
- Heat-transfer cover sheet or protective paper only when specified by the HTV or press maker
- Heat-resistant tape approved for transfers, plus a ruler, flexible tape measure, tailor's chalk, and low-tack paper guides
- Weeding tool, sharp craft scissors, lint roller, and a closed scrap container
- Scrap fabric matching the bag as closely as possible, or an inconspicuous test area allowed by the bag maker
- Optional cotton label, fabric marker, and sew-on clear ID pocket attached only after pressing and kept away from the heat zone
- Optional sewing machine or hand needle and polyester thread for a label pocket or reinforced hanger opening
- Wide supportive hanger appropriate to the costume and a breathable acid-free tissue layer for delicate embellishments
- Heat-resistant work surface, press stand, timer, and the protective equipment specified by the tool makers
How to make it
- 1
Choose a truly press-compatible bag
Read the garment bag's fiber-content, coating, care, and heat warnings before planning any decoration. Favor a smooth uncoated fabric panel whose maker permits the required temperature. Reject an unknown, melting, water-resistant, laminated, insulated, vinyl, PVC, or heavily coated front unless both the bag and HTV makers explicitly approve the combination.
- 2
Fit the costume before decorating
Hang the finished costume on its supportive hanger, close every fastening, and place it inside the undecorated bag. Confirm that the hem, shoulders, sleeves, train, padding, and embellishments fit without folding or pulling. Mark the true costume outline lightly on the outside so the transfer will not sit where raised details make pressing uneven.
- 3
Map every no-press zone
Lay the empty bag flat and mark at least the clearance required by the tool maker around zippers, snaps, hanger openings, pockets, seams, mesh, labels, piping, buckles, and any clear plastic window. Inspect the reverse side for hidden coatings and lining joins. Plan the design only inside a broad, single-layer fabric area that can lie fully flat on the pressing mat.
- 4
Simplify a duplicate of the artwork
Keep the purchased file untouched and work from a copy. Remove tiny detached marks, fragile hairlines, and details too narrow for the final scale; thicken important bridges and retain the recognizable silhouette. If using two colors, separate them into broad, non-overlapping groups unless the HTV maker specifically permits layering those exact materials.
- 5
Size the focal design on paper
Print or draw a paper rectangle at the proposed transfer size, place it inside the marked safe zone, and view the hanging bag from several feet away. Keep the artwork clear of the zipper path and grip areas, and leave visual space for an optional name label. Photograph the final placement and record distances from two fixed seams.
- 6
Run a complete heat test
Cut a representative detail from the chosen HTV and apply it to matching scrap or a maker-approved hidden test area using the exact planned time, temperature, pressure, cover sheet, and peel method. Let it cool as directed, flex the fabric, and inspect both sides for shine, scorching, dye migration, puckering, adhesive marks, coating damage, or distortion. Change materials rather than exceeding either maker's limits.
- 7
Mirror, cut, and inspect the transfer
Mirror every HTV layer when the material instructions require carrier-side cutting. Place the material on the approved mat in the stated orientation, use the recommended blade and starting setting, and run a small test cut before the full design. Inspect the carrier for skipped lines or cut-through backing before unloading the mat.
- 8
Weed from the strongest edges inward
Trim the carrier to a manageable border and weed under bright light, removing large negative areas before narrow interior details. Use the paper mock-up to confirm that no required element was removed. Place fine scraps directly into a closed container so they cannot migrate onto the bag, costume, pets, or children.
- 9
Prepare a flat pressing surface
Empty the garment bag completely, open it as far as its maker allows, and slide the approved pressing mat behind only the front fabric layer. Move the back panel, lining, zipper pull, labels, pockets, and hardware outside the heat zone. Smooth the panel without stretching and lint-roll it so fibers cannot become trapped under the transfer.
- 10
Preheat only as directed
Set the press from the current HTV heat guide for the exact vinyl and base fabric, not from a generic project setting. Preheat the safe fabric area only for the stated time to remove moisture and wrinkles, then let it return to the instructed condition before alignment. Stop immediately if the panel changes color, smell, gloss, texture, or shape.
- 11
Align with measured guides
Recreate the photographed paper placement using the two seam measurements and low-tack paper guides. Position the mirrored transfer carrier-side up, keep every edge inside the mapped safe zone, and secure it only with heat-resistant tape approved for the process. Remove paper guides before pressing unless the relevant maker explicitly says they may remain.
- 12
Press in controlled sections
Apply the manufacturer's stated pressure for the stated time without sliding the heat tool. If the design exceeds the platen, divide it into deliberately overlapping press zones and avoid reheating completed areas beyond the HTV maker's limit. Keep the cord, hands, zipper, clear parts, and unused carrier film away from the hot surface at all times.
- 13
Cool, peel, and inspect
Move the heat tool to its stand and follow the specified hot, warm, or cold peel instruction exactly. Inspect every edge while the bag remains flat; if a small area lifts, use only the maker's approved repress procedure rather than improvising more heat. Allow the transfer and bag to cool fully before adding a sewn label pocket or closing the zipper.
- 14
Pack and maintain the finished carrier
After the HTV maker's full waiting period, insert the costume on a wide supportive hanger and use loose breathable tissue between rubbing embellishments. Keep shoes, makeup, liquids, sharp props, and heavy accessories in separate containers. Store the bag vertically with ventilation, inspect the transfer and seams before each trip, and follow the gentlest care method permitted by both the bag and HTV makers.
Practical finishing tips
- Choose one large silhouette instead of a dense collage; it weeds faster, flexes better, and reads clearly on a hanging bag.
- Make a paper mock-up at the exact final size and close the zipper before judging placement—bags often shift shape when hanging.
- Use a pressing mat inside the front panel, not beneath the whole folded bag, so hidden seams and hardware do not create uneven pressure.
- Attach a clear or fabric ID pocket after all heat work; never press across a plastic window or unknown pocket material.
- Photograph the packed costume before closing the bag so delicate trains, collars, and accessories can be repacked the same way after an event.
- Keep the bag breathable and dry; airtight plastic can trap moisture against sequins, metallic trim, paint, or specialty costume fabrics.
Troubleshooting
Stop before decorating the visible panel. Confirm the fabric and temperature limits, reduce heat only within the HTV maker's approved range, use the specified cover sheet, or switch to a lower-temperature compatible HTV or a sewn removable label panel.
Do not increase time or pressure blindly. Move the artwork away from the raised seam, support the fabric with an approved small pressing pad if the tool maker permits it, or resize the design for a genuinely flat single-layer area.
Pause the peel and return the carrier without shifting it. Verify whether the vinyl requires a hot, warm, or cold peel, then use only the approved repress sequence. Simplify and recut fragile details if the test shows they are too narrow for this fabric.
Let the bag cool flat and check whether the test used too much pressure, time, repeated heat, or a carrier larger than the supported area. Do not stretch the panel to flatten it; remake the decoration as a smaller transfer or sewn patch if the fabric cannot tolerate the process.
Stop using the selected combination. Allow the preheated polyester to cool fully as directed and choose a manufacturer-approved dye-blocking or low-temperature material after testing; additional heat can worsen migration.
Unplug the tool, let every component cool without touching or forcing it, and inspect for melting, distortion, sharp edges, separation, or weakened stitching. Retire or professionally repair a damaged bag rather than loading a valuable costume into it.
Ways to make it yours
Add two sewn fabric labels for LOOK 1 and LOOK 2 plus a removable checklist card, keeping every pocket and stitch line outside the transfer and zipper clearances.
Repeat one small approved motif on a separate shoe pouch and accessory envelope, using the correct heat test and settings for each different fabric.
Apply the cut-file motif to a removable cotton patch or luggage tag, then sew or clip it onto a bag that cannot safely accept heat.
Use matte black HTV on charcoal canvas with an ornate monogram panel and a separate acid-free tissue packing layer for delicate lace or beading.
Keep crafting
- DIY Gothic Corset Halloween Favor Boxes With Cricut or Silhouette — Turn sturdy cardstock, tiny eyelets, and satin ribbon into structured gothic corset favor boxes for Halloween parties, movie nights, or dramatic place settings.
- DIY Retro Witch Makeup Brush Roll With Cricut HTV — Sew a washable roll-up organizer that keeps makeup brushes separated, protected, and easy to pack, then finish the outer flap with a simplified retro witch HTV design.
- DIY Gothic Vinyl Record Storage Crate With Cricut Stencil — Turn a sturdy unfinished LP crate into a dramatic gothic record organizer with a simplified cut-file stencil, controlled paint layers, and record-safe finishing details.
Inspiration & further reading
This is an original Klean Kut Halloween Crafts project inspired by approachable techniques shared across trusted craft and home sources. Explore Cricut EasyPress operating instructions, Cricut EasyPress recommended settings guidance, Cricut blank preparation for heat transfer, Siser EasyWeed application and material guidance and U.S. Consumer Product Safety Commission Art and Craft Safety Guide for more ideas and technique background.