
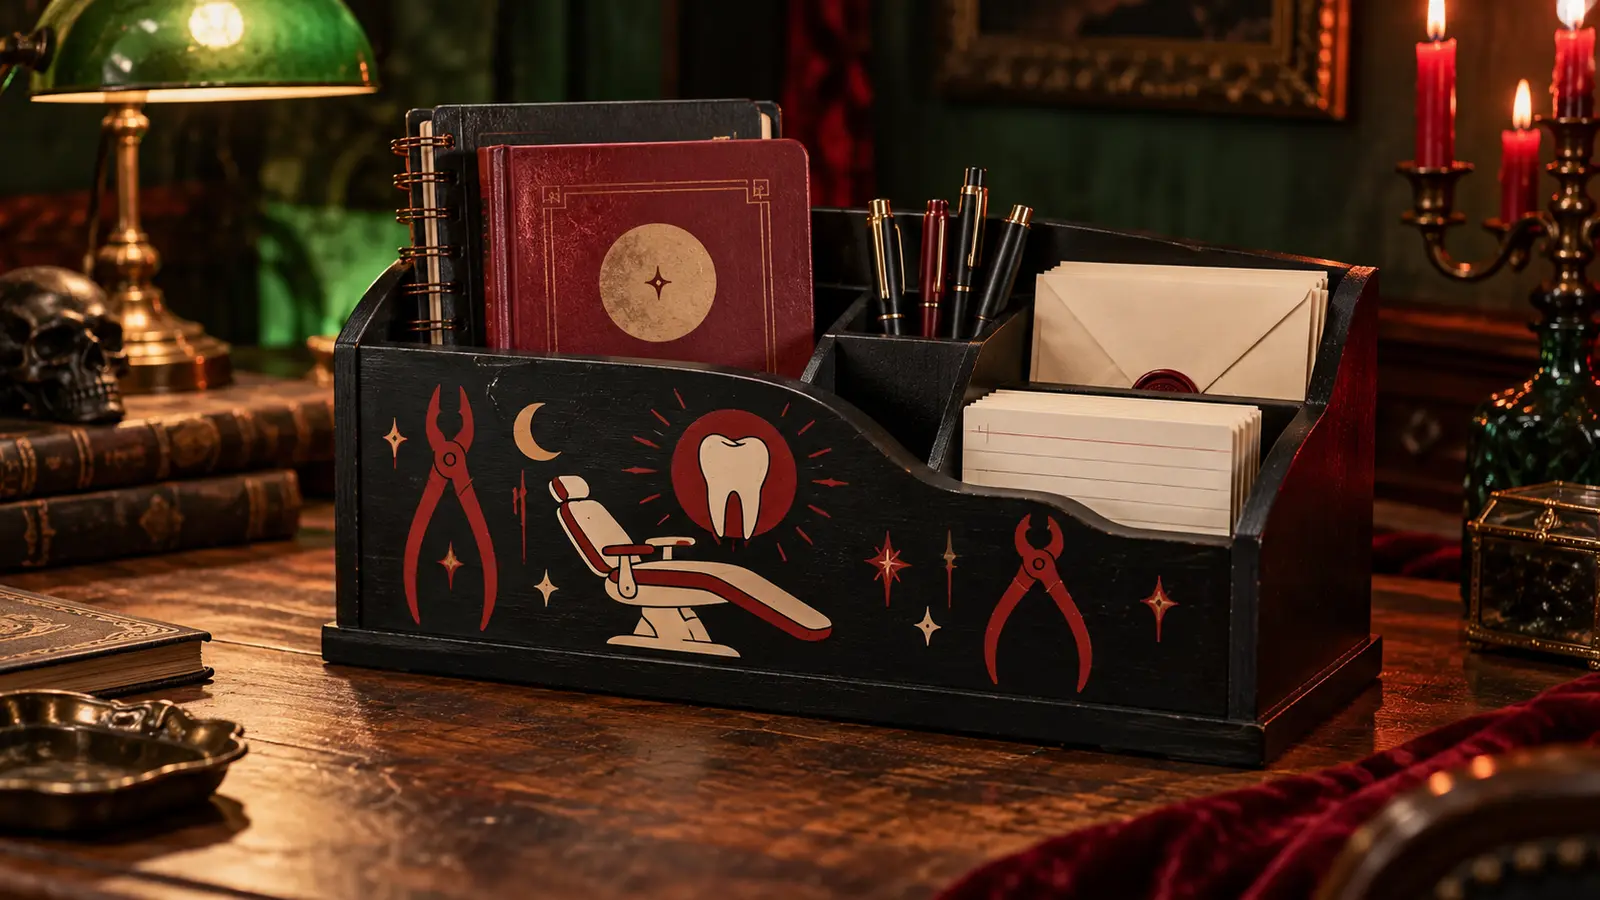
A divided desktop caddy can keep envelopes, index cards, notebooks, and favorite pens within reach without looking like ordinary office storage. This project turns one smooth front panel into a darkly comic horror-dentist vignette in cream and deep red. The decoration stays clear of compartment openings, divider joints, feet, edges, and hand-contact zones so the organizer remains easy to fill, lift, dust, and use.
This is an original project plan based on common adhesive-vinyl methods for smooth hard surfaces. Wood species, factory coatings, paint, texture, cleaners, vinyl chemistry, transfer tape, room conditions, design scale, handling, and rest time can all affect the result. Test the exact organizer and materials in an inconspicuous area, follow the current instructions for every blank, cleaner, material, cutter, blade, mat, and transfer product, and edit only a duplicate working copy of the purchased artwork. The featured KleanKutChaos listing supplies the character artwork; the featured KleanKutChaos file is the design source for this tutorial. This tutorial does not claim that the pictured combination was physically tested with the listing files.
What you’ll need
- Little Shop of Horrors Dentist Scene SVG from the featured KleanKutChaos listing
- One sound commercially made wooden or wood-composite desk organizer with a smooth, sealed, maker-approved front panel
- Cream and deep-red adhesive vinyl approved for the organizer's exact coating and intended indoor use
- Transfer tape matched to the selected smooth vinyl
- Cricut-, Silhouette-, or similar cutting machine with the blade and mat specified for the vinyl
- Cutting-machine software and a duplicate working copy of the purchased artwork
- The organizer maker's approved cleaner and two lint-free cloths
- Paper or cardstock for a full-size placement template
- Ruler, small square, painter's tape, and a removable surface-safe marking method
- Weeding tool, scraper or burnisher, tweezers, scissors, and bright task lighting
- Optional brayer only when the vinyl maker recommends it for the transfer tape
- Scrap of similarly finished material or a hidden maker-approved test area
- Paper goods such as notebooks, envelopes, index cards, and folders for the finished compartments
- Capped pens, pencils, rulers, and other ordinary lightweight desk supplies
- Soft dry dusting cloth for routine care after the vinyl's stated rest period
How to make it
- 1
Choose a decoration-safe organizer
Select a rigid commercial desk organizer with stable feet, sound dividers, intact joints, and one broad smooth sealed panel. Reject raw splintering wood, peeling veneer, chalky paint, swelling, wobbling sections, sharp edges, loose hardware, or any blank whose maker prohibits adhesive decoration.
- 2
Decide what the compartments will hold
Assign each opening to lightweight paper and writing supplies before decorating. Confirm that notebooks and envelopes slide in without scraping the front panel and that pens remain capped. Keep food, medicines, dental or medical tools, chemicals, hot tools, loose blades, batteries, and liquids in appropriate purpose-built storage elsewhere.
- 3
Map every no-vinyl zone
Measure the front panel and mark generous protected borders around the base, side edges, top lip, corner radii, divider joints, seams, labels, feet, and areas gripped when the organizer is lifted. The entire decal should fit on one uninterrupted flat field without wrapping over an edge or crossing a joint.
- 4
Check the finish and cleaning rules
Read the blank's care information and the vinyl maker's surface guidance. Use only the cleaner approved for that exact coating; alcohol can damage some paint, lacquer, printed finishes, plastics, and engineered wood. Clean the panel lightly and let it become fully dry and room temperature.
- 5
Test adhesion discreetly
Cut a small sample containing a curve, a narrow opening, and one point. Apply it to a hidden maker-approved area or similarly finished scrap using the official transfer method. After the stated rest interval, check for lifting, staining, softened finish, adhesive residue, or coating removal. Change the blank or material if the test is not clean.
- 6
Build a full-size paper mock-up
Print or sketch the scene at finished size and tape it temporarily to the front. View the organizer from its normal seated distance, load the compartments, and confirm that supplies do not hide the focal tooth and chair. Preserve enough bare surface around the design for comfortable handling and cleaning.
- 7
Simplify a duplicate artwork file
Keep the purchased file untouched and work from a copy. Isolate the broad chair, tooth, and character silhouettes, remove detached specks, open cramped negative spaces, and thicken fragile bridges. Retain the darkly comic story while reducing tiny facial and costume details that would be difficult to weed or adhere on a handled object.
- 8
Plan two side-by-side colors
Assign cream to the chair and main silhouettes and deep red to two or three broad accents. Use inset or side-by-side shapes with a narrow exposed-background gap so the vinyl layers do not overlap unless both material makers specifically approve layering. Add temporary square registration marks outside the final artwork if they help alignment.
- 9
Run a decisive test cut
Place the vinyl on the mat in the orientation specified by its maker. Test the smallest opening, narrowest bridge, sharpest inside corner, and one registration mark. The blade should cut the film cleanly without deeply scoring the liner; adjust one setting at a time and repeat until the sample weeds without stretching.
- 10
Cut and weed each color
Cut cream and red on separate liners. Weed large negative spaces first, then hold narrow bridges against the liner while lifting waste at a low angle. Compare both weeded layers with the software preview and recut a complete damaged layer instead of patching tiny loose fragments onto the organizer.
- 11
Apply and burnish transfer tape
Use the tape recommended for the smooth vinyl. Anchor a small area at one edge or the center, smooth outward, and burnish the face and liner side as directed. Trim the carrier to a manageable rectangle while preserving any registration marks and a straight reference edge.
- 12
Hinge the first color into place
Align the cream carrier to measured centerlines and secure one edge with painter's tape as a hinge. Recheck every protected border, lift the carrier, remove the liner without touching the adhesive, and lower the decal gradually while smoothing from the hinge toward the opposite edge.
- 13
Release the tape and add red accents
Burnish from the center outward, then peel the transfer tape slowly back close to the surface at the maker's recommended angle. If vinyl rises, return the tape and burnish again. Align the red shapes with the paper guide or registration marks, apply them the same way, and remove temporary marks without scratching the finish.
- 14
Rest, inspect, and load the organizer
Leave the organizer undisturbed for the vinyl maker's full rest or cure interval. Inspect every edge, confirm the design remains clear of joints and handholds, and test stability on a level desk. Load only lightweight paper and capped writing tools without forcing compartments, then dust gently according to the blank and vinyl care instructions.
Practical finishing tips
- A chair, tooth, and two bold character silhouettes will read more clearly than every small line in the source scene.
- Choose the lightest transfer-tape tack that reliably moves the selected vinyl so the organizer's finish is not stressed unnecessarily.
- Use side-by-side colors and a deliberate background gap to avoid uncertain vinyl-on-vinyl adhesion.
- Photograph the paper template and record its measurements before transfer so a damaged layer can be recut at the same scale.
- Keep pens capped and papers below the panel edge so ink, friction, and repeated contact do not reach the vinyl.
- Lift the organizer from the maker's intended grip points rather than pulling on dividers or pressing fingers over the decal.
Troubleshooting
Return the tape to its original position and burnish the face and liner side again. Peel more slowly and closer to the panel. If the test sample also fails, verify finish compatibility and room conditions rather than increasing force on a delicate coating.
Stop and do not apply adhesive vinyl to that organizer. Follow the blank maker's cleanup guidance, then switch to a freestanding decorated card, removable commercial label holder, or a different compatible organizer.
Enlarge the artwork, thicken weak bridges, open narrow counters, and remove isolated marks in the duplicate file. Recut the complete affected color so the finished scene stays intentional.
Do not stretch the carrier. Lift it before full contact when the material permits, return to the measured centerline, or widen the intentional background gap in the duplicate file and recut the accent layer.
Unload it and stop using it. Vinyl cannot repair a structural problem. Follow the organizer maker's service or replacement guidance and never glue, nail, clamp, or modify a damaged blank as part of this decorative project.
Ways to make it yours
Use only a large cream tooth-and-chair silhouette, remove the smallest accents, and complete one cut and one transfer.
Mount the simplified artwork on cardstock and slide it into a commercial clear label holder that the organizer maker approves, keeping adhesive off the furniture finish.
Assign the rear compartment to incoming mail, the front to index cards, and one cup to capped pens; keep the same front-panel decal and add handwritten category cards inside the compartments.
Repeat one broad tooth silhouette on a separate smooth manufacturer-approved pencil cup, leaving its rim, base, seams, and hand-contact zone bare.
Keep crafting
- DIY Haunted Flower Shop Wood Key Holder With Vinyl — Turn a smooth painted board, cream vinyl, and five antique-brass hooks into a useful haunted flower-shop key station for a gothic entryway.
- DIY Gothic Costume Emergency Kit Tin With Cricut Vinyl — Turn a smooth hard-shell tin into a compact gothic costume emergency kit with a simplified portrait decal and safely organized repair supplies.
- DIY Witchy Pegboard Craft Tool Organizer With Removable Vinyl — Turn a plain pegboard into a flexible craft-tool station with removable witchy decals, clearly labeled zones, and a load plan that keeps sharp and heavy supplies secure.
Inspiration & further reading
This is an original Klean Kut Halloween Crafts project inspired by approachable techniques shared across trusted craft and home sources. Explore Cricut Vinyl cutting and application guidance, Cricut Transfer Tape instructions, Silhouette Matte Removable Vinyl material guidance, Silhouette Transparent Transfer Paper guidance and U.S. Consumer Product Safety Commission Art and Craft Safety Guide for more ideas and technique background.