
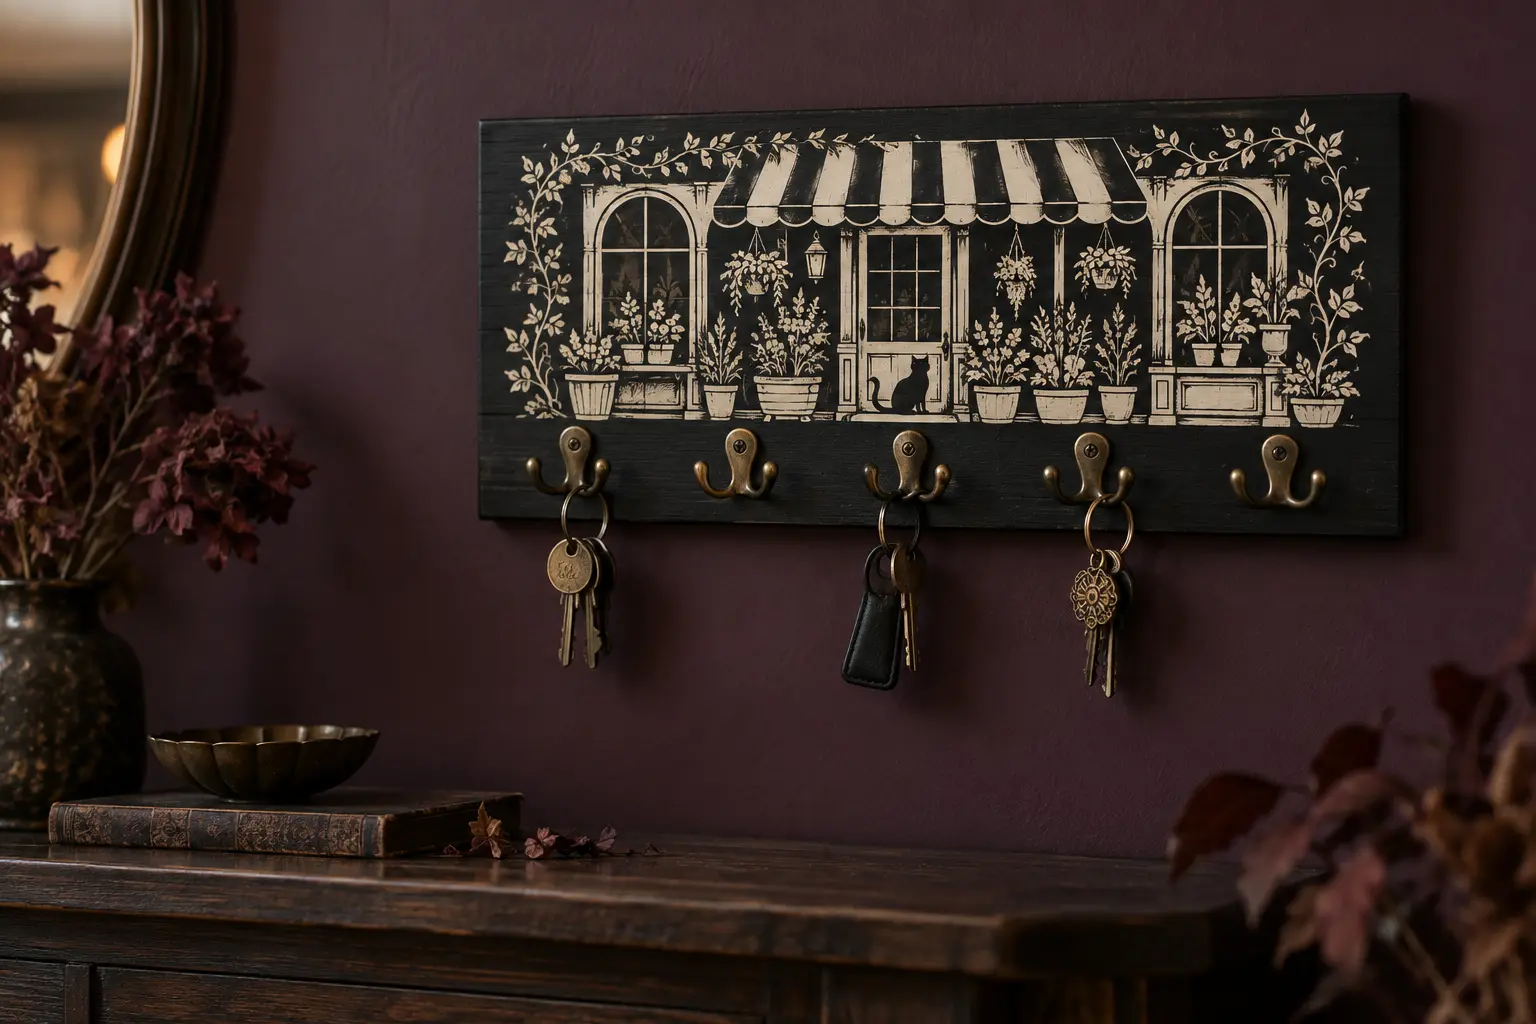
This project turns a slim wood plaque into a useful landing spot for household keys. A simplified flower-shop storefront stretches across the upper half in aged-cream adhesive vinyl, while five antique-brass hooks create an orderly row below. The finished piece has enough atmosphere for Halloween but reads like intentional gothic entryway décor throughout the year.
This is an original project plan based on common painted-wood sign, adhesive-vinyl, small-hook, and wall-mounting methods. Lumber moisture and grain, paint and primer chemistry, cure time, surface smoothness, vinyl adhesive, blade condition, mat grip, transfer tape, board thickness, hook geometry, screw length, wall material, anchor choice, installation quality, and the final load all affect the result. Make the paper layout and painted-scrap adhesion test, and follow the current directions from the lumber, coating, vinyl, cutting-machine, blade, mat, transfer-tape, hook, fastener, anchor, drill, and wall-mount manufacturers. The featured KleanKutChaos artwork supplies the decorative storefront image; it does not include the board, hook layout, hardware, or mounting plan described here. This exact material combination has not been represented as physically tested.
What you’ll need
- Little Shop of Horrors Flower Shop SVG from the featured KleanKutChaos listing
- One new, dry, straight pine or poplar board about 18 by 8 by 3/4 inch with no old paint, cracks, knots at fastener locations, or live edges
- Five small double hooks with matching manufacturer-supplied screws short enough to remain inside the board
- Two-point picture-hanging hardware or a low-profile cleat rated above the combined board, hook, and key load
- Wall fasteners or anchors specifically rated for the actual wall material and mounting system
- Bonding primer and matte black water-based paint approved for the chosen wood
- Optional compatible clear topcoat for the painted board only, applied and fully cured before vinyl
- Permanent matte adhesive vinyl in aged cream or warm white
- Standard- or low-tack transfer tape matched to the vinyl
- Cricut-, Silhouette-, or similar cutting machine with a clean fine-point blade and compatible mat
- Copy paper, printer, pencil, measuring tape, combination square, ruler, level, and painter's tape
- Orbital sander or sanding block with the grits recommended by the coating maker
- Vacuum, tack-free lint cloth, paint tray, foam roller, and quality brush
- Drill-driver, bits sized for the exact screws, countersink bit if specified, clamps, and scrap wood backing
- Stud finder appropriate to the wall, awl, screwdriver, and digital scale
- Eye and hearing protection, a well-fitting particulate respirator for sanding, and a drop cloth
How to make it
- 1
Choose a safe location and load
Select an indoor wall near the entry but outside door swings, narrow walkways, stairs, heaters, damp zones, and children's or pets' reach. Decide that the holder is for ordinary key rings and similarly light items only—not bags, coats, tools, umbrellas, heavy leashes, or anything a child may pull. Identify the wall material and likely studs before buying the mounting hardware.
- 2
Inspect and weigh the bare board
Use a new unfinished board so sanding does not disturb unknown old coatings. Sight along every edge and reject wood that is twisted, split, wet, moldy, heavily knotted, or too thin for the hook screws. Weigh it and record the dimensions. Check each supplied hook screw against the board thickness so no point can emerge from the back.
- 3
Map the hooks and wall fasteners
Draw a centerline and mark five hook centers in one straight row across the lower third, leaving generous space from every edge. Mark a separate two-point wall-mount system near the upper corners or plan the exact cleat position. Keep hook screws, cleat screws, and wall fasteners from intersecting inside the wood. Tape a full-size paper board to the wall and test comfortable adult reach.
- 4
Pre-drill every board hole
Clamp the board face-up over scrap wood. Wear eye and hearing protection, verify bit sizes from the hardware instructions, and drill shallow pilot holes for the five hooks without passing through the back. Flip and prepare only the specified hanging-hardware holes. Mark each depth on the bit with tape and stop if a knot, split, wandering bit, or screw-length conflict appears.
- 5
Ease and sand the wood
Round the exposed corners and break every sharp edge with the coating maker's recommended sanding sequence. Sand with the grain on a stable clamped surface using dust collection and a suitable respirator. Vacuum the board and work area, then wipe with a clean lint-free cloth approved by the finish maker. Do not use household polish, silicone spray, or oily tack cloths that can interfere with paint and vinyl.
- 6
Prime, paint, and fully cure
Apply thin primer and paint coats to the face, edges, back, and within the approved limits around predrilled holes, following every ventilation, temperature, recoat, and cure direction on the labels. Use a foam roller for the broad face and brush only where needed. Let the final surface reach its full stated cure before the adhesion test; paint that feels dry can still be too soft for adhesive vinyl.
- 7
Simplify the storefront artwork
Import a duplicate of the flower-shop SVG and preserve the original. Keep the awning, broad window arches, doorway, several large potted plants, and one curling vine. Remove tiny leaves, hairline brickwork, thin crosswalk stripes, small lettering, narrow window muntins, and isolated specks. Weld overlapping cream shapes where practical and keep every remaining gap wide enough to weed at the final 15- to 16-inch size.
- 8
Build a full-size paper layout
Print the simplified design at 100 percent and tape it above the hook line on the paper board. Leave at least three-quarters of an inch around all edges, mounting points, and hook bases. Hang sample keys from paper hook marks to make sure they will not cover the main storefront or strike the board edge. Adjust the art before cutting vinyl.
- 9
Test vinyl on a painted offcut
Prepare a scrap of the same wood with the exact primer, paint, optional topcoat, and full cure. Cut a sample containing a small leaf, window corner, narrow line, and broad filled area. Apply it with the intended transfer tape, wait the vinyl maker's stated dwell time, then test edge adhesion and tape release. Change the coating, cure time, vinyl, or detail size if paint lifts or the decal will not bond evenly.
- 10
Cut and weed in manageable panels
Divide the storefront into two or three sections at natural vertical seams. Run the saved test cut, then inspect the first panel before cutting the rest. Weed large negative spaces first and support fine vines with a fingertip or tweezers while the vinyl stays on its liner. Replace any stretched or torn detail instead of hiding it beneath another layer.
- 11
Dry-align the complete scene
Lay all paper-backed vinyl panels on the cured board and align them to the centerline and hook marks. Tape each section along its top edge as a hinge and photograph the layout. Confirm adjacent panels meet with an intentional gap or clean overlap that matches the artwork. The cream scene should remain above every metal hook base and wall-fastener position.
- 12
Transfer the vinyl from the center out
Apply compatible transfer tape and burnish the vinyl backing. Start with the center storefront panel, fold it upward on the tape hinge, remove a few inches of liner, and lower it gradually while burnishing outward. Add the side panels using the same method. Peel transfer tape back at an acute angle; if paint or vinyl lifts, stop and return to the scrap test instead of increasing pressure.
- 13
Install and inspect the hooks
Allow the vinyl to settle for the maker's stated time, then attach the five hooks by hand into the pilot holes. Keep a screwdriver square to the head and stop when each base sits snug and level; overtightening can strip wood or crush the finish. Inspect the rear after every hook. A screw tip, new crack, spinning screw, or loose base means the board must not be mounted.
- 14
Mount and perform a staged load test
Install the two-point hanger or cleat exactly as its maker specifies. Fasten to studs when the system calls for it; otherwise use anchors rated for the actual wall material and load. With a second adult supporting the board, level and secure it, then add one key ring at a time over several hours. Check the wall, fasteners, board, hooks, and level after each addition and remove the holder immediately if anything shifts.
Practical finishing tips
- Place the hooks first in the plan, not after the vinyl is designed. Keys should hang below the artwork rather than cover the storefront.
- A small foam roller leaves a smoother painted face than heavy brushwork, which gives adhesive vinyl more consistent contact.
- Use one warm cream vinyl instead of several colors. The high contrast keeps the shop scene readable and makes panel seams less obvious.
- Split the long graphic at doorway or window edges. Natural architectural seams are easier to align than one oversized decal.
- Label the back of the board with its intended light-duty use and the installation date so future users do not mistake it for a coat rack.
- Keep a spare hook and the paint formula. A damaged hook can be replaced and a small exposed area retouched without rebuilding the whole sign.
Troubleshooting
The paint may be uncured, textured, dusty, incompatible, or contaminated. Stop and repeat the exact scrap test after the full label cure time. Do not compensate with a heat gun, spray adhesive, or unapproved sealer.
Remove the panel without pulling farther, protect the damaged area, and let the board recover. Verify primer compatibility and cure times, use lower-tack transfer tape approved for the vinyl, and remake the board surface if the coating bond remains weak.
Lift only an unapplied section when the vinyl permits repositioning. Realign from the doorway or another strong vertical edge. If a panel stretched, recut it; adding a thin patch often makes the seam more visible.
Remove the board from service. The pilot may be oversized, the screw too short, or the wood damaged. Use hardware sized and repaired according to the hook and lumber makers, or remake the board. Do not fill a load-bearing hole with glue and guess at its strength.
Take off every key and support the board before touching fasteners. Check both wall points, the cleat engagement, anchor type, wall condition, and level. Reinstall with the correct rated hardware; adhesive strips are not a repair for loose mechanical mounting.
Use shorter key rings, move frequently used keys to the outer hooks, or replace the hooks with slightly deeper compatible hardware after rechecking screw length and load. Do not add dangling spacers or cords that create snag hazards.
Ways to make it yours
Omit wall hardware and hooks, apply the simplified storefront to a stable weighted desk organizer, and place keys in its existing divided tray.
Apply the vinyl to a removable freestanding entryway organizer that already has manufacturer-rated hooks instead of altering a wall.
Use a new smoothly finished walnut-toned board and matte black vinyl after an exact finish-adhesion test, keeping the same five-hook layout.
Scale the simplified awning and window shapes to a shorter board with two hooks, then recalculate every edge clearance, screw depth, mounting point, and load.
Keep crafting
- DIY Carnivorous Plant Faux Stained-Glass Suncatcher With Vinyl — Layer transparent jewel-tone vinyl and bold black leading on a clear acrylic blank to make a lightweight carnivorous-plant suncatcher for an indoor Halloween window.
- DIY Gothic Apothecary Drawer Labels With Removable Vinyl — Turn a plain mini-drawer cabinet into functional gothic storage with nine ornate frame decals, readable center labels, and a reusable placement jig.
- DIY Gothic Rose Window Mirror With Vinyl — Turn a thrifted mirror into a cathedral-inspired rose window with black vinyl, an antique-gold frame, and a clean reflective center.
Inspiration & further reading
This is an original Klean Kut Halloween Crafts project inspired by approachable techniques shared across trusted craft and home sources. Explore Cricut vinyl cutting and application guide, Cricut transfer tape instructions and Lowe's guide to choosing drywall anchors for more ideas and technique background.