
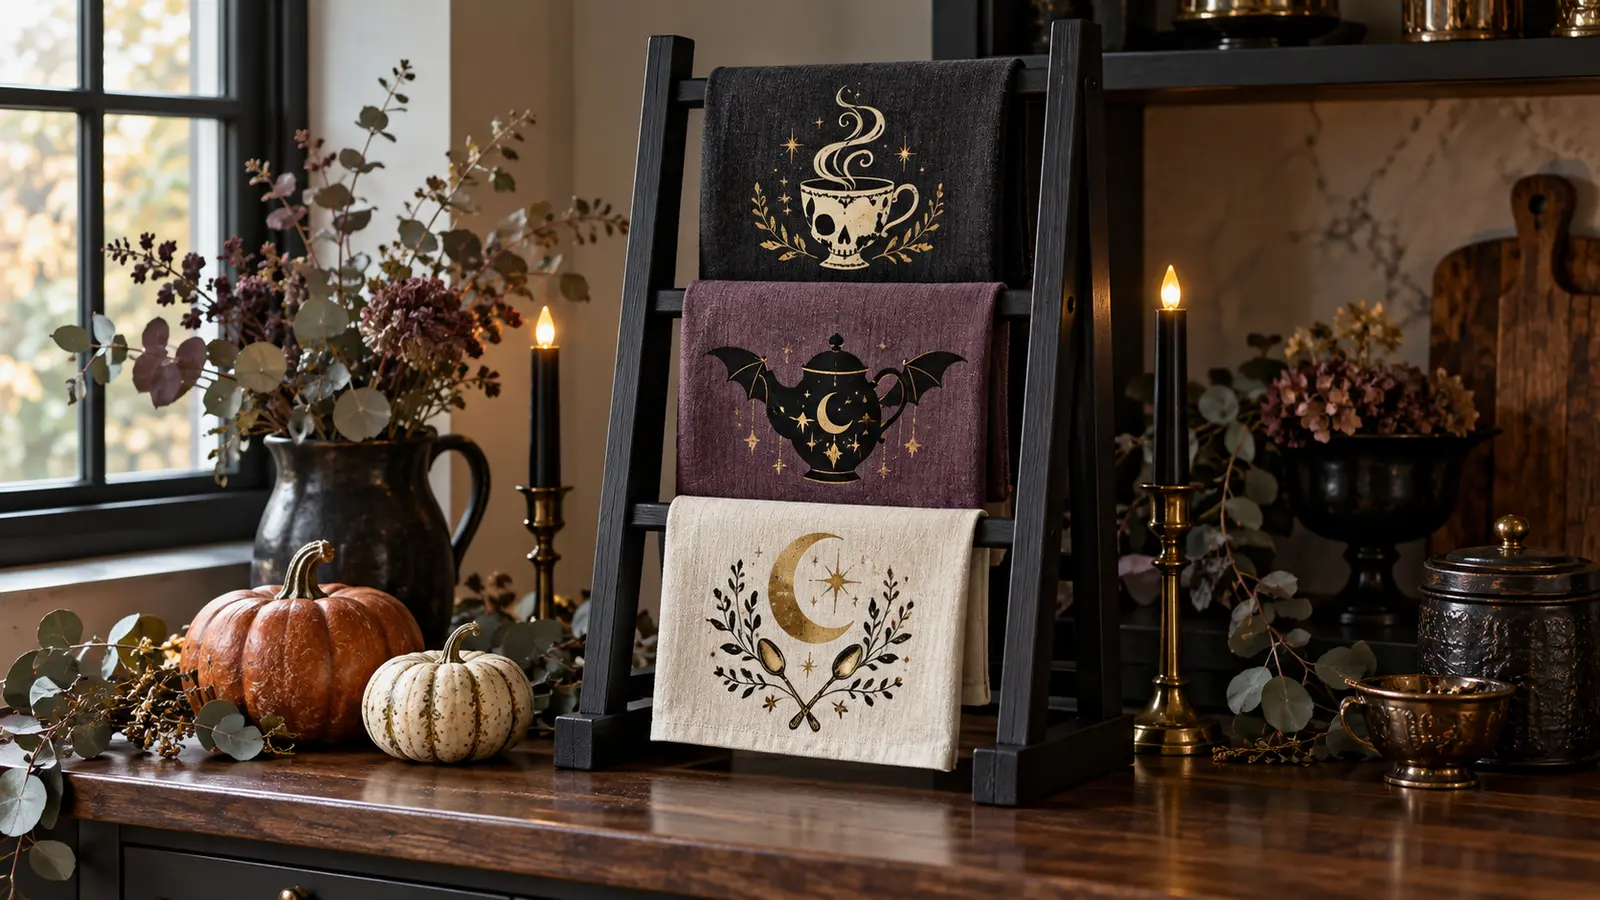
A purpose-made countertop towel ladder turns three ordinary kitchen linens into a vertical Halloween vignette without crowding the worktop. The practical trick is to decorate the removable towels, not the ladder rungs: each towel can lie completely flat for pressing, then hang loosely enough to keep the artwork visible. A charcoal towel carries one bold haunted cup, muted plum supports a bat-wing teapot, and warm ivory gives a moon-and-spoon motif enough contrast to read from across the room.
This is an original project plan based on ordinary cotton-linen construction, water-based finishing, and heat-transfer-vinyl methods. Towel fiber, weave, finish, dye, detergent residue, HTV chemistry, cutter, mat, blade, design scale, press, heat, pressure, peel timing, paint, and ladder construction can all change the result. Make complete paint and fabric test samples and follow the current instructions for every material and tool. Edit only a duplicate working copy of the purchased artwork. The KleanKutChaos listing supplies the featured motif artwork; the featured KleanKutChaos file is the design source for this tutorial. This tutorial does not claim that the pictured combination was physically tested with the listing files.
What you’ll need
- Goth Pottery Part 3 Haunted Teacup SVG Bundle from the featured KleanKutChaos listing
- One purpose-made freestanding countertop display ladder, approximately 18–24 inches tall, with a broad stable base and smooth towel rungs; it must be decorative and not designed for climbing
- Three tightly woven, smooth cotton or cotton-linen tea towels in charcoal, muted plum, and warm ivory, plus one extra matching swatch
- Heat-transfer vinyl approved for the exact towel fiber in antique gold, cream, matte black, or another high-contrast palette
- Cricut-, Silhouette-, or similar cutting machine with current software, compatible fine-point blade, and mat
- Heat press or household iron approved by the HTV maker, plus the maker-specified pressing mat, protective sheet, and heat-resistant tape if required
- Lint roller, ruler, fabric marking pencil, pressing cloth if approved, scissors, weeding tool, and a clean paper placement template
- Laundry detergent without fabric softener for prewashing the towels
- Fine-grit sanding sponge and clean tack-free cloth if finishing an unfinished wood display ladder
- Water-based paint or stain and compatible clear finish approved for the ladder material; black paint is optional
- Scrap wood finished exactly like the ladder for coating and scuff tests
- Battery-operated candles, small pumpkins, or lightweight décor for styling away from heat and food-preparation areas
- Heat-resistant work surface, ventilation, safety glasses, and any protective equipment required by the tool and coating makers
How to make it
- 1
Choose a true display ladder
Use a compact freestanding towel or blanket display made for a counter or sideboard, not a shortened utility ladder or a wall prop balanced upright. It should sit flat on broad feet, resist tipping when each rung carries one towel, and have no splinters, sharp corners, loose joints, exposed fasteners, or pinch points. Follow its maker's load and placement instructions and label it decorative if guests could mistake it for a step.
- 2
Measure the ladder and visible towel zones
Record the ladder height, footprint, rung width, rung spacing, and the depth available behind each towel. Fold the three towels as they will hang and measure only the front-facing rectangle below each rung. Reserve at least one inch around hems and folds so artwork does not disappear around the wood or land on bulky seam allowances.
- 3
Plan a balanced three-towel story
Print or sketch paper stand-ins for one haunted teacup, one bat-wing teapot, and one crescent-and-spoon accent. Tape them to the folded towels on the ladder, then view the arrangement from six to ten feet away. Keep the top motif bold, the middle one wider, and the bottom design slightly lighter so the composition feels deliberate rather than stacked with equal visual weight.
- 4
Prewash and dry the towels
Wash the towels according to their care labels with detergent but no fabric softener, dryer sheet, or fragrance booster that could coat the fibers. Dry them as directed, then press out storage creases with the approved method. Do not apply HTV to damp fabric, a stain-resistant coating, or a towel whose care label prohibits the required heat.
- 5
Prepare the ladder separately
If the display is unfinished, sand and coat it only as the wood and finish makers direct. Keep paint out of joints and off nonslip feet, work with ventilation, and allow the complete stated cure—not merely dry-to-touch time. Test the finish on matching scrap and confirm it does not transfer color when rubbed with a clean light cloth.
- 6
Build a full-size placement template
Draw each visible towel rectangle on paper and mark the centerline, hems, fold, and rung overlap. Position the artwork inside the safe zone and leave generous negative space around fine steam curls and handles. This paper map prevents a perfectly pressed design from landing under a rung or against a thick hem.
- 7
Simplify the purchased artwork
Open a duplicate of the featured files and select three motifs with distinct silhouettes. Remove isolated specks, thicken fragile bridges, reduce tiny interior cuts, and separate color layers only when the HTV maker permits layering. Preserve the character of each design while favoring details that can weed cleanly and survive laundering at the planned size.
- 8
Confirm size and mirror every cut
Create a rectangle in the cutting software that matches each measured visible zone, then size the motif within it. For ordinary liner-backed HTV, turn Mirror on for every mat before cutting and place the shiny carrier side toward the mat as the material maker specifies. If the exact product uses a different construction, follow its current directions instead of assuming the usual orientation.
- 9
Test-cut the finest motif
Cut a one-inch section containing a steam curl, cup handle, or star. The blade should cut the HTV film cleanly without slicing through the carrier. Weed the sample in strong side light and adjust only one machine setting at a time. Enlarge or simplify detail that stretches, closes up, or tears rather than forcing it through a poor cut.
- 10
Make a complete fabric test swatch
Apply the test motif to the prewashed matching swatch using the exact time, temperature, pressure, preheat, post-heat, and peel timing specified for the HTV and towel fiber. Let it cool and rest as directed, then flex and launder the swatch before committing to the finished towels. Stop if the fabric scorches, dye migrates, texture prevents bonding, or the vinyl puckers.
- 11
Cut and weed one towel set at a time
Label the three carriers before cutting so colors and towel positions stay matched. Weed at a low angle, keeping delicate steam and spoon details supported on the carrier. Trim the carrier into a manageable rectangle while preserving a safe border, and compare the weeded result with the paper template before turning on the press.
- 12
Prepare a safe pressing station
Place the specified pressing mat on a firm, flat, waist-high, heat-resistant surface away from the ladder, décor, children, pets, cords, water, and food. Return the hot press to its safety base whenever it is not on the towel. Smooth one towel flat with the visible panel centered and keep hems, folds, buttons, and thick seams outside the pressing area.
- 13
Press the first motif
Preheat only if the material instructions require it, then use the paper template and ruler to position the mirrored weeded design carrier-side up. Secure it with heat-resistant tape only when approved. Apply heat and pressure exactly as specified, without sliding the press, and use the required warm-, cool-, or cold-peel timing. Protect exposed HTV from direct contact with the heat plate.
- 14
Repeat and inspect all three towels
Let the first towel cool flat while pressing the remaining motifs separately. Under side light, inspect edges and narrow details without picking at warm vinyl. If the maker allows a corrective press, cover the complete design with the specified liner and repeat only the permitted time and pressure; otherwise stop and diagnose the test conditions before continuing.
- 15
Rest, fold, and hang the towels
Keep the towels flat and undisturbed for the HTV maker's required rest period, commonly at least 24 hours before washing. Fold each towel on the template lines without creasing directly through fragile vinyl, then drape one per rung with enough overlap to stay put. Confirm the stand remains stable and that no towel touches the counter near a sink, burner, candle, or hot appliance.
- 16
Do a final display and care check
Nudge the empty sideboard and lightly tug each towel to confirm the ladder does not rock or tip. Style only with lightweight pumpkins and battery lights outside the footprint. Photograph the finished arrangement, store each material's care directions with the towels, and remove the display from service if the ladder loosens, the finish transfers, or HTV begins to lift.
Practical finishing tips
- Choose smooth, low-pile towels; waffle weaves and terry loops make fine HTV details harder to support evenly.
- Keep each motif to one or two HTV colors. A strong silhouette reads better on a hanging fold and avoids repeated heat exposure.
- Use a paper template for both cutting and refolding so the design returns to the same visible position after laundering.
- Photograph the carriers beside their matching towels before pressing; it is an easy safeguard against switching the black and ivory color plans.
- Store the ladder and towels separately after the season so wood pressure and long folds do not crease the vinyl.
- Treat the decorated towels as display linens. Keep a separate plain towel near the sink and stove for actual kitchen work.
Troubleshooting
Stop and compare the exact fiber and weave with the HTV maker's approved base materials. Repeat the full process on a prewashed swatch using the current heat guide. If loops or deep texture prevent even pressure, switch to a smooth flour-sack or flat-weave cotton towel rather than increasing heat beyond the instructions.
Turn off the press, move it to its safety base, and let the sample cool. Verify fiber content, coating, temperature, dwell time, and pressing surface. Replace the towel or HTV system if the required settings exceed the fabric's care limits; never hide heat damage under another vinyl layer.
Check whether the design was under-sized, the fabric was textured, pressure was uneven, or peel timing was wrong. Use the maker-approved corrective press only if permitted. Otherwise thicken the lines, enlarge the motif, recut it, and prove the revision on a fresh swatch.
Test on scrap before trying to correct the finished towel. Excess heat, pressure, or contact with a finish-sensitive fabric may be responsible. Follow the fabric and HTV instructions exactly and consider a matte material or a different towel if the test remains visibly marked.
Return to the full-size paper template and increase the distance between the artwork and the fold line. Re-folding may rescue a small error, but do not trim a finished towel or force a sharp crease through the HTV just to expose more artwork.
Remove every towel and decoration immediately. Place the stand on a level, dry, nonslip surface and inspect its joints and feet. Follow the maker's repair guidance or replace it; do not add hidden weights, wall tethers, or structural modifications unless the manufacturer expressly approves them.
Ways to make it yours
Use three black flat-weave towels with one cream haunted cup on each, varying only the vessel silhouette for a quieter year-round gothic kitchen.
Decorate one smooth cotton towel with the boldest cup motif and hang it on a compact one-rung display stand, preserving the same testing, pressing, stability, and heat-clearance rules.
For heat-sensitive vintage linens, mount printed motif panels in three small standing frames beside an undecorated towel ladder instead of applying HTV to irreplaceable fabric.
Place one Halloween motif low on the front half and a simple moon or botanical motif on the opposite half so a different fold can change the display without pressing over existing vinyl.
Keep crafting
- DIY Gothic Apothecary Drawer Labels With Removable Vinyl — Turn a plain mini-drawer cabinet into functional gothic storage with nine ornate frame decals, readable center labels, and a reusable placement jig.
- DIY Witchy Sewing Notions Box With Layered Cricut Vinyl — Turn a plain wooden box into a practical witchy sewing organizer with a carefully simplified portrait, layered vinyl accents, and removable interior dividers.
- DIY Gothic Candelabra Canvas Pillow With Metallic HTV — Turn a plain black canvas pillow cover into polished gothic décor with a large silver candelabra cut from metallic heat-transfer vinyl.
Inspiration & further reading
This is an original Klean Kut Halloween Crafts project inspired by approachable techniques shared across trusted craft and home sources. Explore Cricut Everyday Iron-On instructions, Cricut EasyPress use and safety guidance, Cricut Design Space mirroring instructions and U.S. Consumer Product Safety Commission Art and Craft Safety Guide for more ideas and technique background.