
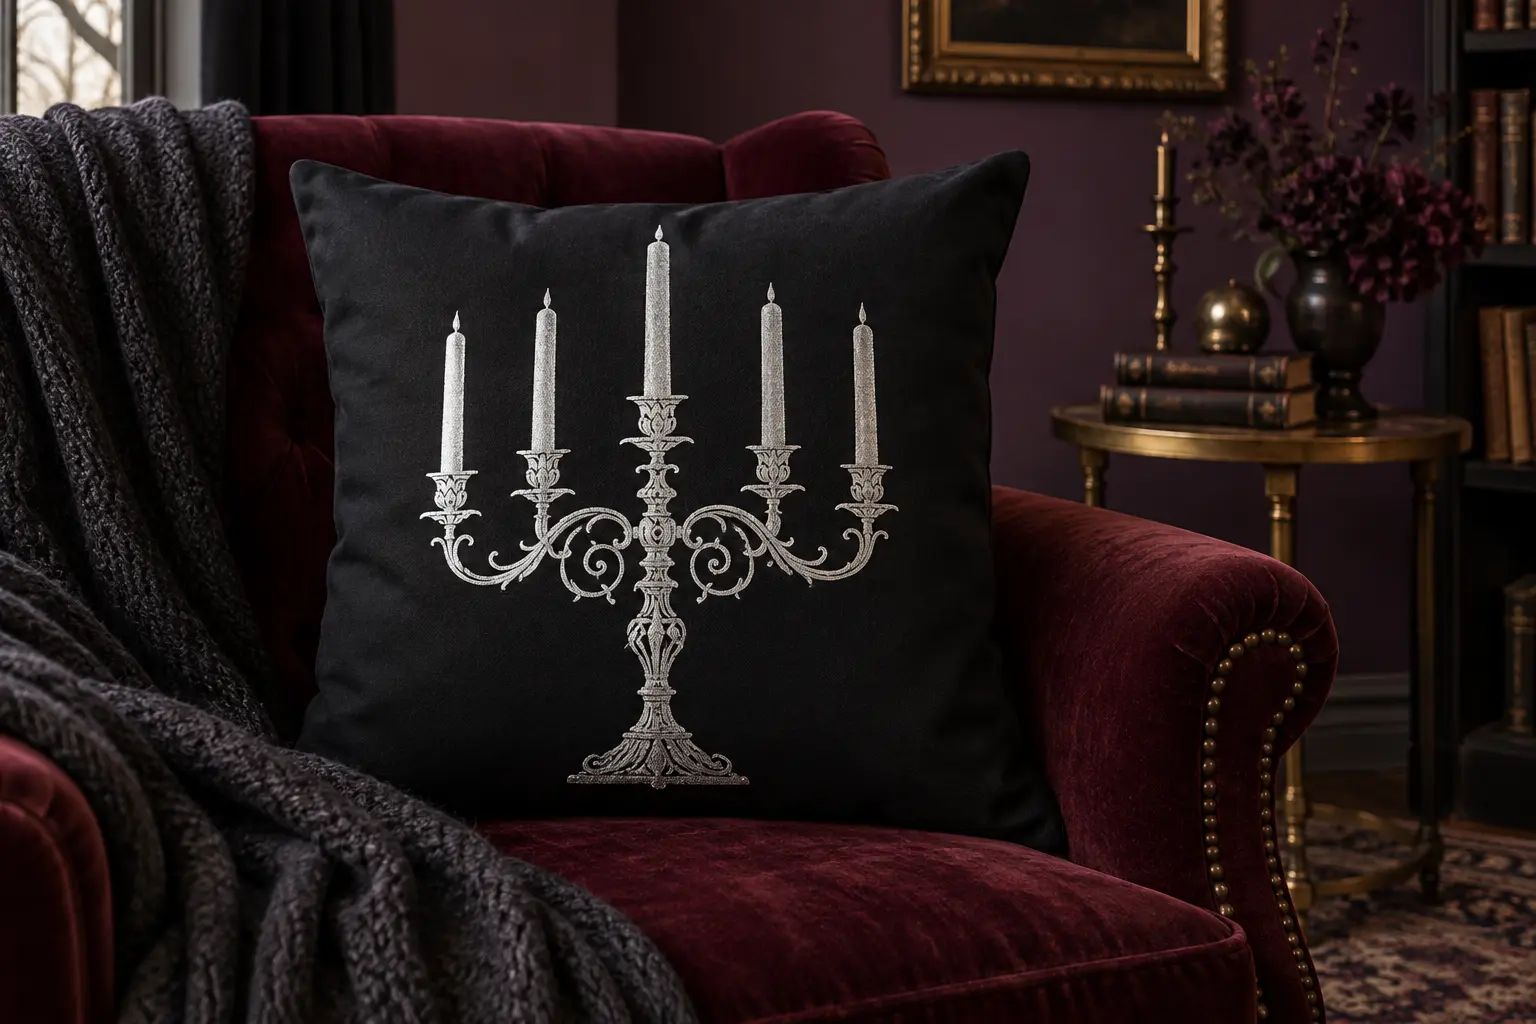
This project gives a ready-made black canvas pillow cover a dramatic but useful Halloween upgrade. The tall clock and candelabra section of the featured artwork becomes one generous metallic-silver graphic, sized large enough to preserve the strongest curls and candle shapes without demanding microscopic weeding. The finished cover can dress a reading chair for October, then fold flat for compact off-season storage.
This is an original project plan based on common heat-transfer-vinyl and ready-made pillow-cover methods. Fabric fiber, weave, coatings, dyes, seams, zipper placement, moisture, laundering, vinyl formula, blade condition, mat grip, design simplification, heat-tool accuracy, surface firmness, pressure, temperature, dwell time, peel method, and care all affect the result. Make the full-size paper proof and exact-material test before committing the main cover, and follow the current directions from the pillow-cover, HTV, cutting-machine, blade, mat, heat-tool, and pressing-surface manufacturers. The featured KleanKutChaos file supplies the decorative character scene; this tutorial uses only a simplified clock-and-candelabra portion and does not claim that the pictured project was physically tested with the listing artwork.
What you’ll need
- Riff Raff Candelabra Cut File from the featured KleanKutChaos listing
- One new 18-inch square black cotton-canvas pillow cover with a removable insert and a fiber content approved by the HTV maker
- A separate 18-inch pillow insert added only after pressing and complete cooling
- Metallic or foil heat-transfer vinyl in silver, pewter, or antique gold
- A small offcut of the same cover fabric or an inconspicuous interior seam allowance for testing
- Cricut-, Silhouette-, or similar cutting machine with a clean fine-point blade
- Compatible cutting mat and the HTV maker's recommended material setting
- Heat press or EasyPress large enough to cover the design in planned sections
- Firm heat-safe pressing surface and compatible pressing mat
- Protective sheet or clean carrier sheet approved by the HTV maker
- Lint roller, ruler, fabric-safe marking pencil, painter's tape, and heat-resistant tape if permitted
- Printer, copy paper, scissors, and transparent ruler for the full-size template
- Weeding tool, fine tweezers, and a bright work light
- Heat-resistant gloves if recommended for the chosen press and a stable safety base
How to make it
- 1
Check the cover and heat-transfer instructions
Read the pillow-cover fiber label and the exact metallic HTV application chart before cutting anything. Confirm that the fabric, finish, zipper, seams, pressing surface, and heat tool are compatible. Wash and dry the empty cover only when its maker requires prewashing, using no fabric softener or dryer sheet, then let it return to room temperature completely dry.
- 2
Choose a safe finished size
Measure the flat front panel inside the seam lines. Plan a design about 10 to 12 inches wide, leaving at least 2 inches of quiet space from every seam and well above the zipper. If the artwork would need to be smaller than its fine lines can support, enlarge the cover or simplify more rather than forcing a tiny cut.
- 3
Isolate the candelabra composition
Open a duplicate of the SVG and preserve the original. Keep the tall clock, three broad candle shapes, strongest candelabra arms, and the most recognizable large clothing contours. Remove facial detail, hairline shading, tiny buttons, narrow brick marks, isolated specks, and interior gaps that would become slivers. Weld intentional overlaps and repair open paths.
- 4
Make a full-size paper proof
Print the simplified artwork at 100 percent, tape the tiled pages together, and cut around its outer silhouette. Center it on the empty cover while the cover lies square and flat. Check the design from across the room, then fold the cover as it would sit around an insert to confirm no candle or clock edge disappears into a seam.
- 5
Run an exact-material heat test
Cut a test containing one narrow curve, a candle tip, a broad filled area, and a small interior opening. Mirror it, weed it, and apply it to the matching fabric offcut or permitted hidden test area with the exact temperature, time, pressure, protective layer, and peel method specified for the HTV and fabric. Reject settings that scorch, shine, flatten, discolor, shrink, or fail to bond.
- 6
Prepare and mirror the final cut
Return to the approved 10- to 12-inch layout and confirm that all pieces fit within the heat plate or planned press sections. Mirror the complete design before sending it to the cutter. Place metallic HTV carrier-side down on the correct mat, choose the maker's material setting, and load it square under the rollers.
- 7
Cut a small corner first
Run the machine's saved test cut in an unused corner. The vinyl layer should release cleanly while the clear carrier remains intact. Adjust force or blade exposure one step at a time if needed, replace a dull blade rather than adding extreme pressure, then cut the full mirrored design without leaving the machine unattended.
- 8
Weed from broad areas to fine curls
Trim away excess sheet while keeping a generous carrier border. Remove large outside areas first, then weed clock openings, spaces between candelabra arms, and candle details under bright light. Support narrow metallic curls against the carrier with a fingertip or tweezers. Recut any stretched arm or detached candle instead of trying to hide a damaged shape.
- 9
Prepare a firm, seam-free pressing area
Remove the pillow insert and lint-roll the front and back. Put the approved pressing mat inside the cover so the zipper and rear seams hang beyond the heat plate. Lay the cover on a waist-high, firm, heat-safe surface rather than an ironing board. Preheat only as directed to remove moisture and wrinkles, then allow any required pause.
- 10
Center and secure the carrier
Fold the carrier lightly in half without creasing the vinyl and mark its center. Align that mark with the cover's vertical center and use the paper template measurements to set the height. Keep every edge clear of seams and zipper hardware. Secure only with heat-resistant tape when the HTV or heat-tool maker permits it.
- 11
Press without sliding
Cover the design with the approved protective layer and apply the exact time, temperature, and pressure from the current material chart. Lift the press straight up instead of sliding. If the design exceeds the plate, divide it into equal sections with minimal overlap, keep the carrier in place, and protect previously pressed exposed vinyl during any later pass.
- 12
Peel at the specified temperature
Let the transfer reach the maker's required hot, warm, or cool peel condition. Pull the carrier slowly back across itself while watching the smallest candle and curl. If an edge rises, replace the carrier and protective sheet and use only the maker's approved short repress; do not improvise extra heat or pressure.
- 13
Cool, inspect, and finish
Leave the empty cover flat until it is completely cool. Inspect in angled light for loose edges, scorching, press boxes, misplaced pieces, or seam damage. Wait the full laundering interval stated by the HTV maker before washing. Add the pillow insert only after cooling, shape the corners gently, and keep the finished pillow away from open flames and hot candleholders.
Practical finishing tips
- Metallic vinyl shows every interruption in a line, so preserve fewer bold curls instead of dozens of fragile ones.
- Photograph the paper proof on the cover before removing it. The image is a quick alignment reference at the press.
- A pressing mat inside the cover helps isolate the front panel from the zipper and rear seams, but it must match the heat-tool instructions.
- Keep the carrier border wide enough to stabilize the tall clock and candles while you position the design.
- Store the cover empty and flat between seasons so the metallic surface is not sharply creased around a compressed insert.
- Record the actual vinyl, cover fiber, cut setting, and application chart used so a matching second pillow is easier to reproduce.
Troubleshooting
The details may be too narrow, the blade may be dull, or the cut may be incomplete. Enlarge or simplify the curls, repeat the test cut, and recut the affected section. Do not stretch a lifted line back into place.
Stop peeling and return the carrier to position. Confirm that the cover is dry and compatible, the press reached the verified setting, pressure was even, and the correct peel temperature was used. Apply only the short repress allowed by the product instructions.
Let the fabric cool before judging it because some marks relax. If it remains, the test should be repeated with a compatible protective layer, lower permitted pressure, or different blank. Never exceed the HTV maker's range to chase adhesion.
Do not keep pressing over the ridge. Reposition the internal pressing mat so hardware and seams sit beyond the plate, or move the artwork farther inward. Replace the cover if the planned design cannot occupy a truly flat zone.
Too much heat, time, pressure, plate movement, or fabric shrinkage may be responsible. Compare the result with the exact-material test, verify the current chart, and recut the panel if the HTV has been permanently distorted.
The shape may be too small or may have detached during weeding. Enlarge and recut that candle section on fresh carrier, align it with the paper proof, and apply it only if the HTV maker approves a second layer or adjacent repair.
Ways to make it yours
Use antique-gold metallic HTV on deep forest-green canvas after completing the same fiber and heat tests.
Cut the clock in matte gray and the candelabra in metallic silver, but verify that both vinyl formulas permit the required layer order and pressing schedule.
Delete every figure contour and keep only the clock, candle cups, and bold ornamental arms for subtler year-round gothic décor.
Scale one simplified candle cluster to a heat-compatible zip pouch, leaving a generous safety zone around the zipper and seams.
Keep crafting
- DIY Gothic Corset Halloween Favor Boxes With Cricut or Silhouette — Turn sturdy cardstock, tiny eyelets, and satin ribbon into structured gothic corset favor boxes for Halloween parties, movie nights, or dramatic place settings.
- DIY Horror Killer Lineup Table Runner With Heat-Transfer Vinyl — Turn a plain cotton runner into a dramatic Halloween centerpiece with eight coordinated horror silhouettes, careful spacing, and matte black heat-transfer vinyl.
- DIY Gothic Witch Book Box With Vinyl & Metallic Paint — Turn a plain book-shaped wooden box into an aged black, plum, and gold keepsake with an ornate witch cameo on the cover.
Inspiration & further reading
This is an original Klean Kut Halloween Crafts project inspired by approachable techniques shared across trusted craft and home sources. Explore Cricut Specialty Iron-On instructions, Cricut EasyPress operating guidance and Cricut heat-transfer troubleshooting for more ideas and technique background.