
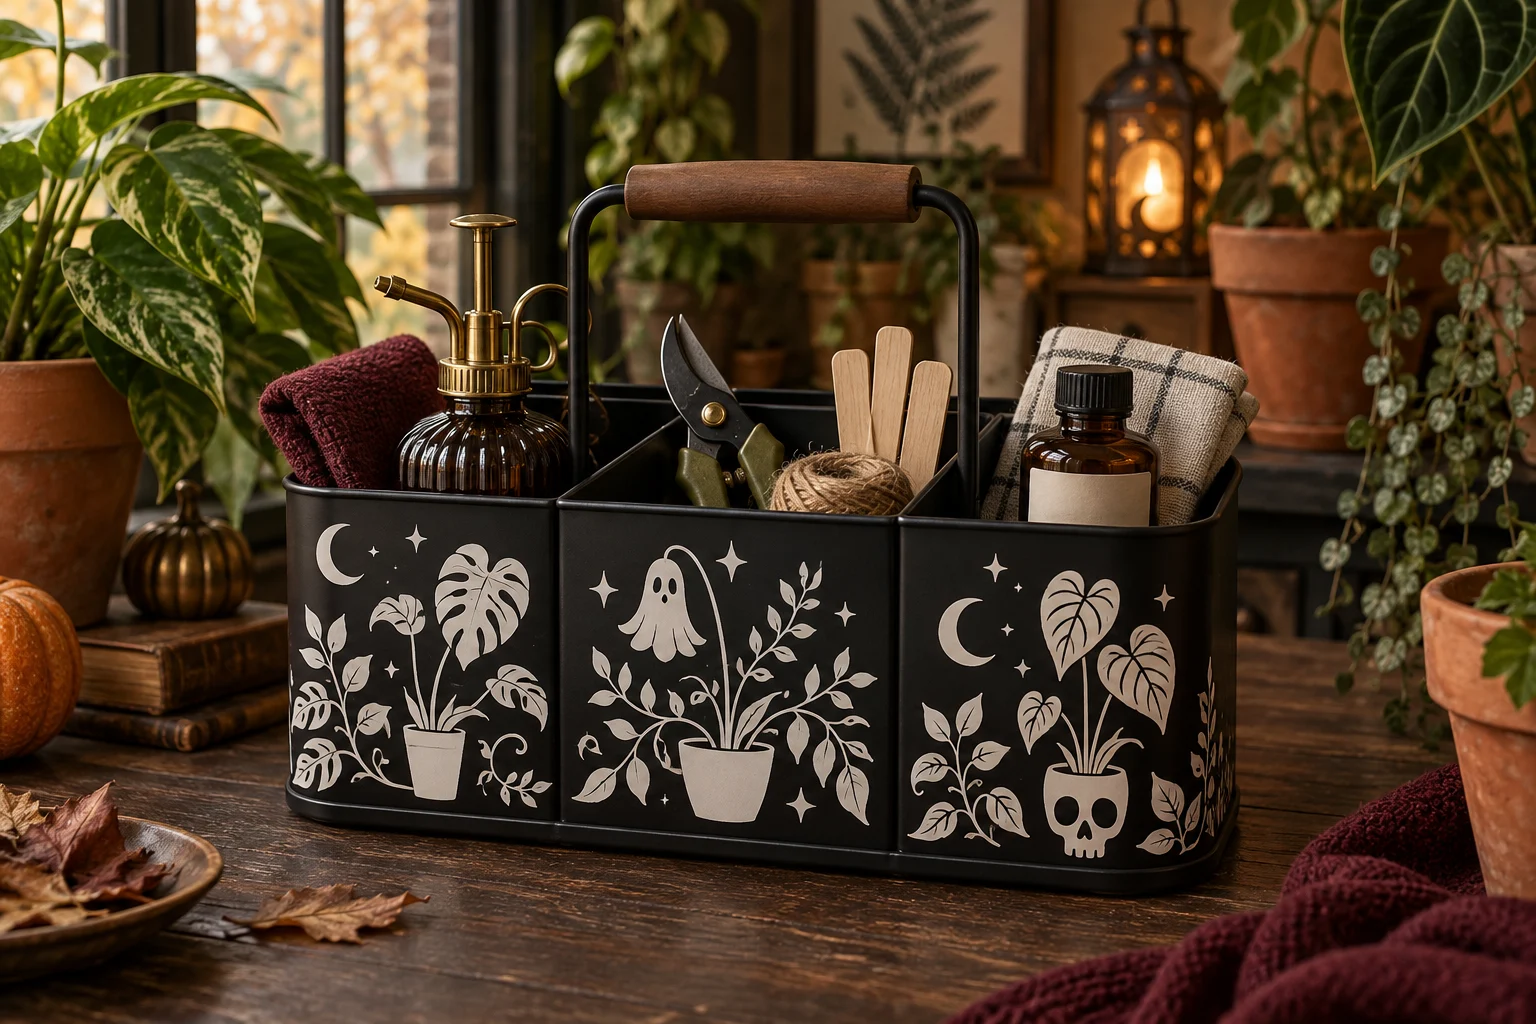
This portable organizer keeps the tools for a weekly houseplant check in one place instead of scattered between a sink, potting shelf, and junk drawer. A powder-coated metal caddy provides three wipeable compartments for a mister, soft cloth, plant labels, twine, and securely closed hand tools. Three simplified haunted-botanical designs wrap across the smooth outer panels in high-contrast vinyl while leaving the handle, seams, and wet interior untouched.
This is an original project plan based on common adhesive-vinyl application and household tool-storage methods. Powder-coat texture, metal finish, cleaner compatibility, vinyl adhesive, artwork detail, blade condition, mat grip, transfer-tape tack, room temperature, humidity, moisture, caddy shape, and stored-tool weight all affect the result. Make paper placement proofs and test the exact vinyl on an inconspicuous area before decorating. Follow the current directions from the caddy, cleaner, vinyl, transfer-tape, cutting-machine, blade, mat, and every stored-tool maker. The featured KleanKutChaos bundle supplies the decorative botanical artwork; this tutorial simplifies selected designs for larger vinyl shapes and does not claim that the pictured material combination was physically tested with the listing files.
What you’ll need
- 20 Haunted Houseplants SVG Bundle from the featured KleanKutChaos listing
- One stable three-compartment metal or rigid plastic utility caddy with smooth, flat outer panels and a secure handle
- Permanent adhesive craft vinyl approved for the caddy finish
- Transfer tape matched to the chosen vinyl
- Cricut-, Silhouette-, or similar cutting machine with a clean fine-point blade
- Compatible clean standard-grip cutting mat
- Copy paper, printer or pen, scissors, ruler, flexible measuring tape, and pencil for full-size proofs
- Low-tack painter's tape, scraper, brayer, weeding tool, fine tweezers, and bright task light
- Finish-safe cleaner recommended by the caddy maker and two lint-free cloths
- Small glass or plastic plant mister with a leak-free cap or pump
- Compact bypass pruning shears with a working blade lock and protective sheath when available
- Soft leaf-cleaning cloth, wooden plant labels, cotton twine, and a blunt pencil or plant marker
- Small sealed bottle for plant-care supplies, clearly labeled outside the decorative area and stored upright
- Optional removable rigid divider cups that fit below the caddy rim
- Eye protection and a lidded scrap container
How to make it
- 1
Choose a stable, wipeable caddy
Pick a caddy that sits flat when empty, has a firmly attached handle, rounded or finished edges, and enough depth to keep bottles upright. Inspect welded seams, corners, coating, and compartment walls. Reject rust, sharp burrs, peeling finish, loose handles, cracks, or a base that rocks.
- 2
Plan what the caddy will actually hold
Set the closed mister, locked shears, cloth, labels, twine, and sealed bottle beside the empty caddy. Assign wet items to one compartment, tools to another, and dry labels or cloths to the third. Do not store loose fertilizer, pesticides, open liquids, exposed blades, batteries, or anything that can leak into the organizer.
- 3
Measure every decorating panel
Measure the flat width and height of each outer panel, stopping before seams, curves, rivets, feet, handles, and rolled edges. Subtract at least half an inch from every side for a safe vinyl boundary. Record each panel separately because molded or divided caddies are not always symmetrical.
- 4
Choose and simplify three plant designs
Open duplicates of three coordinating files from the haunted-houseplant bundle and preserve the originals. Keep bold pots, stems, large leaves, moons, and one or two ghostly features. Remove isolated specks, hairline veins, tiny thorns, narrow gaps, and floating accents that would be fragile at the measured size. Weld intentional overlaps and close broken paths.
- 5
Make full-size paper proofs
Print or cut each simplified design at final size. Tape the proofs to the empty caddy and view it from the front, both sides, and while carrying it. Keep artwork away from grip areas and any place that rubs against your body. Load the empty caddy with sample weights and confirm no bottle or tool presses against the decorated walls.
- 6
Test the finish and adhesive
Follow the caddy maker's cleaning directions on an inconspicuous spot, let it dry, then apply a small square of the exact vinyl. Leave it for the vinyl maker's recommended evaluation period. Remove or inspect it as directed. Continue only if the finish stays intact and the vinyl bonds without bubbling, discoloration, or adhesive residue.
- 7
Clean and dry the outer panels
Empty the caddy and clean only the decorating areas with the approved method. Keep liquid out of seams and under the base. Wipe with a fresh lint-free cloth and allow complete air drying. Do not use lotion-rich soap, oily polish, abrasive pads, or an unapproved solvent that could damage the coating or weaken the adhesive.
- 8
Test-cut the simplified artwork
Place a scrap of the exact vinyl on the clean mat and begin with the material maker's recommended cut setting. Check that the design weeds cleanly while the liner remains uncut. Adjust one setting at a time and replace a dull blade instead of increasing pressure repeatedly. Confirm that the smallest retained leaf and ghost opening survives weeding.
- 9
Cut and weed panel by panel
Cut each design as a separate labeled piece without mirroring. Weed the large background first, then remove planned interior openings under bright light. Compare every weeded piece with the paper proof before adding transfer tape. Recut any stretched stem, torn leaf, detached pot, or distorted moon rather than trying to repair it on the caddy.
- 10
Apply the center panel
Add compatible transfer tape and burnish from the center outward. Position the first design with the paper-proof measurements, then create a vertical painter's-tape hinge through its center. Peel and apply one half at a time, keeping the vinyl relaxed and pressing outward with the scraper. Peel the transfer tape back slowly at an acute angle.
- 11
Align the remaining designs
Use the bottom edge of the center art and small painter's-tape registration marks to align the side panels. Repeat the hinge method, checking that stems and moons appear balanced without forcing artwork across corners or seams. Burnish only on supported flat surfaces; do not squeeze or dent thin metal while pressing.
- 12
Let the vinyl settle
Keep the caddy empty, dry, and indoors for the vinyl maker's recommended settling time. Do not add heat, liquid sealer, dishwasher spray, or aggressive burnishing to speed the bond. After settling, inspect every edge under bright light and recut a failing section if the surface test and application method were otherwise successful.
- 13
Load for safe carrying
Place the leak-tested mister and sealed bottle upright in the wet compartment, locked shears in a rigid divider or sheath with handles up, and labels, twine, and cloth in the dry compartments. Keep everything below the rim except the mister neck and tool handles. Lift the caddy a few inches over a protected surface and confirm the load stays balanced.
- 14
Use and maintain the station
Carry the caddy with one hand on the handle and the other supporting the base when it is heavily loaded. Return tools only after cleaning and drying them according to their makers' directions. Wipe drips promptly with an approved cloth, never soak the caddy, and inspect the handle, base, coating, vinyl edges, bottle closures, and blade lock before each plant-care session.
Practical finishing tips
- Use one white or cream vinyl across all three panels so the botanical details read as a collection instead of competing decals.
- Keep the narrowest stems at least an eighth inch wide at final size; bolder stems weed and survive wiping more reliably.
- Store a dedicated soft cloth in the caddy so leaf cleaning never shares a rag with household cleaners or plant treatments.
- Add removable cups inside the compartments rather than gluing dividers permanently; they are easier to empty and clean after a spill.
- Photograph the finished compartment layout so anyone returning tools knows which side keeps wet items separate from paper labels.
- If the caddy travels between rooms, reduce the load before adding more storage; portability matters more than filling every gap.
Troubleshooting
The finish may be textured, oily, uncured, or incompatible with the adhesive. Stop applying more pieces, remove the test vinyl only as both makers allow, clean again with the approved method, and test a different compatible vinyl. Use a removable cardstock tag on the handle if no vinyl passes the surface test.
Lift only the nearest unapplied edge while the transfer tape still supports it, then lower the vinyl gradually while scraping outward. For a settled bubble, follow the vinyl maker's correction guidance; do not puncture powder-coated metal or use uncontrolled heat.
Enlarge the design, thicken or remove the smallest leaves, check blade condition, and repeat the material test. Recut the complete panel so its scale and line weight stay consistent instead of patching multiple fragile pieces.
Move it to a snug removable cup, add a rigid washable divider, or choose a shorter leak-tested container. Never rely on vinyl, loose cloth, or twine to restrain a bottle containing liquid.
Set it down, remove the load, and distribute heavier items across the outer compartments with the lightest supplies in the center. If the handle flexes or the base rocks when loaded, retire the caddy from carrying use.
The cleaner, moisture, texture, or rubbing may be incompatible. Stop wet wiping, dry the area, and remove the failing decal as directed. Retest with a simpler design farther from seams and grip zones; do not trap moisture under liquid sealer.
Ways to make it yours
Decorate only the broad front panel with one large solid haunted plant, leaving at least three quarters of an inch around every edge for faster cutting and easier alignment.
Skip vinyl on the caddy and mount smaller designs on laminated cardstock tags attached to the handle with a closed metal ring, keeping the tag clear of your grip.
Replace pruning storage with empty capped propagation tubes in a rigid rack, and use the remaining compartments for labels, a cloth, and clean rooting notes. Carry tubes only when empty.
Use matte black-on-black vinyl for a subtle raised pattern, then add one removable burgundy handle wrap that does not interfere with the grip or balance.
Keep crafting
- DIY Haunted Houseplant Canvas Pot Covers With Heat-Transfer Vinyl — Give three ordinary nursery pots a gothic makeover with washable canvas covers, crisp haunted-botanical HTV, and a plant-safe double-container setup.
- DIY Celestial Insect Shrink-Plastic Charm Garland — Turn mystical moth, beetle, bee, and dragonfly artwork into a lightweight gothic garland with a measured shrink test, clean printed detail, and securely closed hanging loops.
- DIY Gothic Apothecary Drawer Labels With Removable Vinyl — Turn a plain mini-drawer cabinet into functional gothic storage with nine ornate frame decals, readable center labels, and a reusable placement jig.
Inspiration & further reading
This is an original Klean Kut Halloween Crafts project inspired by approachable techniques shared across trusted craft and home sources. Explore Cricut vinyl cutting and application guide and Cricut transfer tape instructions for more ideas and technique background.