
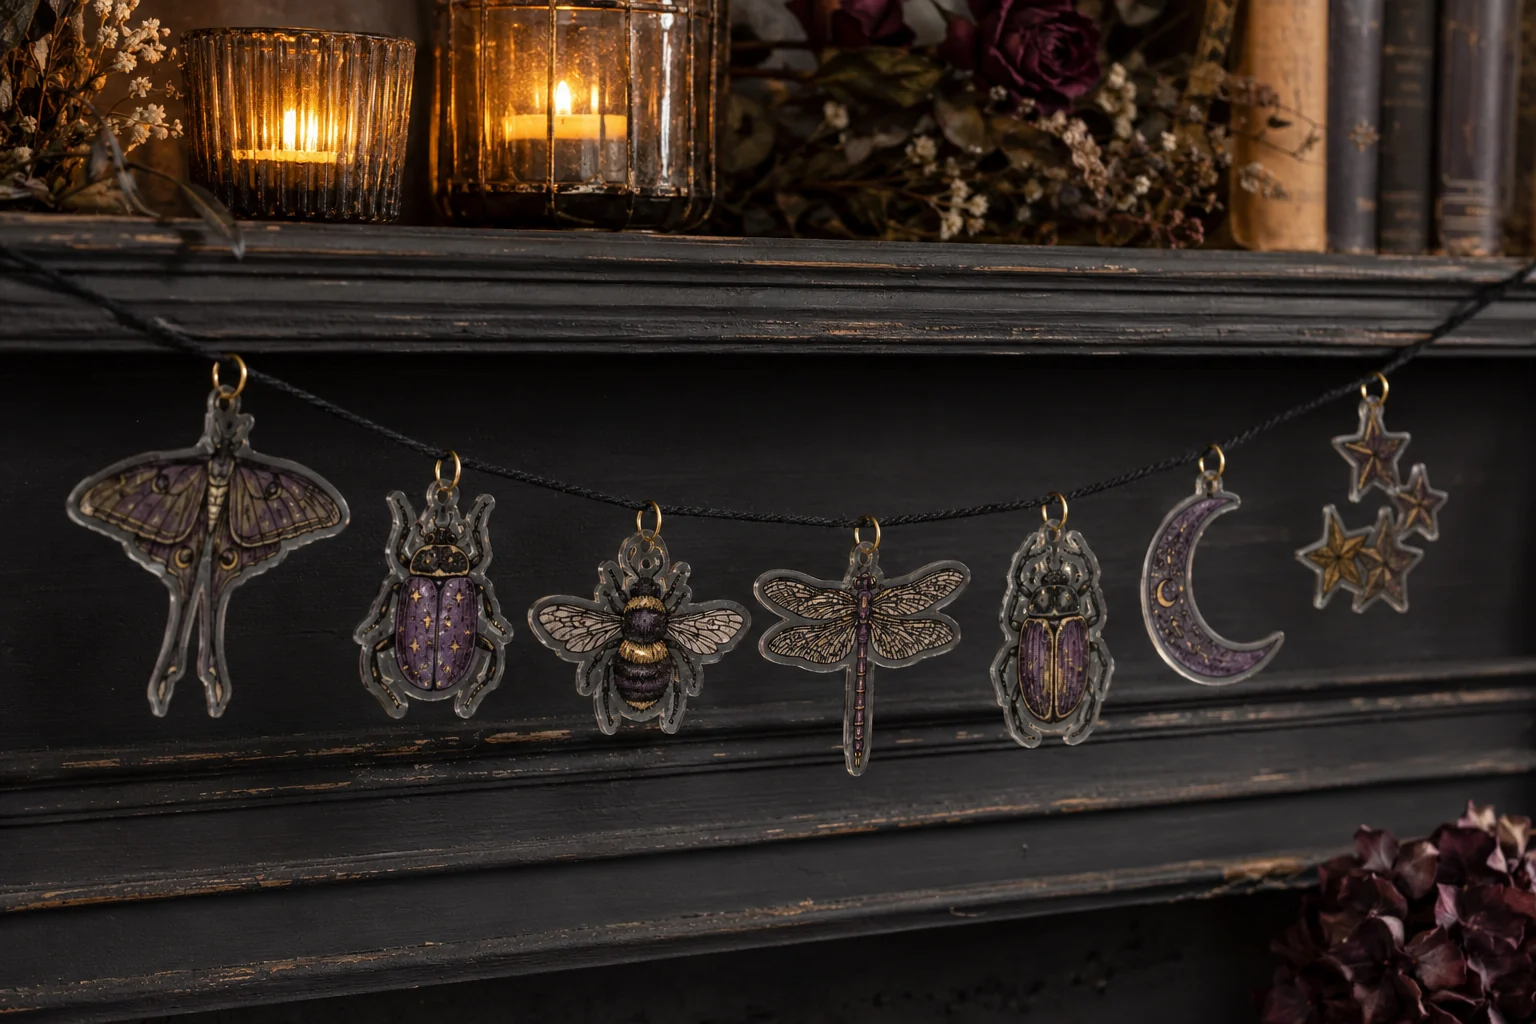
Shrink plastic turns detailed celestial insects into small, sturdy charms that catch a little light without becoming heavy. This garland uses seven coordinated motifs—a luna moth, beetle, bee, dragonfly, scarab, crescent moon, and star cluster—printed large, cut with a simple border, shrunk according to the film maker’s directions, and joined to black cord with closed jump rings.
This is an original project plan based on manufacturer-described inkjet shrink-film and Print Then Cut methods. Shrink percentage, printer ink, sheet coating, oven accuracy, cutting-machine clearance, sensor performance, hole size, and finished color vary significantly. Make the calibration square and one complete sample before committing the remaining sheets, follow the current directions packaged with the exact film, printer, cutting machine, oven, punch, and hardware, and hand-cut whenever the film or machine maker does not approve machine cutting. This specific combination has not been represented as physically tested.
What you’ll need
- 20 Celestial Insect SVG Bundle from the featured KleanKutChaos listing
- Inkjet-printable shrink film compatible with the home printer; do not substitute regular plastic sheets
- Home inkjet printer using ink and settings permitted by the film maker
- Cricut-, Silhouette-, or similar machine that supports Print Then Cut or Print & Cut on the exact film thickness, or sharp detail scissors for hand cutting
- Cutting mat and blade recommended for the chosen film and machine
- Plain printer paper for layout proofs and registration tests
- Ruler, fine-tip permanent marker, and a one-hole punch appropriate for shrink film
- Parchment paper, flat metal baking sheet, and any flattening sheet or weight specifically permitted by the film maker
- Oven thermometer for checking actual temperature
- Heat-resistant gloves, metal spatula, and a heat-safe cooling surface
- Seven small metal jump rings plus two larger end rings
- Two pairs of smooth-jaw jewelry pliers
- Black cotton cord or narrow ribbon long enough for the display area
- Removable painter’s tape for planning charm spacing
- Optional permanent markers approved for the film, in muted plum or antique-gold tones
How to make it
- 1
Choose a safe display span
Measure the mantel, shelf, or wall area and plan a loose garland about 30 to 42 inches long. Mark seven charm positions on the cord with removable tape, leaving enough space that finished pieces cannot strike one another. Keep the planned display well away from fireplaces, stovetops, candles, heaters, humidifiers, and reach paths used by children or pets.
- 2
Print a shrink-ratio test
On a small piece of the exact film, print or draw a two-inch square and a one-inch circle, then add a punched hole using the tool planned for the charms. Bake only this test according to the package directions. After it cools, measure the square and hole. Divide the cooled width by two inches to get the actual shrink ratio for this film, printer, and oven.
- 3
Calculate the working size
Choose a finished charm width that suits the measured ratio, usually around one to one-and-a-half inches for a light garland. Divide the desired finished width by the test ratio to find the size to print. For example, if the test finishes at 0.4 of its original width, a 1.25-inch charm begins near 3.125 inches. Use your measured number, not a generic package estimate.
- 4
Prepare seven printable motifs
Import the PNG files and choose one luna moth, beetle, bee, dragonfly, scarab, crescent moon, and star accent. Keep their proportions locked and arrange them at the calculated pre-shrink sizes. Add a simple offset border around detailed wings, legs, and antennae so the cut path does not trace every narrow line. Include a broad top tab for the hanging hole rather than punching through a fragile wing.
- 5
Proof on ordinary paper
Print the complete layout on plain paper at actual size. Cut out the paper shapes, punch the planned holes, and place them along the taped cord. Check that the motifs have varied silhouettes, the borders do not hide important art, and the largest pre-shrink pieces fit within the film and the software’s printable cut area.
- 6
Calibrate the print-and-cut system
Run the cutting machine’s current Print Then Cut or Print & Cut calibration on plain paper before loading expensive film. In the project layout, keep every design, offset, and cut line outside registration-mark exclusion zones. If the film is transparent, glossy, too thick, or otherwise unsupported by the sensor or machine, print it without machine-cut registration and hand-cut the approved film instead.
- 7
Print one sample charm
Confirm which side of the film accepts ink, load a single sheet exactly as its maker directs, and select the permitted printer type and quality. Never use a laser printer unless the film is specifically labeled for it. Print one full-size moth or beetle sample first, allow the ink to dry for the stated time, and inspect fine black lines for smearing, banding, or puddling.
- 8
Cut with a forgiving border
For machine cutting, place the dry printed film on the approved mat in the same orientation shown on screen, choose the closest manufacturer-supported material setting, and perform a small test cut in unused margin. Use multiple passes only when both machine and film guidance allow. For hand cutting, follow the smooth offset border rather than trimming around individual legs or antennae.
- 9
Punch every hanging hole before baking
Punch the top tab on the sample before it enters the oven. The hole shrinks along with the charm, so compare its cooled result with the selected jump ring. If the ring cannot move freely, enlarge the pre-bake hole on the next test rather than drilling the finished plastic. Keep the hole centered with enough material around it to resist splitting.
- 10
Bake and flatten the complete sample
Preheat the oven to the film maker’s specified temperature and verify it with the oven thermometer. Arrange the sample on a parchment-lined metal sheet in the orientation directed by the package. Expect curling during shrinking; wait for the maker-described flattening stage, then remove and flatten only with the permitted method while wearing heat-resistant gloves.
- 11
Approve the sample before batching
Let the piece cool fully, then check its final size, color density, flatness, edge smoothness, hole clearance, and resistance to gentle handling. Adjust the source scale, border, ink density, punch size, bake time, or permitted flattening method now. Do not print and bake the other six until one complete charm meets the project requirements.
- 12
Produce the remaining charms
Print, dry, cut, punch, and bake the remaining six designs using the approved sample settings. Work in small batches that can lie without touching on the baking sheet. Record the printer setting, source width, cut setting, oven temperature, and time so a replacement charm can be made later without repeating the full calibration.
- 13
Assemble closed jump-ring loops
Use two pliers to twist each jump ring sideways, slip it through a cooled charm, and twist it closed until the cut ends meet flush. Do not pull the ring ends apart vertically because that weakens the round shape. Tie or loop each ring onto the marked cord positions, then add larger end rings or secure hanging loops at both ends.
- 14
Hang, balance, and inspect
Mount the garland on hardware rated for the surface and its complete weight. Step back and adjust spacing so the larger moth and scarab anchor opposite sides while smaller pieces fill the center. Confirm that no charm rests against a heat source, real candle, wet greenery, or abrasive surface, then remove the temporary spacing tape.
Practical finishing tips
- Print the celestial art in rich black but avoid automatic photo enhancement that can fill intentional white openings in wings, eyes, and stars.
- Use a larger smooth border around antennae and legs; the printed line still shows the detail while the physical edge remains durable.
- Arrange mirrored or visually heavy insects on opposite halves of the garland so the collection looks balanced rather than crowded at one end.
- Keep a cooled calibration square and note its source measurement on the storage envelope; it becomes the most reliable scale reference for future charms.
- If adding color, use only markers approved by the film maker and apply restrained accents before baking unless the product instructions specify another sequence.
Troubleshooting
Stop before using another film sheet. Recalibrate on plain paper, verify that the material matches the software page orientation, keep artwork clear of registration exclusion zones, and improve sensor visibility as the machine maker recommends. Hand-cut if the exact film surface is not reliably supported.
Curling is a normal stage for many shrink films. Continue only for the time and method stated by the maker; if edges touch, use the maker-approved tool and protection to separate them, then return the piece to finish shrinking. Do not touch hot plastic with bare hands.
Use the measured test-square ratio in the formula rather than the package’s general estimate. Recalculate the source width from the desired final width and print one new sample before rebuilding the set.
Increase the pre-bake punch size based on the cooled test, widen the top tab, and keep the hole farther from the edge. Do not force a jump ring through or drill a brittle finished piece; remake it with adequate surrounding material.
Confirm that the printable side was used, the printer and ink type are compatible, and the selected quality does not oversaturate the coating. Reduce automatic color adjustments, let ink dry fully, and test a single motif before changing all sheets.
Use round jump rings that move freely through the cooled holes, close each ring flush, and tie charms at evenly spaced points. A slightly heavier center charm can steady the drape, but do not add weights that strain the plastic tab.
Ways to make it yours
Keep every insect black and assign one restrained accent to each charm, moving from smoky silver through plum to muted gold across the garland.
Make three larger charms instead of seven small ones and hang each from a labeled drawer pull or display hook, leaving text on separate paper tags so it remains readable.
Attach individual cooled charms to reusable fabric gift ties, making the hanging tab wide enough for repeated use and keeping them away from very young recipients.
Skip sensor cutting entirely, print each motif with a smooth pale offset border, and cut it by hand with detail scissors before punching and baking according to the film maker’s directions.
Keep crafting
- DIY Haunted Houseplant Canvas Pot Covers With Heat-Transfer Vinyl — Give three ordinary nursery pots a gothic makeover with washable canvas covers, crisp haunted-botanical HTV, and a plant-safe double-container setup.
- DIY Gothic Apothecary Drawer Labels With Removable Vinyl — Turn a plain mini-drawer cabinet into functional gothic storage with nine ornate frame decals, readable center labels, and a reusable placement jig.
- DIY Gothic Rose Window Mirror With Vinyl — Turn a thrifted mirror into a cathedral-inspired rose window with black vinyl, an antique-gold frame, and a clean reflective center.
Inspiration & further reading
This is an original Klean Kut Halloween Crafts project inspired by approachable techniques shared across trusted craft and home sources. Explore Grafix Shrink Film product guide, Grafix Shrink Film FAQ, Cricut Print Then Cut guide, Cricut Print Then Cut calibration guide and Silhouette Print & Cut registration guidance for more ideas and technique background.