
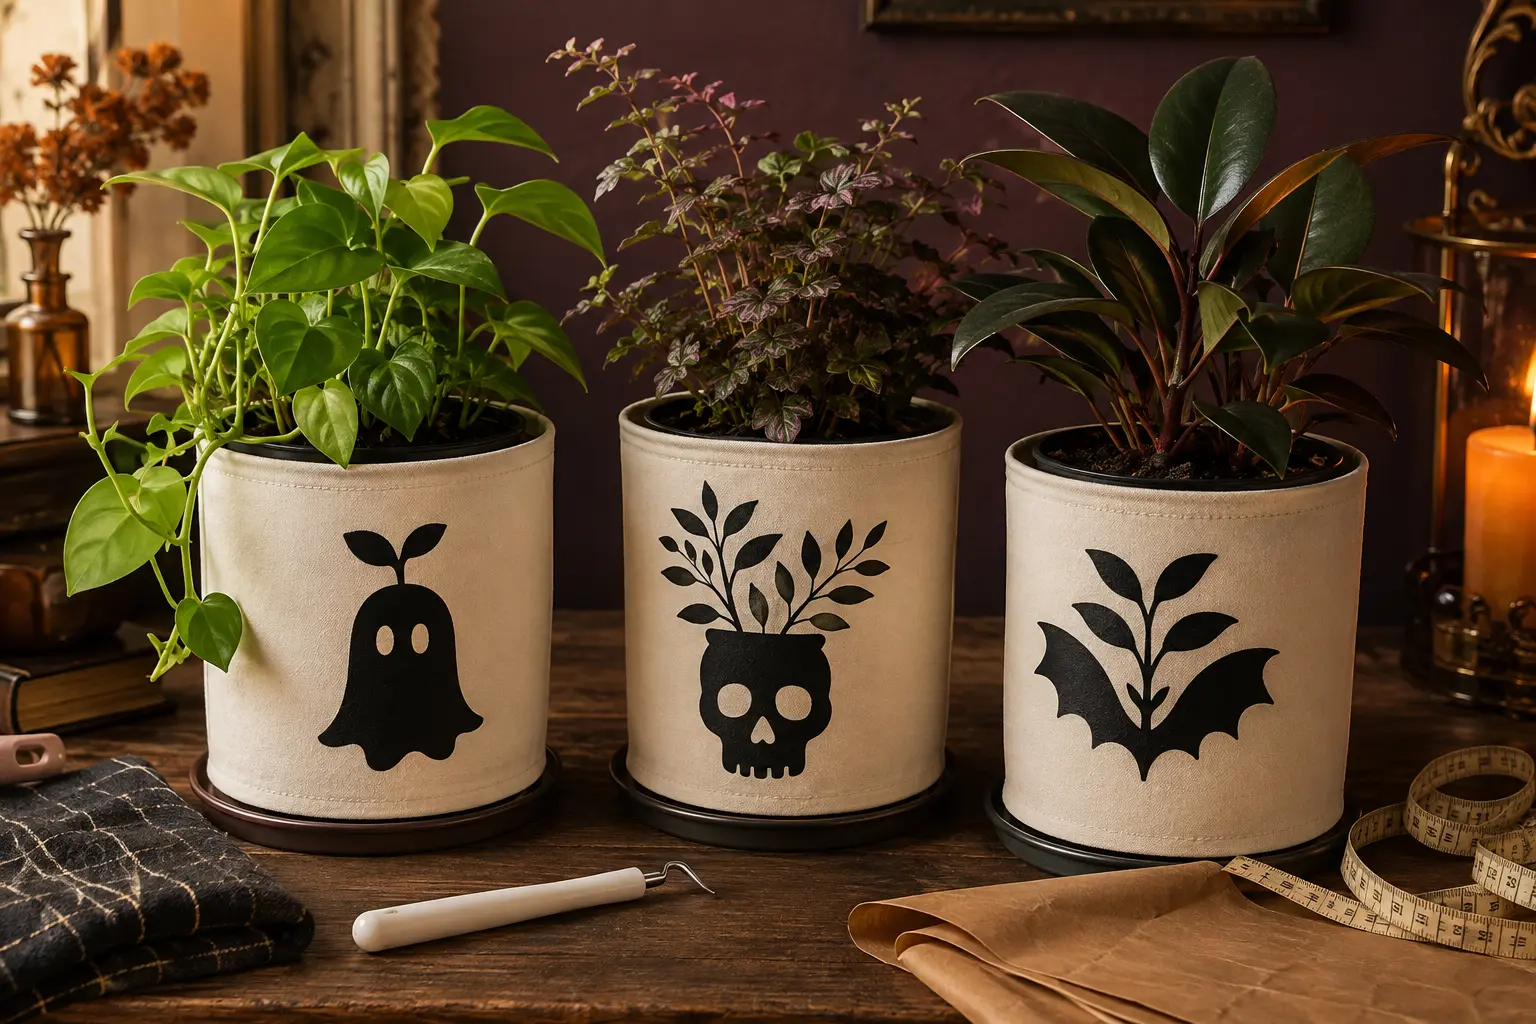
A fabric cachepot gives a plain nursery pot a finished look without interfering with the plant’s drainage. This set uses three bold haunted-houseplant designs—such as a ghost sprout, skull planter, and bat-wing foliage—to make a coordinated gothic plant shelf. The vinyl goes only on the removable canvas cover; the living plant stays inside its original draining pot and a rigid waterproof saucer.
This is an original project plan based on standard heat-transfer-vinyl application and the accepted cachepot method of placing a draining nursery pot inside a decorative outer cover. Canvas fiber, coatings, seams, HTV adhesive, blade condition, press model, plant size, and pot drainage vary. Treat the measurements as planning guidance, test the exact blank and HTV before committing to the set, and follow the current instructions supplied with the cutting machine, vinyl, heat press, canvas cover, saucer, and plant. This specific material combination has not been represented as physically tested.
What you’ll need
- 20 Haunted Houseplants SVG Bundle from the featured KleanKutChaos listing
- Three removable cotton-canvas cachepot covers or sturdy fabric baskets sized for the chosen nursery pots
- Three healthy plants kept in their original rigid pots with unobstructed drainage holes
- Three waterproof rigid saucers or liners that fit completely inside the canvas covers
- Smooth black heat-transfer vinyl approved for the canvas fiber content
- Cricut-, Silhouette-, or similar cutting machine with the blade and mat recommended for the HTV
- Heat press or household iron permitted by the HTV and blank makers
- Firm heat-safe pressing surface and a pressing mat
- Pressing pillow, folded towel, or rigid heat-safe insert sized to create a flat panel inside the empty cover
- Weeding tool, fine tweezers, ruler, flexible tape measure, and heat-resistant tape if the HTV maker permits it
- Protective pressing sheet or parchment only when recommended for the chosen HTV and press
- Plain paper for full-size layout templates and a scrap of comparable canvas for testing
- Lint roller, clean dry cloth, and low-tack painter’s tape
How to make it
- 1
Build a dry double-container system
Choose nursery pots with working drainage holes, then pair each with a rigid waterproof saucer that fits inside—not beneath—the fabric cover. Slip the empty pot and saucer into the blank cachepot to confirm that the canvas stays dry, the pot sits level, and the cover can be removed easily. Do not plant directly in fabric or rely on the fabric as a waterproof liner.
- 2
Measure the true decorating panel
Remove the plants, pots, and saucers before crafting. Flatten one empty cover and measure the uninterrupted front panel between side seams, base stitching, handles, folds, and the top hem. Use the smallest safe panel across all three covers as the maximum design area so the trio can share a consistent scale.
- 3
Choose three bold haunted plants
Import the bundle and select designs with sturdy silhouettes that remain readable on woven canvas. A ghost sprout, skull planter, and bat-wing foliage motif make a balanced set because their outer shapes differ while the black botanical style repeats. Avoid hairline roots, isolated dots, or tiny web strands that become difficult to cut and press at the chosen size.
- 4
Size and rehearse on paper
Keep each design’s proportions locked and size it to leave at least three-quarter inch between the art and every seam or curved edge. Print or cut full-size paper templates, tape them to the empty covers, and view the set from several feet away. Raise a wide design slightly if the visual center appears low, then record the final width and centerline for each blank.
- 5
Prepare the canvas correctly
Check the blank’s fiber content, coating, and care label. If the maker permits washing, prewash without fabric softener and dry completely to reduce later shrinkage; otherwise follow its preparation directions exactly. Remove lint and loose fibers. Never apply heat to damp fabric, a water-resistant coating not approved for pressing, or an assembled cover containing a plant, pot, or saucer.
- 6
Mirror and test-cut the HTV
Mirror every design before cutting. Place ordinary HTV shiny liner side down on the grip surface specified by its maker, then cut one small test shape with the recommended material setting. Weed it and check for clean leaf points, open ghost details, and intact interior bridges before cutting the three full designs.
- 7
Weed from large spaces to details
Remove the broad background vinyl first while the carrier remains supported on a flat surface. Work slowly around spiderwebs, leaf gaps, and narrow stems, holding adjacent pieces down with tweezers rather than stretching them. Compare the weeded design with its paper template before discarding scraps so no intentional eye, leaf, or planter opening is missing.
- 8
Create a firm, flat pressing area
Slide a pressing pillow, folded towel, or other maker-approved heat-safe form inside the empty cover. The front panel should lie flat and slightly proud of seams, hems, and handles so the press contacts the complete design evenly. Mark the panel center with short pieces of painter’s tape outside the heated area, then align the carrier with the paper-template measurements.
- 9
Test heat in a hidden spot
Apply the small HTV test shape to an inconspicuous area or matching canvas scrap using the exact time, temperature, pressure, peel, and protection instructions for that HTV, blank, and press. Let it cool as directed, then check for scorching, shine, dye change, adhesive bleed, coating damage, or weak bonding. Stop and choose a compatible material if the test fails.
- 10
Press one design at a time
Preheat only if the material guidance calls for it. Center the first weeded design with the shiny carrier facing up and secure it only with approved heat-resistant tape when necessary. Press on a stable waist-high surface using the maker’s current settings; for a design larger than the heat plate, divide it into planned zones without sliding the hot press or reheating completed areas excessively.
- 11
Peel, inspect, and finish the trio
Remove the carrier at the temperature specified for the vinyl—warm and cool peels are not interchangeable. If an edge lifts, replace the carrier or protective sheet and re-press only as the HTV maker directs. Repeat the same centerline and margin method on the other covers, then let all three rest for the full recommended period before cleaning or handling heavily.
- 12
Reassemble without trapping water
Return each rigid saucer and draining nursery pot only after the covers are cool and settled. For watering, lift the nursery pot out, water it over a sink or waterproof tray, let excess moisture drain, wipe the saucer and pot exterior dry, and then return them to the canvas cover. Inspect the fabric, liner, and shelf regularly for condensation or leaks.
Practical finishing tips
- Choose three covers from the same manufacturer and fiber lot; matching color and weave make identical black vinyl look more cohesive.
- Use one shared design width when the covers match, but align by visual center rather than the file’s bounding box if leaves lean to one side.
- Keep the lower edge of each motif above the saucer rim so accidental condensation is less likely to reach the vinyl application area.
- Photograph each paper-template placement with a ruler in frame; the image becomes a fast alignment reference for replacement covers later.
- If the canvas is heavily textured, choose the bundle’s broadest silhouettes instead of stacking extra pressure or heat onto fragile details.
Troubleshooting
The surface may be damp, coated, too textured, or outside the HTV’s compatible fiber range; pressure or heat may also be incorrect. Stop, verify both makers’ guidance, build a flatter pressing surface, and repeat a small hidden test rather than increasing temperature blindly.
Lay the carrier or approved protective sheet back down and re-press only for the maker’s stated correction time. If the detail still lifts, the cut may be too fine for the canvas weave; recut a slightly larger or bolder botanical rather than sealing it with an unrelated adhesive.
Flatten the empty cover with a firm insert and mark both vertical and horizontal centerlines before pressing. Judge the art while the cover contains a dry empty pot because soft fabric can look centered when flat but shift when rounded.
The seam is holding the heat plate above the vinyl. Reposition the internal pressing form so the design area rises above the seam, or reduce and move the design inward. Do not compensate with prolonged heat across the entire blank.
Remove the plant immediately, dry every component, and inspect the rigid saucer and nursery pot for overflow, cracks, or blocked drainage. Water and drain the plant outside the cover from then on; replace the cover if moisture has damaged the canvas or HTV.
Ways to make it yours
Use identical cream covers and black vinyl, then choose three botanical silhouettes with different heights for a museum-like haunted herbarium display.
Use plum HTV for foliage and a small compatible copper layer for sturdy planter details, following the vinyl maker’s approved layering order and press limits.
Apply one hanging haunted botanical to a handled canvas basket only when its handles and seams can remain fully outside the pressing area and the finished support is rated for the pot’s weight.
For coated or heat-sensitive covers, mount the haunted designs on separate cardstock or washable-fabric tags and tie them loosely to the cover instead of forcing an incompatible HTV application.
Keep crafting
- DIY Gothic Apothecary Drawer Labels With Removable Vinyl — Turn a plain mini-drawer cabinet into functional gothic storage with nine ornate frame decals, readable center labels, and a reusable placement jig.
- DIY Gothic Rose Window Mirror With Vinyl — Turn a thrifted mirror into a cathedral-inspired rose window with black vinyl, an antique-gold frame, and a clean reflective center.
- DIY Cute Bat Magnetic Bookmarks for Halloween Reading — Turn six playful bat cut files into slim magnetic bookmarks with hidden paired magnets, reinforced paper hinges, and book-friendly rounded edges.
Inspiration & further reading
This is an original Klean Kut Halloween Crafts project inspired by approachable techniques shared across trusted craft and home sources. Explore Cricut Value Iron-On Instructions, Cricut Everyday Iron-On guide, Penn State Extension guide to repotting and cachepots and ASPCA toxic and non-toxic plant directory for more ideas and technique background.