
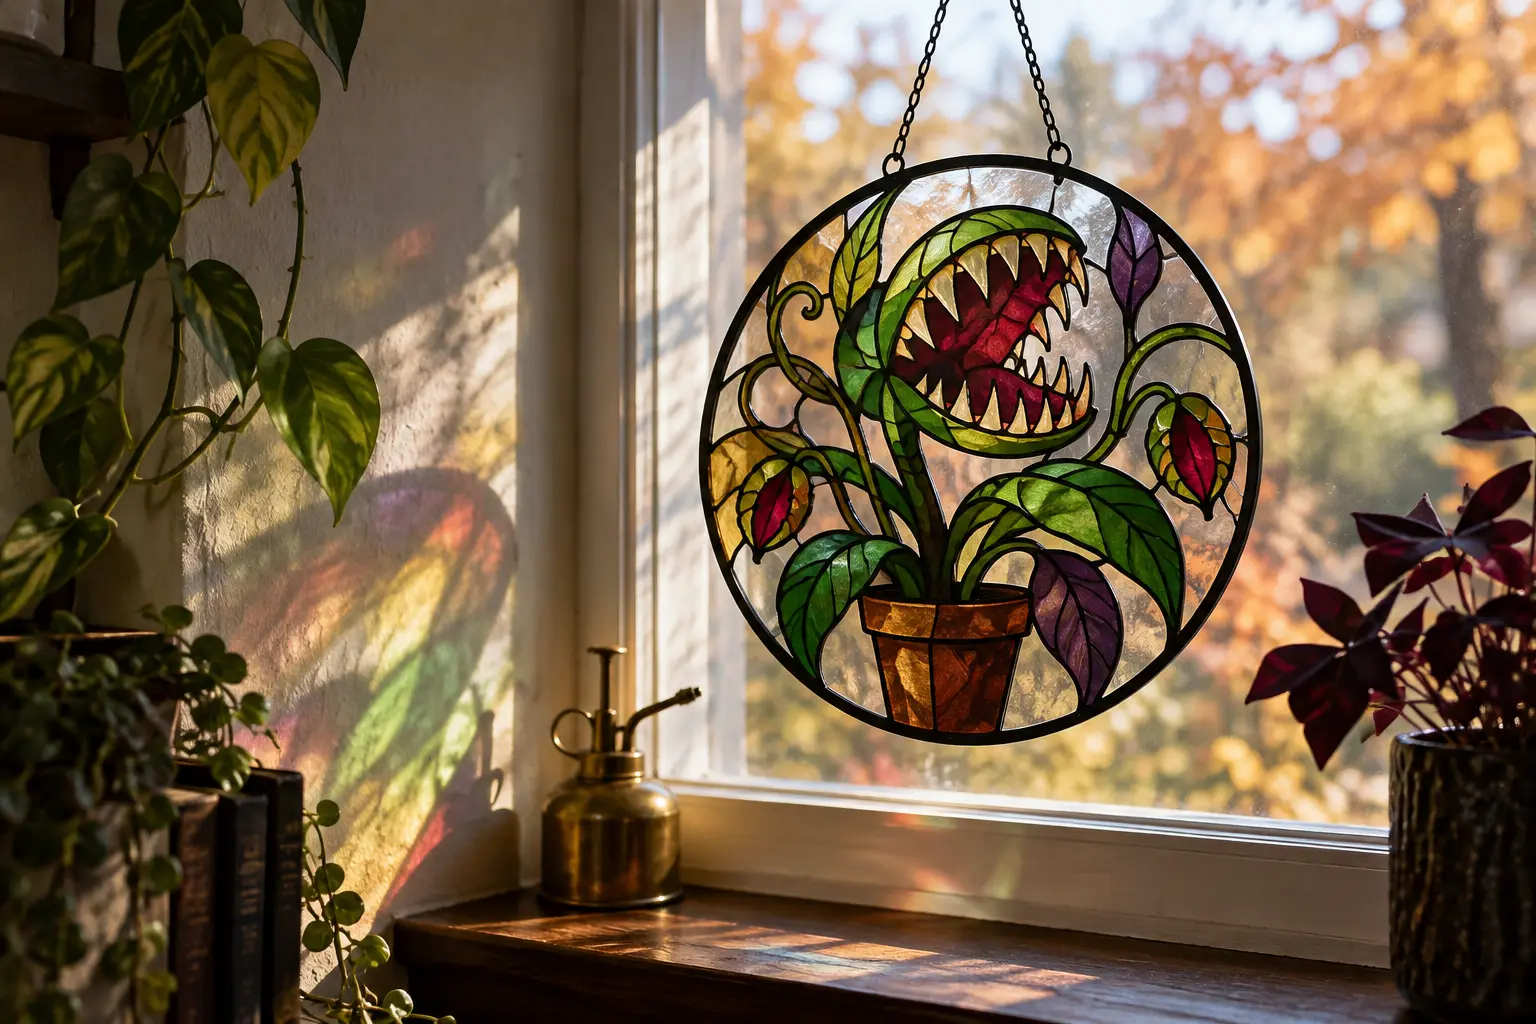
This window project turns a bold potted monster-plant silhouette into a luminous, flat piece of Halloween décor. Transparent emerald, plum, ruby, amber, and smoke-colored film creates the glass effect; narrow matte-black vinyl strips define the leaves, pot, and open mouth. Everything is applied to one factory-finished acrylic circle, so the project catches daylight without the weight, sharp edges, solder, or lead used in traditional stained glass.
This is an original project plan based on common adhesive-vinyl layering and acrylic-sign methods. Acrylic type and thickness, factory edge quality, hole placement, film opacity, adhesive chemistry, temperature, sunlight, blade condition, mat grip, transfer tape, layer order, mounting hardware, and window orientation all affect the result. Make the complete paper proof and exact-material test tile, and follow the current directions from the acrylic, transparent-film, opaque-vinyl, cutting-machine, blade, mat, transfer-tape, chain, and hook makers. The featured KleanKutChaos artwork supplies the decorative potted-plant image; it does not include the round panel, color map, black leading, or hanging system described here. This exact material combination has not been represented as physically tested.
What you’ll need
- Audrey II Potted Plant SVG from the featured KleanKutChaos listing
- One factory-cut clear acrylic circle, 8 to 10 inches wide and about 1/8 inch thick, with smooth finished edges and a factory-drilled hanging hole
- Transparent adhesive craft vinyl or stained-glass-effect film in emerald, olive, plum, ruby, amber, and smoke
- Matte black permanent adhesive vinyl for the border and faux leading
- Cricut-, Silhouette-, or similar cutting machine with a clean fine-point blade
- Cutting mats and settings approved for each chosen vinyl or film
- Standard or low-tack transfer tape matched to the black vinyl
- Printer, copy paper, pencil, fine-tip marker, ruler, and low-tack painter's tape
- Weeding tool, fine tweezers, scraper, brayer, and small sharp craft scissors
- Lint-free cloths and acrylic-safe cleaner approved by the blank maker
- Parchment or clean release liner for staging the cut pieces
- Two small smooth split rings or closed jump rings rated for more than the finished weight
- Short lightweight black display chain with secure closed links
- A manufacturer-rated indoor wall or window-trim hook installed into a suitable structure
- Kitchen scale, measuring tape, step stool with a second adult, and eye protection
- Optional removable frosted film for a few background cells, if compatible with the acrylic
How to make it
- 1
Choose the window and mounting point first
Pick an indoor window that is not an emergency exit, fire-escape route, frequently opened sash, door, shower area, cooking zone, or place above a bed or seat. The finished circle must remain clear of blinds, cords, locks, glass edges, HVAC vents, pets, children, and direct contact with the pane. Identify a solid trim or wall mounting point and verify the hook, substrate, chain, and connectors are each rated comfortably above the expected weight.
- 2
Inspect and measure the acrylic blank
Leave the protective film on while checking both faces, the finished edge, and the factory-drilled hole. Reject a blank with chips, cracks, sharp edges, clouding, or a hole too close to the rim. Trace the exact circle and hole onto paper, then mark a half-inch no-vinyl zone around the hole and a quarter-inch visual margin inside the outer edge.
- 3
Simplify the potted-plant artwork
Import a duplicate of the SVG and preserve the original file. Keep the toothy flower, broad leaves, curling stems, and pot silhouette, but remove hairline veins, tiny spots, narrow gaps, and loose islands. Break the art into enclosed color cells large enough to cut and place by hand. Redraw teeth with rounded tips and leave deliberate black space between the mouth and surrounding leaves.
- 4
Build a practical color map
Place the simplified art inside the measured circle and assign one transparent color to each closed cell. Limit adjacent cells of the same color so the black leading remains visible. Create a separate top layer containing a broad outer ring, the plant outline, pot divisions, leaf veins, and mouth details. Keep every line thick enough for the chosen vinyl and finished size.
- 5
Make a full-size paper light test
Print the color map at 100 percent and cut out the outer circle. Tape colored tissue or marker-filled tracing paper behind the cells, then hold the proof near the intended window without climbing or attaching it to glass. View it from several room positions in daylight and after dark. Enlarge weak details and move the plant away from the hanging hole before cutting vinyl.
- 6
Cut a complete material test tile
On a small acrylic offcut or inconspicuous corner of a matching blank, apply one transparent color, one overlapping black line, a tight inside curve, and a narrow gap. Use the material makers' recommended cut and application methods. Let the sample rest for the stated time, then check for haze, bubbles, adhesive reaction, lifting, color loss, scratches, and difficult removal of transfer tape.
- 7
Cut and label the transparent cells
Cut one color family at a time using a tested setting and mat. The transparent shapes are not mirrored when applied to the viewing face. Weed the surrounding film while each cell remains on its liner, then label the liner with its color and map number. Store the pieces flat on clean release liner so dust cannot reach the adhesive.
- 8
Cut the black leading as sections
Divide the black layer into the outer ring, plant-and-pot outline, and two or three interior detail groups. Add temporary registration tabs outside the final art only when they can be removed cleanly. Test-cut the narrowest line before running the full sheets, weed slowly from broad negative spaces toward small counters, and discard any line that stretches or develops a ragged edge.
- 9
Clean and stabilize the panel
Set the acrylic flat on a lint-free towel with the protective film still on the reverse. Remove the film from the decorating face only, then clean that face exactly as the acrylic maker directs; household glass cleaners, ammonia, abrasives, paper towels, and strong solvents can damage some plastics. Let the blank dry completely and tape the paper color map beneath it as an alignment guide.
- 10
Apply the color cells from the center out
Position the mouth or central flower cell first. Peel only a small part of its liner, anchor one edge, and lower the film gradually while smoothing with a felt-edged scraper or wrapped card. Add neighboring cells with a tiny intentional gap for the black leading rather than overlapping edges. Work outward symmetrically and lift only an unbonded edge; stretched film should be recut.
- 11
Add the black outline and border
Apply the main plant outline over the color-cell gaps with transfer tape matched to the black vinyl. Burnish from the center outward and peel the tape back at an acute angle. Add interior veins and pot divisions next, then the outer ring last so it visually unifies the composition. Trim no vinyl with a blade while it is on the acrylic; remove and recut any section that crosses the rim or hanging-hole margin.
- 12
Settle and inspect every edge
Lay the panel flat for the vinyl maker's stated dwell time. Examine it against white paper and transmitted daylight, checking every tooth, vine, cell edge, and leading intersection. Press only with a clean approved tool and do not add heat, flame, resin, sealant, or an unapproved clear coat. Remove the reverse protective film only after the decorated face passes inspection.
- 13
Assemble the lightweight hanger
Weigh the finished panel. Connect the factory hole to the short chain using smooth, fully closed rings that fit without forcing the acrylic, then hang the assembly from the rated hook with a second adult stabilizing the step stool. Never drill the finished blank, hang it from a suction cup, attach hardware to the glass, or place chain load on a sash, latch, blind bracket, or curtain hardware unless its maker specifically rates that use.
- 14
Complete daylight and movement checks
Observe the suncatcher for a full day before leaving it displayed. Confirm it does not touch the window, swing into the wall, cast distracting glare into a walkway, soften in heat, or pull the hook loose. Open and close nearby doors and permitted window parts gently while another adult watches. Remove the piece immediately if the chain, rings, hook, acrylic, or vinyl show movement, heat damage, cracks, lifting, or unusual odor.
Practical finishing tips
- Use large transparent cells and let the black outline provide detail. Tiny color slivers are hard to align and contribute little when backlit.
- Keep the paper color map taped behind the clear blank until every transparent cell is placed, then remove it before applying the outer border.
- Use a matte black vinyl for the leading. Its low reflection makes the transparent colors read more like stained glass in bright daylight.
- Apply transparent film dry only when its maker allows it. Some products recommend wet application for larger graphics, so follow the exact film rather than a universal method.
- Photograph the finished piece against white paper before hanging it. The image becomes a useful placement and repair reference if a cell ever lifts.
- Dust with a soft dry microfiber cloth and support the acrylic with the other hand. Do not scrape, soak, bend, or polish across the vinyl edges.
Troubleshooting
Stop before adding the black outline. If the maker permits, lift only the nearest unbonded edge and reapply slowly; otherwise replace the cell. Do not puncture bubbles with a needle or heat the acrylic unless the material makers explicitly approve that repair.
Burnish the vinyl backing again, turn the sheet face down, and peel the liner away from the vinyl. After placement, peel the transfer tape back at an acute angle. If the line still stretches, use lower-tack compatible tape or recut a wider line.
Decide whether the gap reads as intentional clear glass. For a distracting opening, cut a slightly larger replacement cell and apply it before replacing that section of leading. Do not patch with tiny loose slivers that may lift.
Too many dark overlapping colors or overly dense black lines may be blocking light. Remove one test section only if the vinyl maker permits clean removal, then substitute a lighter transparent cell or wider clear space. Simplify the next cut rather than stacking more film.
Take it down and place it flat. Confirm the hole is centered, both connectors are fully closed, and the decorative weight is balanced. Shorten or reposition the approved connector arrangement; never add dangling counterweights or drill a second hole into the finished blank.
Remove the suncatcher from service. Clean only as the acrylic and vinyl makers allow, replace the entire affected cell or line, and repeat the dwell test. Edge lifting can indicate contamination, incompatible materials, temperature stress, or insufficient settling time.
Ways to make it yours
Use smoke, pale violet, and clear frosted film with black leading for a quieter gothic window that still glows in daylight.
Scale the simplified plant to a small rectangular acrylic blank and display it on a stable tabletop easel rather than hanging it.
Trace the approved paper cells onto transparent film and cut broad, simple shapes by hand with craft scissors; use straight black vinyl strips for leading.
Make a second independent acrylic circle with a winter botanical design and swap the entire panel on the same rated hanger instead of layering artwork on both faces.
Keep crafting
- DIY Carnivorous Plant Halloween Fascinator With Felt and HTV — Turn felt, soft foam, and small HTV accents into a compact carnivorous-plant fascinator that stays above the brow and adds theatrical bite to a Halloween outfit.
- DIY Carnivorous Plant Pop-Up Halloween Card With Cricut or Silhouette — Build a dimensional carnivorous-plant card that opens into a tiny haunted flower shop, then folds flat for an envelope with measured tabs, clean score lines, and sturdy paper layers.
- DIY Gothic Rose Window Mirror With Vinyl — Turn a thrifted mirror into a cathedral-inspired rose window with black vinyl, an antique-gold frame, and a clean reflective center.
Inspiration & further reading
This is an original Klean Kut Halloween Crafts project inspired by approachable techniques shared across trusted craft and home sources. Explore Cricut vinyl cutting and application guide, Cricut transfer tape instructions, ORAFOL ORACAL 8300 transparent craft vinyl and ORAFOL ORACAL 651 opaque craft vinyl for more ideas and technique background.