
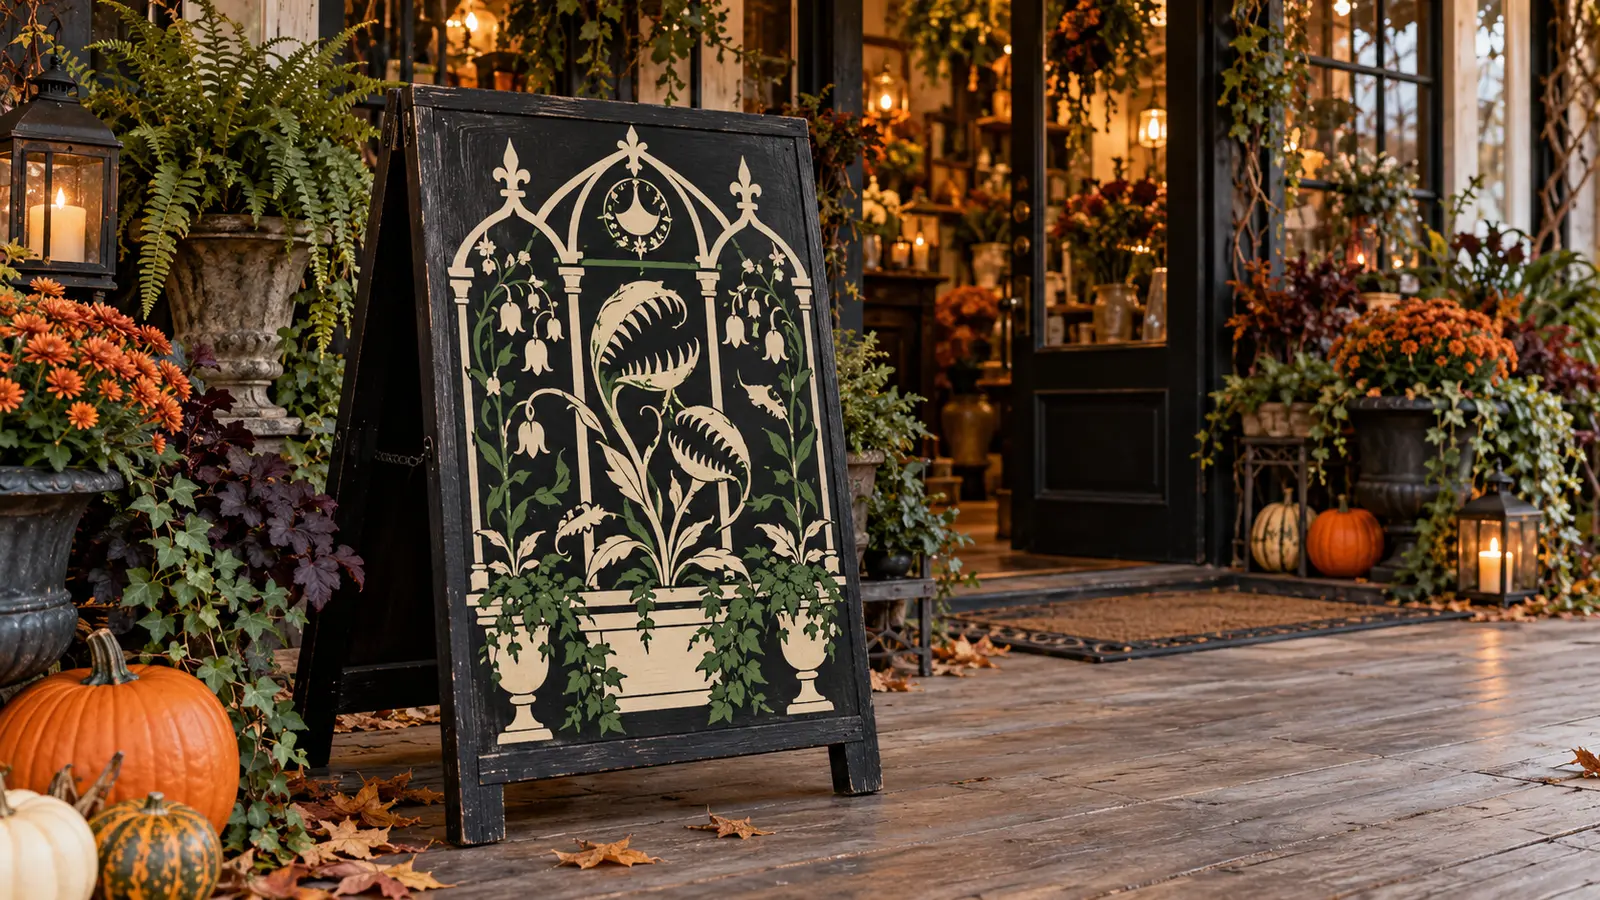
An A-frame sign gives a front porch the atmosphere of a tiny after-hours flower shop, but the structure should stay as dependable as the decoration is dramatic. This project begins with a commercially made sign in sound condition and keeps all paint and stencil work on one broad face, well away from hinges, chains, feet, edges, and hardware. The finished piece is a reusable covered-porch display with an oversized carnivorous bloom, a gothic storefront frame, and enough open space to read clearly from the sidewalk.
This is an original project plan based on common stencil-film and decorative-paint methods. Wood species, factory finish, surface coating, stencil adhesive, paint chemistry, brush or sponge loading, weather, humidity, temperature, and cure time can all change the result. Test the exact sign, stencil material, paint, primer, and sealer together; follow the current instructions from every sign, paint, stencil, cutter, blade, mat, and coating maker; and edit only a duplicate working copy of the purchased artwork. The featured KleanKutChaos listing supplies the flower-shop scene artwork, while the featured KleanKutChaos file is the design source for this tutorial. This tutorial does not claim that the pictured combination was physically tested with the listing files.
What you’ll need
- Little Shop of Horrors Flower Shop Scene SVG from the featured KleanKutChaos listing
- One sturdy commercially made wooden A-frame sign with intact hinges, feet, chain or spread limiter, and maker-approved paintable faces
- Water-based bonding primer approved for the sign finish, only if the paint maker requires it
- Opaque water-based craft, furniture, or exterior paint compatible with the sign and intended display conditions
- Optional compatible clear topcoat approved over the selected paint; a topcoat does not make an indoor sign weatherproof
- Cricut-, Silhouette-, or similar cutting machine with the blade and mat specified for the stencil material
- Removable stencil film or stencil vinyl approved for the sign surface and paint system
- Transfer tape matched to the stencil film, if the stencil maker calls for it
- Low-tack painter’s tape, kraft paper, and a full-size paper placement template
- Cutting-machine software and a duplicate working copy of the purchased artwork
- Dense stencil brush or cosmetic-style wedge sponges; use a separate applicator for each color
- Lint-free cloths and the sign maker’s approved cleaner
- Ruler, square, pencil or removable surface-safe marker, and a small level
- Weeding tool, scraper or burnisher, tweezers, scissors, and bright task lighting
- Drop cloth, disposable palette, gloves and eye protection when required by product labels, plus two scrap boards finished like the sign for testing
How to make it
- 1
Choose a sound sign and safe location
Select a commercially made A-frame whose maker allows decorative paint on the faces. Reject cracked wood, loose fasteners, sharp splinters, bent hinges, missing spread limiters, or wobbling feet. Measure the covered display area with the door fully open and reserve an unobstructed walking route, landing, handrail, and threshold.
- 2
Read every material instruction
Confirm that the sign finish, cleaner, primer, paint, stencil adhesive, and optional topcoat are mutually compatible. Record the stated preparation, temperature, ventilation, drying, recoat, cure, and outdoor-use limits. If any maker prohibits another product in the stack, change the system rather than improvising.
- 3
Clean and test the surface
Fold or secure the sign exactly as its maker directs and work on a protected level surface. Clean one face with the approved method, keeping moisture away from hardware and unfinished end grain. On a hidden paintable area or a similarly finished scrap, test cleaning, stencil adhesion, paint, removal, and topcoat through the full cure interval.
- 4
Map the no-paint zones
Open the sign to its normal stop and mark a generous protected border around the frame, hinges, chain or strap, fasteners, feet, floor-contact edges, and any moving joint. Close it only as directed and confirm that no proposed artwork crosses a fold, bevel, gap, handle, or hardware shadow.
- 5
Make a full-size paper composition
Print or tile a paper mock-up at the intended size. Center it on the broad sign face, step back to the usual viewing distance, and simplify until the plant, arch, and flower-shop framing remain readable. Keep every element within the flat paintable field and preserve comfortable negative space around the outer edge.
- 6
Simplify a duplicate artwork file
Leave the purchased files untouched and work from a copy. Isolate the carnivorous plant and a few broad storefront shapes, remove detached specks and very small character details, thicken fragile bridges, and open narrow counters that could trap paint. Use the original composition as inspiration without forcing every fine line into a porch-scale stencil.
- 7
Create a bridge-safe stencil
Inspect every enclosed space and add bridges where centers would otherwise fall out. Divide the design into two or three registration-friendly sections if one sheet would wrinkle on the sign. Add small square registration marks outside the painted artwork, then group each paint color with matching marks before cutting.
- 8
Run a test cut
Use the stencil maker’s starting settings, then cut a sample containing the narrowest bridge, smallest opening, and one registration mark. Weed the areas that will receive paint. The blade should cut the film cleanly without deeply scoring its backing; adjust one setting at a time and repeat until the test lifts intact.
- 9
Cut, weed, and transfer the stencils
Cut each section and color from fresh stencil film. Weed only the paint openings, checking them against the on-screen preview. Apply compatible transfer tape when required, burnish from the center outward, and trim the carrier into manageable rectangles without cutting through registration marks.
- 10
Prepare the sign face
Mask the protected frame and hardware zones. Scuff, prime, or repaint the face only when the coating instructions require it, then allow the full stated dry or cure time before applying adhesive film. Remove dust with the approved method; the surface must be clean, dry, flat, and at the specified temperature.
- 11
Place and seal the first stencil
Align the paper template first, then position the largest stencil using measured centerlines rather than the sign edge alone. Remove the backing gradually while smoothing the film outward. Burnish every bridge and cut edge, remove transfer tape at a sharp low angle, and mask the surrounding face against accidental paint.
- 12
Pounce on thin paint layers
Load a dense stencil brush or sponge, off-load almost all paint onto the palette, and apply several light vertical layers rather than one wet coat. Work from the stencil edge toward the open center to reduce seepage. Follow the paint maker’s recoat interval and keep the sign horizontal if that orientation is permitted.
- 13
Remove and register the next layer
Lift the stencil at the material maker’s recommended stage, pulling it back at a low angle and using tweezers only on waste film. Let the first color dry as required, then align the second stencil with the registration marks. Repeat the thin-paint method with a fresh applicator and remove the alignment marks before final curing.
- 14
Cure, finish, and display responsibly
Let all paint cure for the full stated interval before closing, carrying, or topcoating the sign. Add only a compatible topcoat when every coating maker approves the stack, and keep it off hinges, feet, chains, labels, and moving parts. Recheck the hardware and stability, then place the sign on a dry level covered surface outside the walking path; bring it indoors for wind, rain, freezing conditions, or whenever the sign maker requires.
Practical finishing tips
- Broad shapes and intentional negative space read better outdoors than a literal copy of every small line in the source artwork.
- A nearly dry sponge is the best defense against paint bleed; build opacity gradually and resist pressing paint under the stencil edge.
- Keep a printed preview beside the weeded film so a small flower, tooth, or bridge is not accidentally removed.
- Cut large designs into sections that meet in open background areas, not across the plant’s face or a narrow architectural line.
- Photograph the registration marks and measurements before removing each stencil so a damaged layer can be recut at the same scale.
- Store the cured sign open or closed only as its maker directs, in a dry indoor location where the faces cannot rub together.
Troubleshooting
Stop adding paint, remove the stencil at the instructed stage, and let the area dry. Correct a small bleed with a fine brush and matching background paint only after the paint maker allows recoating. On the next section, burnish again and use less paint with straight up-and-down pouncing.
Return the film to its backing or sign and burnish the stencil itself, then peel the transfer tape back at a sharper low angle. If the test showed excessive tack, switch to the stencil maker’s recommended lower-tack transfer product rather than stretching the cut bridges.
Pause before paint reaches the loose edge. Press the bridge down with a clean dry tool if the material instructions permit, then use a drier applicator. Enlarge or simplify the weak area and recut the section if adhesion remains unreliable.
Do not stretch the film to force the marks together. Recheck the measured centerlines and square registration marks, split the layer into smaller sections, or intentionally leave a narrow background gap between colors so slight movement is not visible.
Move the sign to the temperature and humidity range specified by the coating maker and allow more cure time without handling. Do not add another coat to trap moisture or solvent; contact the manufacturer before sanding, stripping, or recoating.
Ways to make it yours
Use only the oversized plant and a simple arch in one cream paint color, removing the second registration step and the smallest leaf details.
Stencil a separate manufacturer-approved flat sign insert and display it in a commercial panel-holding A-frame designed for replaceable inserts, keeping all fasteners and retention hardware unchanged.
Use an indoor-rated chalkboard-style A-frame and removable stencil-compatible paint only if the board and paint makers approve the combination; keep the design away from writing areas and hinges.
Cut one simplified plant silhouette from removable window vinyl for a nearby interior-facing pane, following the glass and vinyl makers’ instructions and preserving required visibility through doors and windows.
Keep crafting
- DIY Haunted Flower Shop Wood Key Holder With Vinyl — Turn a smooth painted board, cream vinyl, and five antique-brass hooks into a useful haunted flower-shop key station for a gothic entryway.
- DIY Haunted Greenhouse Garden Apron With Cricut HTV — Turn a sturdy canvas apron into a practical haunted-greenhouse tool carrier with a carefully sized HTV focal design and pockets that stay fully usable.
- DIY Carnivorous Plant Faux Stained-Glass Suncatcher With Vinyl — Layer transparent jewel-tone vinyl and bold black leading on a clear acrylic blank to make a lightweight carnivorous-plant suncatcher for an indoor Halloween window.
Inspiration & further reading
This is an original Klean Kut Halloween Crafts project inspired by approachable techniques shared across trusted craft and home sources. Explore Cricut Smart Stencil and Stencil Film instructions, Cricut Transfer Tape instructions, Silhouette Stencil Material guidance, U.S. Consumer Product Safety Commission Art and Craft Safety Guide and U.S. Consumer Product Safety Commission Healthy Indoor Painting Practices for more ideas and technique background.