
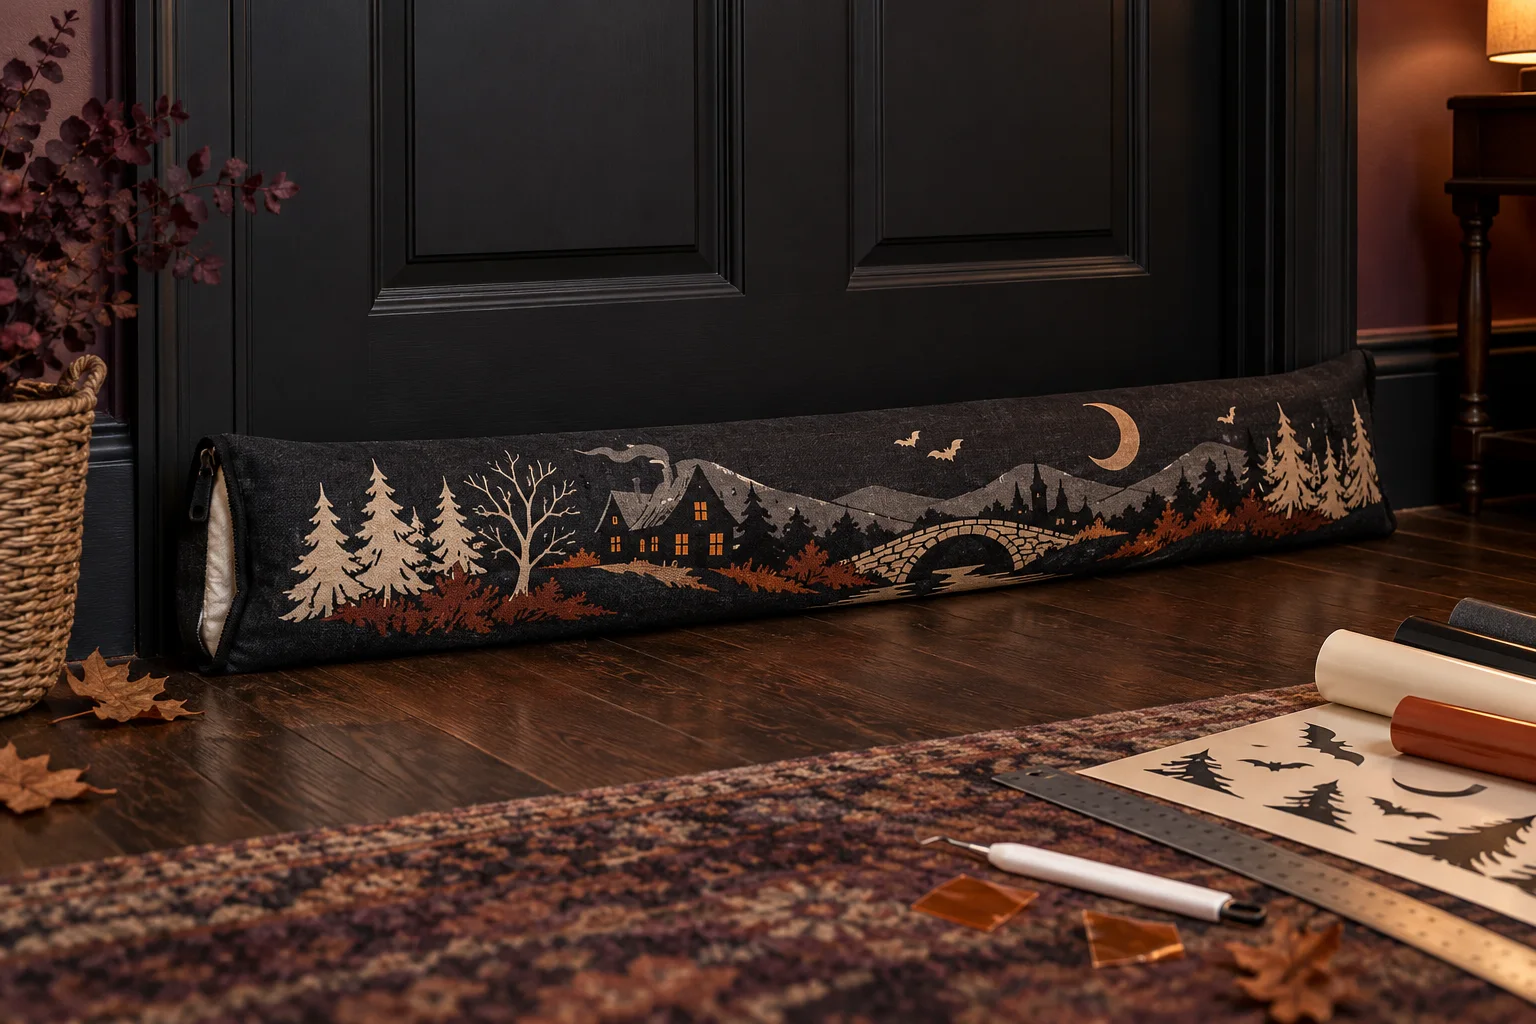
A removable draft stopper can soften a chilly interior doorway without committing to permanent hardware. This project starts with a commercially sewn, washable cotton-canvas tube cover and a separate flexible insert sized for the door. The long front panel becomes a miniature haunted landscape: a rural cabin at one end, a bridge at the center, then hills, pines, a crescent moon, and a few distant bats. The cover is decorated while completely empty, allowed to cure, and filled only after every heat step is finished.
This is an original project plan based on ordinary home-cutter and heat-transfer-vinyl methods. Door construction, fire rating, egress rules, threshold clearance, HVAC design, cover fiber content, coatings, seams, closure, insert material, HTV formula, heat tool, platen, blade, mat, and artwork detail can all change the result. Confirm that a loose draft stopper is suitable for the exact doorway, follow every current manufacturer instruction, and test the actual fabric and vinyl together. The KleanKutChaos listing supplies the featured digital artwork only. The featured KleanKutChaos file is the design source for this tutorial, and this tutorial does not claim that the pictured combination was physically tested with the listing files.
What you’ll need
- Haunted Countryside SVG Bundle from the featured KleanKutChaos listing
- One ready-made removable tube-style draft-stopper cover in tightly woven cotton canvas, sized slightly narrower than the door and approved for the chosen HTV and heat method
- One commercially made flexible draft-stopper insert sized for the cover, or a zippered washable liner filled with clean polyester fiberfill according to its maker; avoid loose rice, sand, gravel, litter, or other spillable fillers
- Heat-transfer vinyl in two or three compatible colors, such as cream, muted rust, and smoky gray, with current instructions that allow layering on the selected canvas
- Cricut, Silhouette, or similar cutting machine with current software, a clean fine-point blade, and the mat specified for the HTV
- EasyPress-style tool, heat press, or household iron approved by both the HTV and blank makers, plus its stable heat-safe base or stand
- Firm pressing board or pad narrow enough to slide inside the empty cover and keep the back panel, closure, piping, and seams outside the heated footprint
- Protective sheet, parchment, pressing cloth, or heat-resistant tape only when the exact HTV instructions call for it
- Paper, pencil, ruler, flexible tape measure, tailor's chalk, low-tack placement tape, and a full-length paper placement template
- Weeding hook or tweezers, small scissors, scraper, brayer, lint roller, and scrap HTV
- A fabric swatch matching the cover as closely as possible for the full heat and wash test
- Safety glasses and any protective equipment required by the cutter, heat tool, vinyl, cover, and insert makers
How to make it
- 1
Confirm the doorway is suitable
Use this only at an ordinary interior door where a loose floor accessory is permitted. Do not place it at a fire-rated door, required exit, stair landing, emergency route, automatic door, accessible threshold, exterior door exposed to moisture, or any doorway where it could interfere with a sweep, latch, closer, alarm, return-air path, required undercut, or floor vent. Ask the building owner or a qualified professional when the door's function is uncertain.
- 2
Measure the closed door
Measure the door width, the flat floor span between trim, the gap at the threshold, and the clearance needed for the door to swing. Choose a finished stopper one to two inches narrower than the usable span so it cannot wedge into the jamb. Open and close the bare door fully and mark the area that must remain completely clear.
- 3
Inspect the cover and insert
Read every fiber, heat, care, and fill label. Reject a cover with mystery coatings, foam backing, metallic thread, plastic trim, damaged seams, or a heat-sensitive closure in the press area. The insert should be soft, fully enclosed, dry, and flexible—not rigid, weighted with loose particulate, or attached permanently to the door.
- 4
Prepare the empty cover
Remove the insert and every loose component. Prewash and dry the cover only if both the blank and HTV makers direct it, without fabric softener. Lint-roll the surface, press ordinary wrinkles by the cover maker's method, and let the fabric reach room temperature before measuring the decorative panel.
- 5
Map the safe pressing box
Lay the empty cover flat and slide the pressing board inside. Mark a continuous front-panel box that stays at least one inch from the zipper, hook-and-loop closure, end caps, piping, seams, folds, and handles—or farther if the heat tool or blank instructions require it. The platen must sit level without touching any raised construction.
- 6
Build a paper panorama
Trace the safe box at full length on paper. Arrange printed or paper-cut silhouettes of the cabin, bridge, hills, pines, moon, and bats so they read from normal standing distance. Keep the lowest shapes above the floor-contact fold and simplify the scene until every section fits under a level platen.
- 7
Prepare a cuttable working copy
Duplicate the purchased artwork and preserve the originals. Select broad silhouettes with sturdy bridges between details. At final size, remove isolated specks and fragile lines that fall below the vinyl maker's recommended minimum; do not distort the cabin or bridge simply to fill the tube.
- 8
Divide colors and press order
Limit the panorama to two or three HTV colors from compatible product lines. Slice or contour the scene into adjacent color regions whenever possible so full-size layers do not stack. Plan the largest base silhouettes first and the smallest accents last, following the vinyl maker's layering limits and reduced-time guidance.
- 9
Test heat and wash behavior
Apply a sample of every color to a matching fabric swatch with the exact intended tool, temperature, time, pressure, protective layer, and peel method. Let it cure for the stated interval, then flex and wash the swatch only as directed. Stop if the canvas scorches, shines, shrinks, releases dye, delaminates, puckers, or rejects the vinyl.
- 10
Mirror and test-cut
Mirror every standard carrier-backed HTV layer unless its maker says otherwise. Place the material on the mat in the specified orientation, load the correct blade, and cut a small star or tree first. Confirm that the vinyl cuts cleanly without slicing through the carrier before sending the long panorama sections.
- 11
Cut, weed, and label sections
Cut the scene in platen-sized sections if the full design is longer than the heat tool. Weed slowly while each carrier stays flat, preserving intended openings in trees, windows, and the bridge. Label the back of each carrier with its position and press order using removable notes placed outside the heated area.
- 12
Create an alignment map
Mark the cover and paper template with a horizontal baseline plus measured overlap-free registration points. Place every weeded carrier on the paper map and photograph the arrangement with a ruler in view. Trim excess carrier only where doing so cannot disturb alignment or expose vinyl to another carrier's adhesive.
- 13
Isolate the first press area
Slide the firm pressing board inside the empty cover so it supports only the first section. Move the back panel, closure, seams, piping, and end construction completely outside the platen. Lint-roll again, position the first carrier shiny side up from the paper map, and secure its edge only with maker-approved heat-resistant tape.
- 14
Press and peel by the exact guide
Apply the heat tool with the current temperature, time, pressure, motion, and protective layer specified for the exact HTV and canvas. Keep the platen level and move it to its stand immediately afterward. Peel only at the maker's hot-, warm-, or cold-peel stage; if an edge lifts, replace the carrier and use only the approved repress method.
- 15
Advance the board and complete the scene
Move the internal pressing board to the next section without folding freshly applied vinyl. Align each carrier to the baseline, keep adjacent seams from overlapping, and protect prior sections exactly as directed. Use the shortest approved layering press for later colors, then complete any prescribed finishing press without crossing the cover's construction.
- 16
Cure, fill, and door-test
Let the empty cover cool flat and cure for the full interval before flexing or filling it. Insert the approved soft liner without pulling on the decoration, close the factory closure, and place the stopper against the closed door. Open and close the door several times while observing from both sides; remove the stopper immediately if it catches, slides into the walking path, blocks airflow, or affects normal operation.
Practical finishing tips
- Treat the panorama as three readable scenes—cabin, bridge, and forest—rather than shrinking all six bundle designs into one strip.
- A paper baseline is more reliable than judging alignment against a soft tube edge that changes shape when handled.
- Use the same HTV line for all colors unless the manufacturers explicitly confirm cross-brand layering compatibility.
- Keep the lowest vinyl at least half an inch above the fabric's floor-contact fold to reduce abrasion during use.
- Choose a dark washable cover with a removable insert so the decorated shell can be cleaned according to both material makers' rules.
- Store the stopper fully dry and flat or loosely rolled; tight folding can crease both the insert and layered vinyl.
Troubleshooting
Stop before applying heat. Reposition the narrow pressing board so every seam, closure, end cap, and fold hangs beyond the platen. If the safe flat area is too small, enlarge the scene sections or choose a simpler cover rather than pressing harder.
Return to the full-length paper map, mark one shared baseline, and apply each platen-sized section from the center outward. Avoid large carrier overlaps; trim only clear carrier material and keep exposed vinyl protected.
Decorate only the panel while it is empty and flat. Replace the carrier and use the maker-approved repress method on the supported board. If the cured design still sits on the floor-contact fold or rounded end, reduce the artwork and remake it within the flat front panel.
Let it cool completely and compare the result with the swatch. Excess heat, pressure, contact time, or an unsuitable protective layer can permanently change canvas. Do not repeatedly heat the mark; use the verified settings on a fresh compatible blank.
Remove it and compare its actual length and circumference with the cover. Smooth a correctly sized flexible insert before closing the end. Do not force an oversize liner, add loose grain, or pack the tube so firmly that it becomes rigid.
Remove it from service. Confirm that the finished length is narrower than the usable span and that the floor is dry. A loose draft stopper is never a restraint or threshold modification; choose another location or a professionally rated door solution instead of adding adhesives, straps, magnets, or weights.
Ways to make it yours
Cut one broad cream countryside skyline for faster weeding, fewer press cycles, and a lighter-weight finish.
Scale the landscape to a removable cotton window-sill cushion only where it cannot interfere with a lock, egress opening, heater, condensation drainage, or blind cord.
Use the motifs as layered cardstock art in a wall frame beside the doorway when the available cover cannot safely accept heat.
Replace muted rust with icy gray and add simple snow-covered roof shapes while preserving the same safe pressing box and door-clearance rules.
Keep crafting
- DIY Removable Halloween Classroom Door Window Border With Static-Cling Vinyl — Turn spooky-school border files into a reusable static-cling frame for a classroom door window while keeping the center clear, the exit hardware visible, and cleanup residue-free.
- DIY Haunted Flower-Shop A-Frame Halloween Sign With Cricut Stencil — Turn a sturdy commercial A-frame sign into a haunted flower-shop porch display with broad stencil shapes, crisp painted layers, and traffic-safe placement.
- DIY Gothic Candelabra Canvas Pillow With Metallic HTV — Turn a plain black canvas pillow cover into polished gothic décor with a large silver candelabra cut from metallic heat-transfer vinyl.
Inspiration & further reading
This is an original Klean Kut Halloween Crafts project inspired by approachable techniques shared across trusted craft and home sources. Explore Cricut Everyday Iron-On instructions, Cricut Heat Guide and U.S. Consumer Product Safety Commission Art and Craft Safety Guide for more ideas and technique background.