
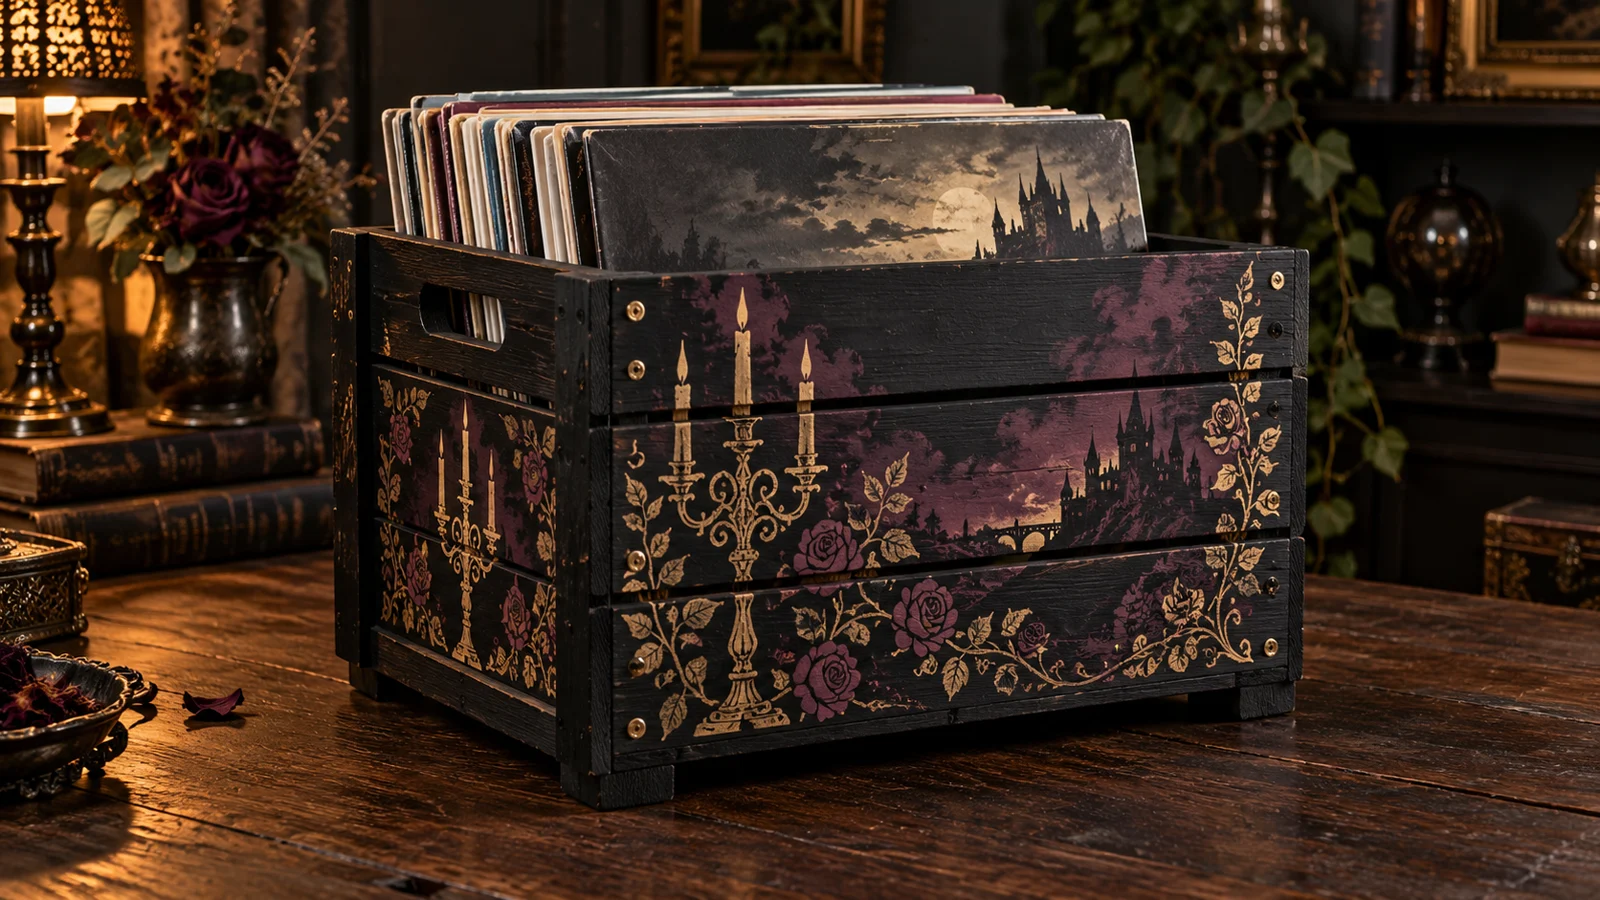
A good record crate protects a collection first and decorates the room second. This project starts with a sound, properly sized wooden crate, gives it a durable dark base coat, and uses one broad theatrical motif as a paint stencil. A candelabra, castle silhouette, or restrained character outline from the featured horror-musical bundle can supply the focal shape; plum roses and narrow antique-gold accents build the atmosphere without crowding the slatted front.
This is an original project plan based on common wood-finishing and adhesive-stencil methods. Wood species, grain, joints, filler, primer, paint chemistry, cure time, stencil film, transfer tape, blade condition, room temperature, record weight, and crate construction can all change the result. Make paint, stencil, and removal tests on a matching offcut or hidden area; follow the current directions from every crate, finish, stencil, cutter, and hand-tool maker; and preserve the purchased artwork while simplifying only duplicate working files. The featured KleanKutChaos pack supplies the artwork for the stencil, while the featured KleanKutChaos file is the design source for this tutorial. This tutorial does not claim that the pictured combination was physically tested with the listing files.
What you’ll need
- 20 Rocky Horror Picture Show SVG designs from the featured KleanKutChaos listing
- Sound unfinished wooden LP record crate with smooth interior faces, secure joinery, comfortable handles, and interior dimensions appropriate for 12-inch records in protective sleeves
- A few empty record jackets or rigid 12-inch cardboard templates for clearance checks; keep valuable records away until every coating has fully cured
- Medium- and fine-grit sandpaper recommended for the wood and finish, plus a sanding block
- Wood filler, bonding primer, black water-based furniture or craft paint, and compatible plum and antique-gold stencil paints
- Optional compatible water-based clear finish for exterior painted faces only, used exactly as its maker directs
- Removable stencil vinyl or stencil film and compatible transfer tape
- Cricut-, Silhouette-, or similar cutting machine with a sharp compatible fine-point blade
- Clean compatible cutting mat and cutting-machine software with duplicate working files
- Kraft paper or taped copy paper, pencil, ruler, low-tack tape, and scissors for a full-size panel proof
- Dense stencil brush, cosmetic wedge, or small foam roller approved for the selected paint
- Brayer or felt-edged squeegee, weeding tool, tweezers, painter's tape, and bright task light
- Four non-staining felt or rubber feet approved for the finished base
- Lint-free cloths, drop cloth, eye protection, and the gloves and respiratory protection specified by the sanding and finish makers
How to make it
- 1
Inspect the crate before decorating
Check every slat, corner, fastener, glue joint, handle, and foot location. Reject cracked wood, projecting nails or screws, sharp interior edges, loose joints, rocking, or a handle that flexes under a modest empty-crate check. Measure the clear interior width, depth, and height with protective record sleeves in mind; this project is an organizer, not seating or a step.
- 2
Map a record-safe paint zone
Place empty jackets or rigid cardboard templates inside and mark every surface they can touch. Keep primer, paint, filler, sealant, stencil adhesive, and transfer tape out of the record-contact interior. Choose one smooth exterior panel for the main stencil and leave generous clearance around handles, fasteners, slat gaps, feet, corners, and high-contact grip areas.
- 3
Choose one readable theatrical motif
Select a broad candelabra, castle scene, or simple silhouette from the featured bundle rather than combining all twenty designs. On a duplicate file, remove facial hatching, isolated dots, hairline folds, and tiny islands. Add temporary bridges wherever a stencil center would otherwise fall away, then confirm that every planned edit and finished use follows the listing license.
- 4
Build a full-size paper proof
Trace the exact usable panel onto kraft paper and mark slat gaps, fasteners, handles, and edge exclusions. Print or rough-cut the motif at final size and tape it to the proof. Hold the mockup upright at shelf height, view it from several feet away, and simplify or enlarge anything that disappears into the wood grain or crosses an unsupported gap.
- 5
Prepare a complete finish sample
Use matching scrap wood when possible, or a hidden exterior area the crate maker permits. Sand, fill, prime, and paint the sample with the exact products and coat sequence planned for the crate. After the full maker-specified cure, apply a small piece of stencil film and transfer tape, paint through it, and remove it using the proposed timing. Reject combinations that lift the base coat, leave residue, bleed badly, or remain soft.
- 6
Sand and repair the exterior
Work with the ventilation and protective equipment specified for the materials. Sand with the grain only enough to smooth raised fibers, splinters, and approved filler. Ease sharp exterior corners without changing structural joints. Remove dust by the primer maker's approved method and keep dust, moisture, oil, and wax away from the prepared surface.
- 7
Prime and paint the base
Mask the clean record-contact interior, handles, hardware, joints, and any area the finish maker excludes. Apply thin primer and black base coats without flooding slat gaps, fasteners, or glue joints. Let each coat dry and the completed base cure for the full stated time; paint that feels dry may still be too soft for transfer tape.
- 8
Test-cut the smallest retained details
Cut a sample containing the narrowest bridge, rose stem, candelabra arm, castle point, and inside corner. Begin with the stencil-film maker's recommended material setting and inspect the cut before unloading. Enlarge, weld, thicken, or delete details that tear or distort; do not compensate for a dull blade by increasing force blindly.
- 9
Cut, weed, and label the stencil
Cut the final stencil with the proven setting. Weed the paint openings while leaving required bridges intact, then compare every opening with the paper proof. Apply compatible transfer tape, burnish from the center outward, and trim the carrier so it can lie flat without bridging a slat gap or catching nearby hardware.
- 10
Position the stencil without stretching
Place the paper proof on the cured crate and transfer only the centerlines and approved registration marks with removable low-tack guides. Hinge one edge of the stencil in position, lift the carrier, remove its liner gradually, and lower it from the hinge outward. Burnish each edge against the grain without pulling the film out of shape.
- 11
Control the first paint layer
If the finish and stencil makers approve the technique, use the tested base-color seal coat at stencil edges; otherwise proceed with the successful sample method. Load the brush, wedge, or roller lightly, offload excess paint, and apply several nearly dry coats from the stencil edge inward. Never flood slat gaps or scrub paint under the film.
- 12
Add restrained color and remove the stencil
Use plum for one broad secondary area and antique gold for small high-contrast accents rather than stacking many wet colors. Follow the paint and stencil makers' timing for removal; peel the film slowly back over itself while the paint is at the tested stage. Lift small bridge pieces with tweezers without dragging them across wet paint, and leave imperfect edges alone until the surface is safely touch-dry.
- 13
Finish and fit protective feet
Touch up only after the stencil paint has dried as directed. Apply an optional compatible clear finish to exterior painted faces only if the complete sample succeeded, keeping spray or brush finish out of the crate interior. After the full cure, attach non-staining feet with the crate maker's approved method so the base sits level and hardware cannot reach the floor.
- 14
Cure, load gradually, and audit
Keep records away for the longest cure period stated by any coating maker and until no odor, tack, dust, or transfer remains. Load inexpensive sleeved records gradually with their jackets upright, never leaning hard against a painted edge. Lift only by sound handles, set the crate down level, and stop using it if joints move, fasteners protrude, the base rocks, paint transfers, or sleeves rub an unsafe surface.
Practical finishing tips
- A single candelabra or castle silhouette at generous scale will read more clearly across wood grain than a collage of character portraits.
- Place stencil bridges where they can become part of the architecture, such as window mullions, candle stems, or rose branches.
- Offload almost all paint from the stencil brush or foam before touching the crate; several thin passes are easier to control than one opaque coat.
- Save the paper proof, simplified working file, blade setting, paint batch, and stencil-film label for future touch-ups.
- Use sleeves and dividers to keep records upright, and divide a large collection among several crates instead of overloading one box.
- Keep the design away from handles so repeated lifting does not polish, chip, or peel the decorative surface.
Troubleshooting
Stop adding paint and let the area dry as directed. Confirm that the base was fully cured, the film was burnished into the grain, and the applicator was nearly dry. On the next test, simplify fine details, use lighter coats, and try the tested base-color edge-seal method only when both product makers permit it.
Stop peeling and support the stencil. The finish may be under-cured, poorly bonded, chemically incompatible, or paired with tape that is too aggressive. Remove materials only as their makers direct, repair and recure the finish, then repeat a hidden-area test with approved lower-tack tape before continuing.
Return to the duplicate file, enlarge the motif, thicken bridges, remove isolated details, and replace a dull blade. Repeat the smallest-feature cut before recutting the full stencil; do not hand-cut fragile shapes while the stencil is on the finished crate.
Use the saved panel proof to move the artwork onto one solid face or redesign each slat as a deliberate separate band. Do not stretch film over a gap or fill structural openings with paint, filler, or glue.
Unload it immediately and keep records elsewhere. Check the level surface, feet, fasteners, and joinery; repair only by the crate maker's approved method or replace the crate. Decoration never compensates for unsound structure.
Remove every record and isolate the crate. Allow additional ventilation and cure time exactly as the coating maker specifies. If transfer or odor persists after the full cure, do not use the crate for records; repurpose it for non-sensitive décor or replace it with an uncoated-interior organizer.
Ways to make it yours
Stencil one oversized warm-gray castle onto a satin-black base and omit metallic paint for the easiest alignment and calmest result.
Place one simplified candelabra on each solid end panel and leave the slatted front undecorated for a quieter, easier-to-lift crate.
Skip stencil paint and apply one large removable-vinyl silhouette only after a successful cured-finish compatibility test; keep it away from grips and record-contact surfaces.
Cut small motifs from archival cardstock for loose, removable section dividers, keeping adhesive, rough glitter, paint, and raised hardware away from record sleeves.
Keep crafting
- DIY Gothic Candelabra Canvas Pillow With Metallic HTV — Turn a plain black canvas pillow cover into polished gothic décor with a large silver candelabra cut from metallic heat-transfer vinyl.
- DIY Gothic Castle Halloween Wreath With Vinyl — Build an indoor black grapevine wreath with a suspended frosted-acrylic center, burgundy ribbon, and a bold gothic castle vinyl scene.
- DIY Gothic Acrylic Vanity Tray With Reverse Vinyl — Turn a clear acrylic tray into dramatic gothic vanity décor with a large reverse-applied group scene protected beneath the tray floor.
Inspiration & further reading
This is an original Klean Kut Halloween Crafts project inspired by approachable techniques shared across trusted craft and home sources. Explore Cricut Smart Stencil and Stencil Film instructions and Cricut vinyl preparation and test-cut guidance for more ideas and technique background.