
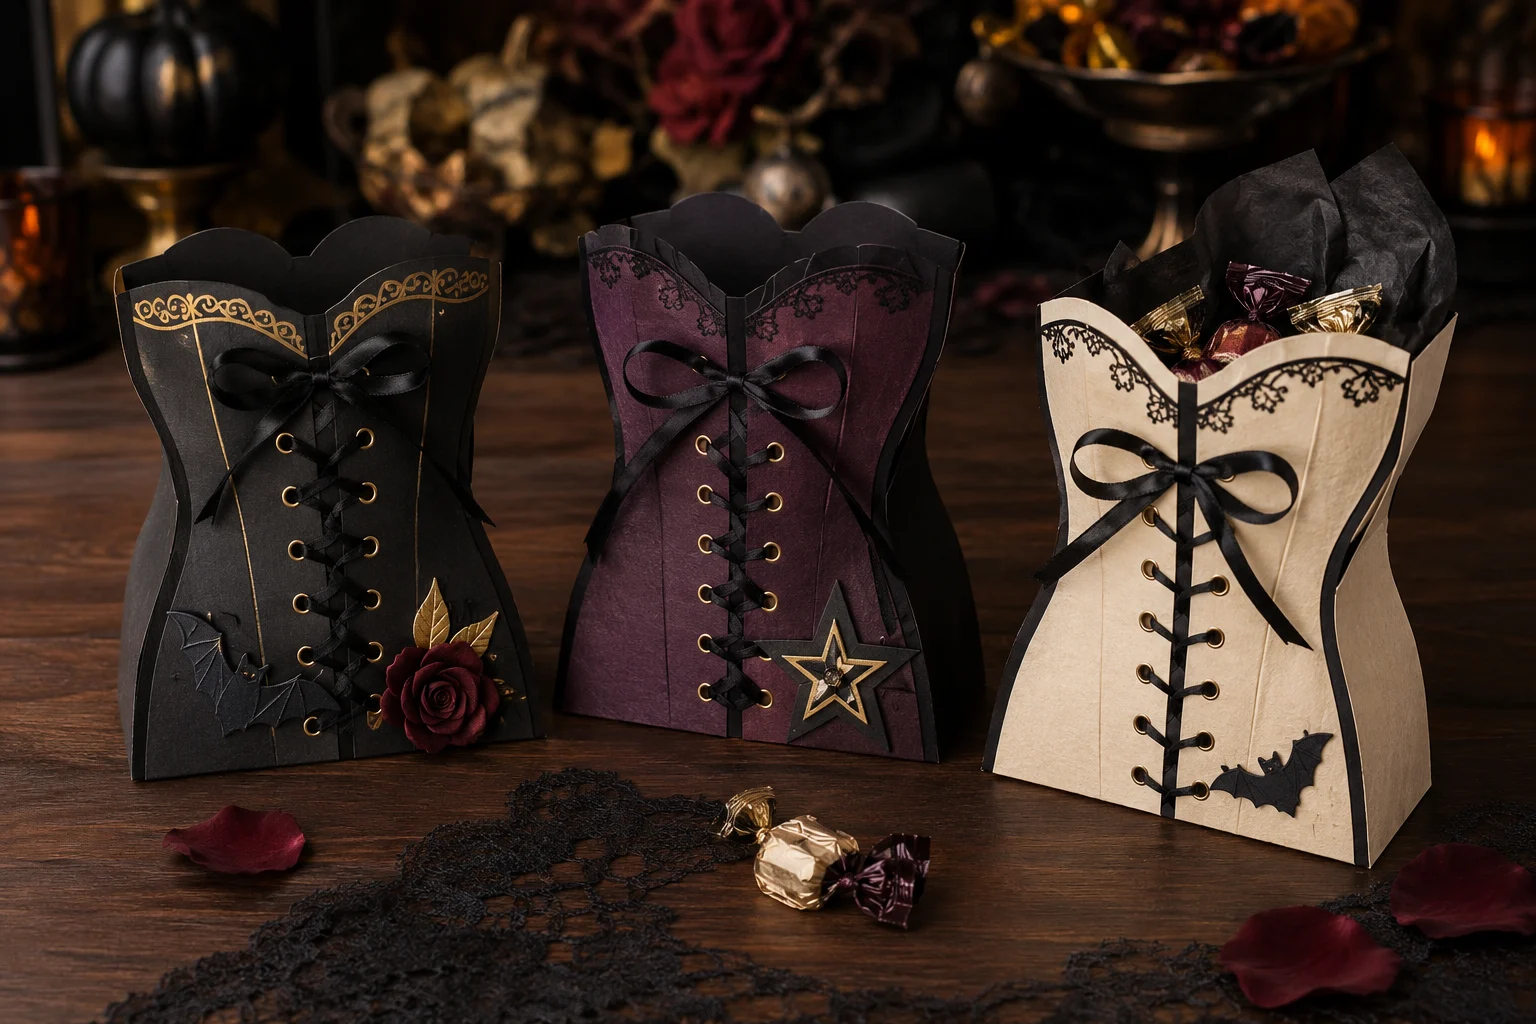
These freestanding favor boxes combine a dependable rectangular carton with a separate curved corset front, so the decorative shape never has to carry the candy. Matte black, oxblood, plum, or cream cardstock gives the project its theatrical mood; small eyelets and narrow ribbon create real lacing, while one simplified cut-file accent ties each box to a favorite cult-horror musical. Use them as place settings, wrapped-candy holders, or party prizes.
This is an original project plan based on standard scored-carton construction, layered paper embellishment, and hand-set eyelets. Cardstock grain, coating, caliper, humidity, mat grip, blade condition, scoring tool, adhesive, eyelet post length, punch diameter, ribbon width, and box contents all affect the result. Build the complete plain-paper prototype, make cut and score tests with the exact cardstock, and follow the current directions from the cutting-machine, blade, mat, scoring-tool, adhesive, punch, and eyelet makers. The featured KleanKutChaos artwork supplies decorative imagery; it does not include the structural carton or corset-box pattern described here. This exact material combination has not been represented as physically tested.
What you’ll need
- 20 Rocky Horror Picture Show SVG Bundle from the featured KleanKutChaos listing
- Three 12-by-12-inch sheets of 80–100 lb cover cardstock for the structural cartons
- Three additional sheets of 65–80 lb cardstock for contrasting corset overlays and small accents
- Copy paper or inexpensive cardstock for a full-size structural prototype
- Cricut-, Silhouette-, or similar cutting machine with a fine-point blade
- Cutting mat matched to the cardstock weight and condition
- Compatible scoring wheel, scoring stylus, or hand-scoring board and bone folder
- Strong paper adhesive with a fine applicator or narrow high-tack double-sided tape
- One-sixteenth- or one-eighth-inch hole punch matched to the chosen eyelets
- Twelve to eighteen small paper-craft eyelets per box with posts short enough for the paper stack
- Eyelet setter and matching anvil, or a crop-style setter approved for the exact hardware
- Thirty to forty inches of 1/8-inch satin ribbon or waxed cotton cord per box
- Metal ruler, pencil, self-healing mat, craft knife, and sharp paper scissors
- Tweezers, scraper, brayer, sewing clips, low-tack tape, and a small bodkin or blunt tapestry needle
- Wrapped candy, sealed snacks, paper-wrapped favors, or a separate food-safe treat bag
- Optional tissue paper, tiny paper roses, or metallic cardstock for nonstructural details
How to make it
- 1
Set a practical finished size
Plan a carton about 3¼ inches wide, 1¾ inches deep, and 5 inches tall. That size fits a single 12-by-12-inch sheet when the glue tab and bottom flaps are arranged efficiently, but confirm it against your machine's actual cut area. Place the intended wrapped treats beside a paper rectangle this size and increase the box only if the flat net still fits the sheet and mat.
- 2
Build the carton net in plain paper
Draw a horizontal sequence of a ½-inch glue tab, 3¼-inch front, 1¾-inch side, 3¼-inch back, and 1¾-inch side. Make the body 5 inches tall, then add bottom flaps no deeper than the matching panel widths. Cut the paper net, score every panel boundary, fold it around the contents, and temporarily tape it closed. Check capacity, balance, opening width, and bottom overlap before using cardstock.
- 3
Convert folds into score lines
Recreate the approved net in the cutting software. Set panel boundaries and bottom-flap folds to Score, keep the perimeter and flap separations as Cut, and attach each score line to its matching carton shape so it stays aligned on the mat. Label a printed or paper copy rather than adding labels to the cut file. Use the exact scoring tool available for the machine; scoring wheels are not compatible with every model.
- 4
Design a separate corset front
Duplicate the front-panel rectangle and inset it by about one-eighth inch on all sides. Curve the long edges inward gently at the waist, add a shallow sweetheart or scalloped top, and keep the bottom flat so the box stands visually grounded. Split this decorative front down the center with a ¼- to ⅜-inch gap for lacing. The two halves should remain broad, continuous shapes without fragile points.
- 5
Map and reinforce the lacing holes
Place four to six matched hole pairs down the center edges, keeping every hole at least twice its diameter from a cut edge. Add narrow cardstock reinforcement strips behind those edges; do not rely on one paper layer to hold tension. Print the hole map at full size, fold it on the centerline, and pierce both sides together in scrap paper to verify that each pair is level.
- 6
Choose one decorative motif
Import one bold portrait, star, lip, castle, or theatrical silhouette from the bundle and size it as a small accent rather than the box structure. Remove isolated specks, hairline paths, and tiny interior islands that will not cut cleanly at the chosen size. Use a simple offset backing when the artwork needs more support, and keep the motif clear of eyelets, ribbon, carton seams, and the bottom standing edge.
- 7
Test cut, score, and fold the cardstock
Cut one scrap containing a curved corset edge, small motif opening, eyelet hole, and scored fold. The cut should release without fuzzy fibers and the score should crease without slicing through the sheet. Fold with and against the grain, then choose the cleaner direction for the long carton folds. Adjust only through the machine and material makers' recommended settings before cutting a complete net.
- 8
Cut the structural carton first
Place the cardstock on the appropriate mat, brayer it evenly, and follow the software prompts for scoring and cutting. Keep fingers away from the carriage and sharp tools. When finished, turn the mat face down and bend the mat away from the carton rather than peeling the paper upward. Inspect every flap and score line before cutting the decorative layers.
- 9
Crease and assemble the box
Fold each score line with a bone folder using firm, controlled strokes that do not polish or crack the surface. Dry-fit the shell, then apply narrow adhesive to the glue tab and align the opposite side edge without twisting the carton. Close the bottom by folding short flaps first and overlapping the larger flaps in the tested order. Let the adhesive cure square around a clean rectangular block wrapped in release paper.
- 10
Prepare the corset overlay
Cut the two front halves, reinforcement strips, and decorative motif. Glue each reinforcement strip behind its row of holes and allow it to dry flat. Repunch through the laminated stack with the correctly sized punch. Test one eyelet in scrap layers first; its post should roll or set securely without splitting the paper, crushing the edge, or leaving a sharp projection.
- 11
Set the eyelets and lace the front
Work on the setter's proper anvil over a stable surface and wear eye protection. Set each eyelet perpendicular to the paper with only the force its maker specifies. Lace from bottom to top using a blunt bodkin or tapestry needle, keeping equal tails and light, even tension. The ribbon should lie decorative and relaxed; pulling it tight enough to bend the cardstock weakens the holes.
- 12
Attach the decorated front
Center the laced overlay on the assembled carton and clip or tape it temporarily. Open the box and confirm that no eyelet or ribbon end catches the interior. Apply adhesive only to the broad outer areas of the overlay, leaving the center lacing free, then press it flat until cured. Add the simplified bundle motif to a lower corner or back panel without covering a fold or seam.
- 13
Fill, finish, and inspect
Line the box with tissue or a separate food-safe bag and add only wrapped or sealed treats. Tie the ribbon tails in a compact bow, trim frayed ends cleanly, and keep them away from candy. Stand every box on a level surface and check for rocking, opening seams, loose eyelets, sharp hardware, or distorted folds. Use the finished set indoors and recycle or discard damaged paper pieces rather than treating them as permanent containers.
Practical finishing tips
- Cut and assemble one complete prototype before batch-cutting the other colors; a one-millimeter fold correction is much cheaper before three sheets are used.
- Keep the carton rectangular and let the overlay create the waist. A truly hourglass-shaped container is harder to fill, glue square, and stand reliably.
- Use ribbon only for decorative lacing, not to pull the box closed. Light tension keeps eyelet holes round and cardstock flat.
- Score coated or heavy cardstock with the exact tool the machine recommends; a double score may be suitable for some thick materials but is not a universal setting.
- Place detailed character art on a larger backing medallion rather than shrinking it until facial lines become difficult to cut or weed.
- Store empty boxes upright with tissue inside so the side panels do not collapse between events.
Troubleshooting
The score may be too shallow, the coating may be brittle, or the fold may be fighting the paper grain. Test another score tool or maker-approved setting, rotate the net if it still fits, and fold gradually toward the intended crease. Replace a visibly split carton rather than hiding a structural crack.
The side seam was glued before the panel edges were square, or the bottom flaps overlap unevenly. Gently release only reversible adhesive, square the shell around the protected rectangular block, and reglue. If permanent adhesive has cured crooked, remake the structural carton and reuse the separate overlay.
The holes are too close to the cut edge, the paper lacks reinforcement, or the ribbon is too tight. Widen the corset halves, move holes outward, laminate reinforcement behind them, and lace with lighter tension. Do not repair a torn load point with another larger hole.
Its post length, punch size, anvil, or setting force does not match the paper stack. Remove it carefully from the test piece, select compatible hardware and tools, and repeat the scrap test. Never place exposed sharp metal against treats or guests' hands.
The blade, mat tack, speed, pressure, or file detail is unsuitable for the cardstock. Simplify narrow paths, use a clean sharp blade and appropriate mat, make a smaller test shape, and follow the named material guidance rather than adding repeated passes blindly.
The contents are too heavy, the flap order or adhesive area is wrong, or the glue has not cured. Empty the box immediately, rebuild the bottom with the paper prototype's overlap, and reduce the contents. These cardstock favors are for lightweight wrapped items, not drinks, glass, or heavy gifts.
Ways to make it yours
Replace eyelets with reinforced punched holes and soft paper cord, then fill with pencils, stickers, or sealed erasers instead of candy.
Use cream and black cardstock, narrow velvet ribbon, and a blank layered medallion where names or table numbers can be added separately.
Skip the carton, glue the two corset halves to a folded A7 card, and lace them loosely for a dimensional invitation that still fits a measured envelope.
Scale the tested net only after confirming that glue tabs, fold widths, lacing holes, and the selected motif remain large enough to cut and assemble safely.
Keep crafting
- DIY Carnivorous Plant Pop-Up Halloween Card With Cricut or Silhouette — Build a dimensional carnivorous-plant card that opens into a tiny haunted flower shop, then folds flat for an envelope with measured tabs, clean score lines, and sturdy paper layers.
- DIY Horror Killer Lineup Table Runner With Heat-Transfer Vinyl — Turn a plain cotton runner into a dramatic Halloween centerpiece with eight coordinated horror silhouettes, careful spacing, and matte black heat-transfer vinyl.
- DIY Gothic Rose Window Mirror With Vinyl — Turn a thrifted mirror into a cathedral-inspired rose window with black vinyl, an antique-gold frame, and a clean reflective center.
Inspiration & further reading
This is an original Klean Kut Halloween Crafts project inspired by approachable techniques shared across trusted craft and home sources. Explore Cricut Scoring Wheel tool guide, Cricut Explore 5 scoring-tool workflow, Cricut cardstock instructions and Silhouette 101 learning hub for more ideas and technique background.