
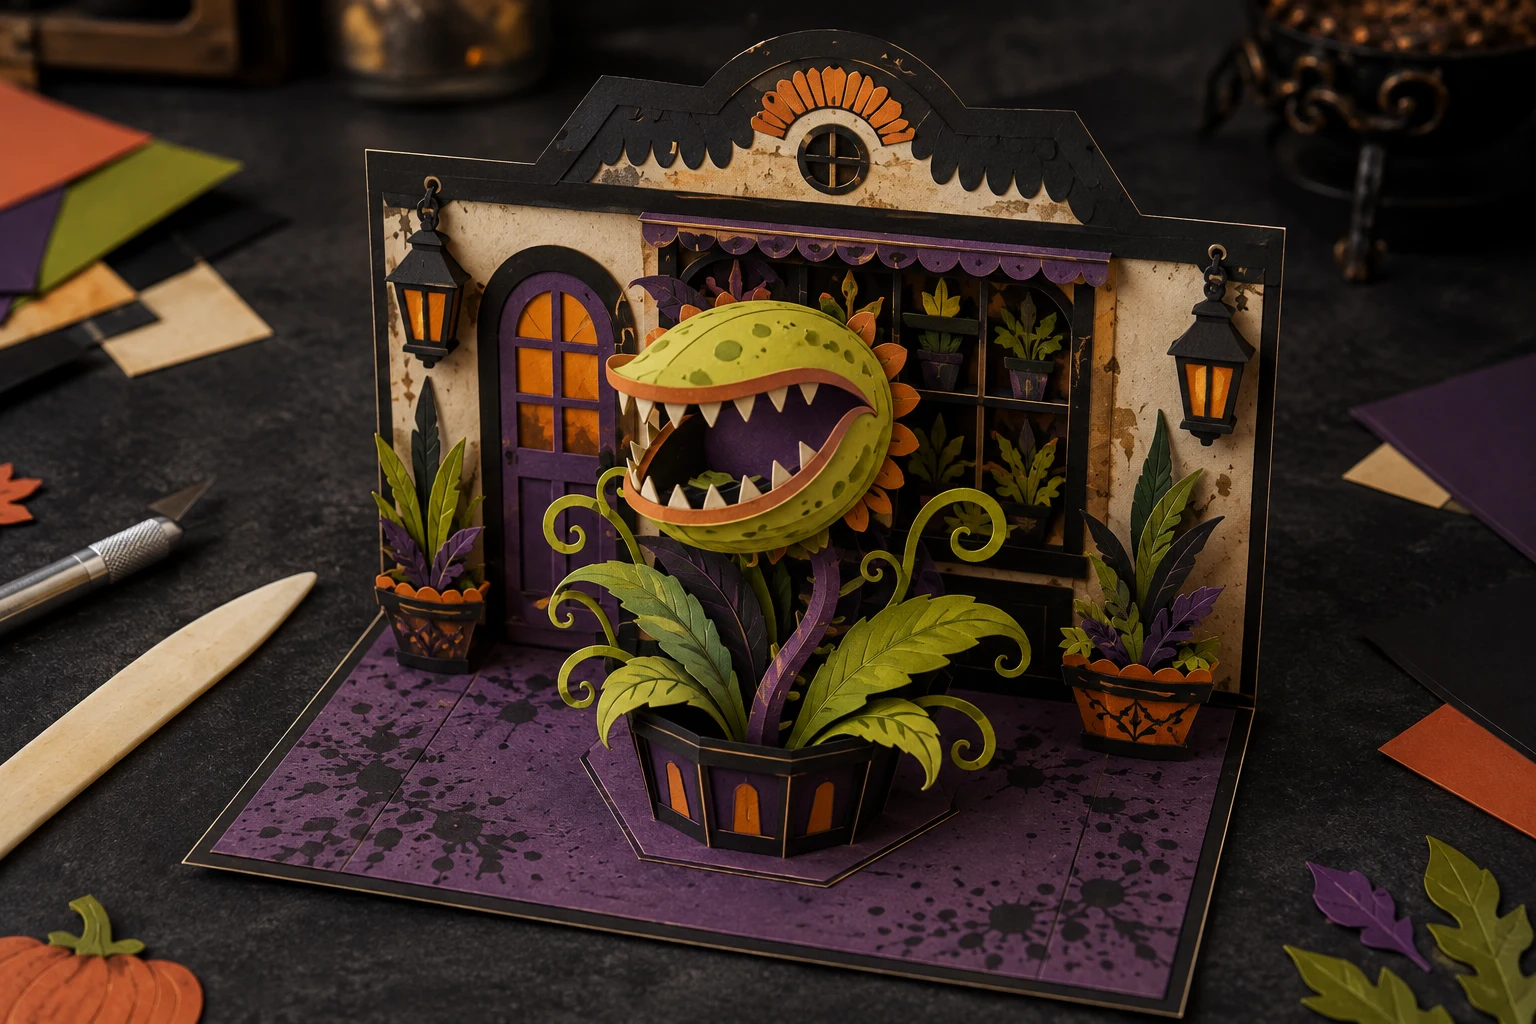
This fold-flat card turns a monster-plant silhouette and flower-shop scene into paper engineering rather than a flat decal. A sturdy outer card supports a separate box-style pop-up mechanism; the storefront stays against the back panel while the toothy plant rises from a front bridge. Open it for a miniature theatrical scene, then close it carefully so the layers nest inside a standard A7 envelope.
This is an original project plan based on standard layered-cardstock cutting, scoring, and rectangular pop-up mechanisms. Cardstock grain, caliper, coating, blade condition, mat tack, scoring tool, adhesive, file complexity, and machine settings vary. Build the complete copy-paper mechanism first, make test cuts with the exact cardstock, and follow the current directions from the cutting-machine, blade, mat, scoring-tool, paper, and adhesive makers. The featured KleanKutChaos artwork supplies decorative imagery; it does not include the structural card mechanism described here. This exact material combination has not been represented as physically tested.
What you’ll need
- 20 Little Shop of Horrors SVG Bundle from the featured KleanKutChaos listing
- One 10-by-7-inch sheet of 100–110 lb smooth cardstock for a 5-by-7-inch folded outer card
- Two or three sheets of 65–80 lb smooth cardstock in black, plum, olive green, orange, and warm cream for the pop-up layers
- One sheet of ordinary copy paper for the full mechanism prototype
- Cricut-, Silhouette-, or similar cutting machine with a fine-point blade
- Cutting mat matched to the paper weight and condition
- Compatible scoring wheel, scoring stylus, or hand-scoring board and bone folder
- Acid-free, photo-safe paper adhesive with a fine applicator; use foam tape only for nonmoving cover details
- Metal ruler, pencil, self-healing mat, craft knife, and small sharp paper scissors
- Low-tack painter’s tape or removable drafting tape
- Tweezers, brayer, scraper, and a clean dry microfiber cloth
- A7 envelope or an envelope template sized for the finished card’s actual thickness
- Optional pearl paper, vellum, or metallic cardstock for small nonstructural accents
How to make it
- 1
Set the closed-card limits
Score the 10-by-7-inch outer card at 5 inches and fold it to make a 5-by-7-inch base. Measure the inside rather than assuming the nominal size. Reserve at least one-quarter inch around all four edges and one-eighth inch beside the center fold; every moving part must fit inside that safe rectangle when the card is closed.
- 2
Prototype the mechanism in copy paper
Cut a 9-by-3-inch strip and score it at 1, 4, 5, and 8 inches to create two 1-inch glue tabs and a 3-inch-deep rectangular pop-up box. Fold the score lines into a shallow open box, temporarily tape its end tabs to the card interior, then close the card slowly. Shorten the box until it collapses without crossing an outer edge or forcing the card open.
- 3
Plan the scene as separate jobs
Choose one Audrey II-style monster plant, one potted plant or leafy accent, and a flower-shop storefront from the bundle. Treat the storefront as a flat back layer, the main plant as a front bridge layer, and small leaves or pots as middle layers. Do not weld the KleanKutChaos artwork into the structural tabs; keep the decorative files replaceable while the mechanism remains simple.
- 4
Simplify delicate SVG details
Import the selected SVGs and inspect them at the actual finished size. Remove isolated specks, hairline veins, and enclosed slivers that are narrower than the reliable test-cut width for your paper and blade. Keep broad teeth, leaves, mouth, and storefront openings that will read clearly from arm’s length. Duplicate nothing until one simplified motif passes a test cut.
- 5
Build sturdy paper layers
Create a simple offset behind the plant silhouette so narrow stems and teeth attach to one continuous backing. Split color changes into large nested pieces instead of dozens of tiny inlays: for example, an olive body, plum mouth, cream teeth, and orange petal ring. Size the finished plant to about 3.25 inches wide and no more than 4 inches tall unless the prototype proves a larger piece folds cleanly.
- 6
Add bridge tabs in the software
Draw a horizontal bridge about 4 inches wide and three-quarters inch tall with a half-inch glue tab at each end. Place the plant’s backing layer above the bridge and weld only those structural backing pieces together. Add score lines where the bridge meets the tabs, then use the software’s attach function so score and cut lines stay aligned on the mat.
- 7
Test-cut each paper family
Place one scrap of every planned cardstock on the appropriate mat and cut a leaf, tooth, narrow window bar, and scored tab. The blade should separate fibers cleanly without carving deeply into the mat; the score should fold without cutting through. Adjust the named material setting, blade condition, mat, or tool according to the maker’s guidance before cutting full sheets.
- 8
Cut from delicate to structural
Cut small cream teeth and orange accents first, then medium-weight plant and storefront layers, and the heavy outer base last. Keep every layer face up in a labeled stack. To release cardstock, turn the mat face down and bend the mat away from the paper instead of curling the cut piece upward. Hand-trim only loose fibers, not structural score lines.
- 9
Pre-fold every moving part
Score the heavy outer card and the pop-up box, bridge, and tabs with the compatible tool. Fold each line both ways once, then settle it in its final direction with a bone folder. Use firm even pressure without polishing coated paper until it shines. Dry-fit the box and bridge inside the card and close it again before adding artwork.
- 10
Assemble decorative layers flat
Glue the colored plant pieces to the continuous backing while it lies flat, using tiny dots or a thin film of adhesive kept away from teeth and fine leaf tips. Build the storefront on a separate flat backing. Weight the assemblies beneath clean paper and a flat book only if the adhesive maker allows, then let them dry for the stated time so moisture does not warp the mechanism.
- 11
Install the box and back scene
Open the card to 90 degrees and pencil the tested box position. Glue one end tab at a time, keeping the box square to the center fold; close the card gently after each attachment so the tab finds its natural hinge. Mount the flower-shop scene to the back panel above the box, leaving the center fold and outer safe margins completely clear.
- 12
Attach the plant bridge
Set the bridge across the front of the box and tape it temporarily. Close the card slowly while watching the tallest leaf and toothy head. When everything nests without collision, glue the two bridge tabs to the box sides—not to the card base—and hold them square until secure. Add only lightweight middle-layer leaves where they cannot snag during closing.
- 13
Cycle-test before decorating the cover
Open and close the card at least ten slow times. Look for white stress marks, crushed tabs, adhesive transfer, or a section that catches. Correct the mechanism now, then add a restrained cover panel or sentiment outside the moving zone. Avoid foam tape inside the card because extra thickness can change the fold geometry.
- 14
Check the envelope and finish
Let all adhesive cure fully, close the card, and measure its thickest point without squeezing it flat. Slip it into the A7 envelope; if it bows, catches, or exceeds mailing limits, make a roomier envelope or present it by hand. Add a separate message panel where writing pressure cannot damage the pop-up, and mark the envelope ‘open gently’ if gifting.
Practical finishing tips
- Use the SVG’s bold outer silhouette for the plant and reserve intricate line art for printed or drawn accents; paper engineering rewards strong shapes.
- Orient major folds parallel to the cardstock grain when possible. A scrap folded in both directions reveals the grain because the easier fold usually runs with it.
- Photograph the copy-paper prototype beside a ruler and write the score positions on it; that physical template is more reliable than reconstructing dimensions later.
- Keep adhesive at least one-eighth inch from every moving fold, then spread it thinly so squeeze-out cannot lock the mechanism.
- Choose an envelope only after the finished card is measured. Dimensional layers can add enough thickness to change postage or hand-delivery plans.
Troubleshooting
A layer is crossing the safe rectangle, the box is too deep, or a bridge tab is fighting the center fold. Remove temporary layers, return to the copy-paper geometry, shorten the mechanism, and reinstall one part at a time rather than pressing the card shut.
The decorative SVG is carrying structural load. Add a continuous offset backing, widen the stem where it meets the bridge, or reduce the plant height. Do not hide the weakness with more wet glue, which can soften the paper.
The cardstock may be coated, too brittle, scored against its grain, or paired with the wrong scoring pressure. Test a fresh scrap, verify the material and tool guidance, score on the intended fold side, and substitute a compatible paper if fibers continue to break.
Reduce mat tack, use a clean sharp blade, simplify the path, and enlarge narrow gaps. Turn the mat face down and peel it away from the cut. If the detail remains fragile, use a printed accent or broader shape instead of forcing a finer cut.
One end tab was attached before the mechanism was squared. Carefully release it if the adhesive permits, align the box at 90 degrees with equal distances from the center fold, and reattach while closing the card once to seat the hinge naturally.
Too much water-based adhesive or uneven drying has distorted the paper. Use a thinner application, work from the center outward, and dry flat under clean protection only as the adhesive maker allows. Recut badly warped structural pieces.
Ways to make it yours
Use a black storefront and one olive plant silhouette with cream teeth, keeping every detail in large attached shapes and limiting the mechanism to one bridge.
Replace the storefront with a black apothecary arch and mount three small plant specimens at different depths, while preserving the tested box dimensions.
Place party details on a separate flat insert and use the pop-up only as the visual reveal so recipients can read the information without pressing on moving parts.
Print a simplified plant silhouette on cardstock, cut the broad outline by hand, and build the same rectangular mechanism with ruler-measured tabs and a scoring board.
Keep crafting
- DIY Haunted Houseplant Canvas Pot Covers With Heat-Transfer Vinyl — Give three ordinary nursery pots a gothic makeover with washable canvas covers, crisp haunted-botanical HTV, and a plant-safe double-container setup.
- DIY Gothic Witch Book Box With Vinyl & Metallic Paint — Turn a plain book-shaped wooden box into an aged black, plum, and gold keepsake with an ornate witch cameo on the cover.
- DIY Cute Bat Magnetic Bookmarks for Halloween Reading — Turn six playful bat cut files into slim magnetic bookmarks with hidden paired magnets, reinforced paper hinges, and book-friendly rounded edges.
Inspiration & further reading
This is an original Klean Kut Halloween Crafts project inspired by approachable techniques shared across trusted craft and home sources. Explore Cricut guide to cardstock for pop-up cards, Cricut Scoring Wheel tool guide, Cricut Explore 5 scoring-tool workflow and Silhouette cutting-mat selection guide for more ideas and technique background.