
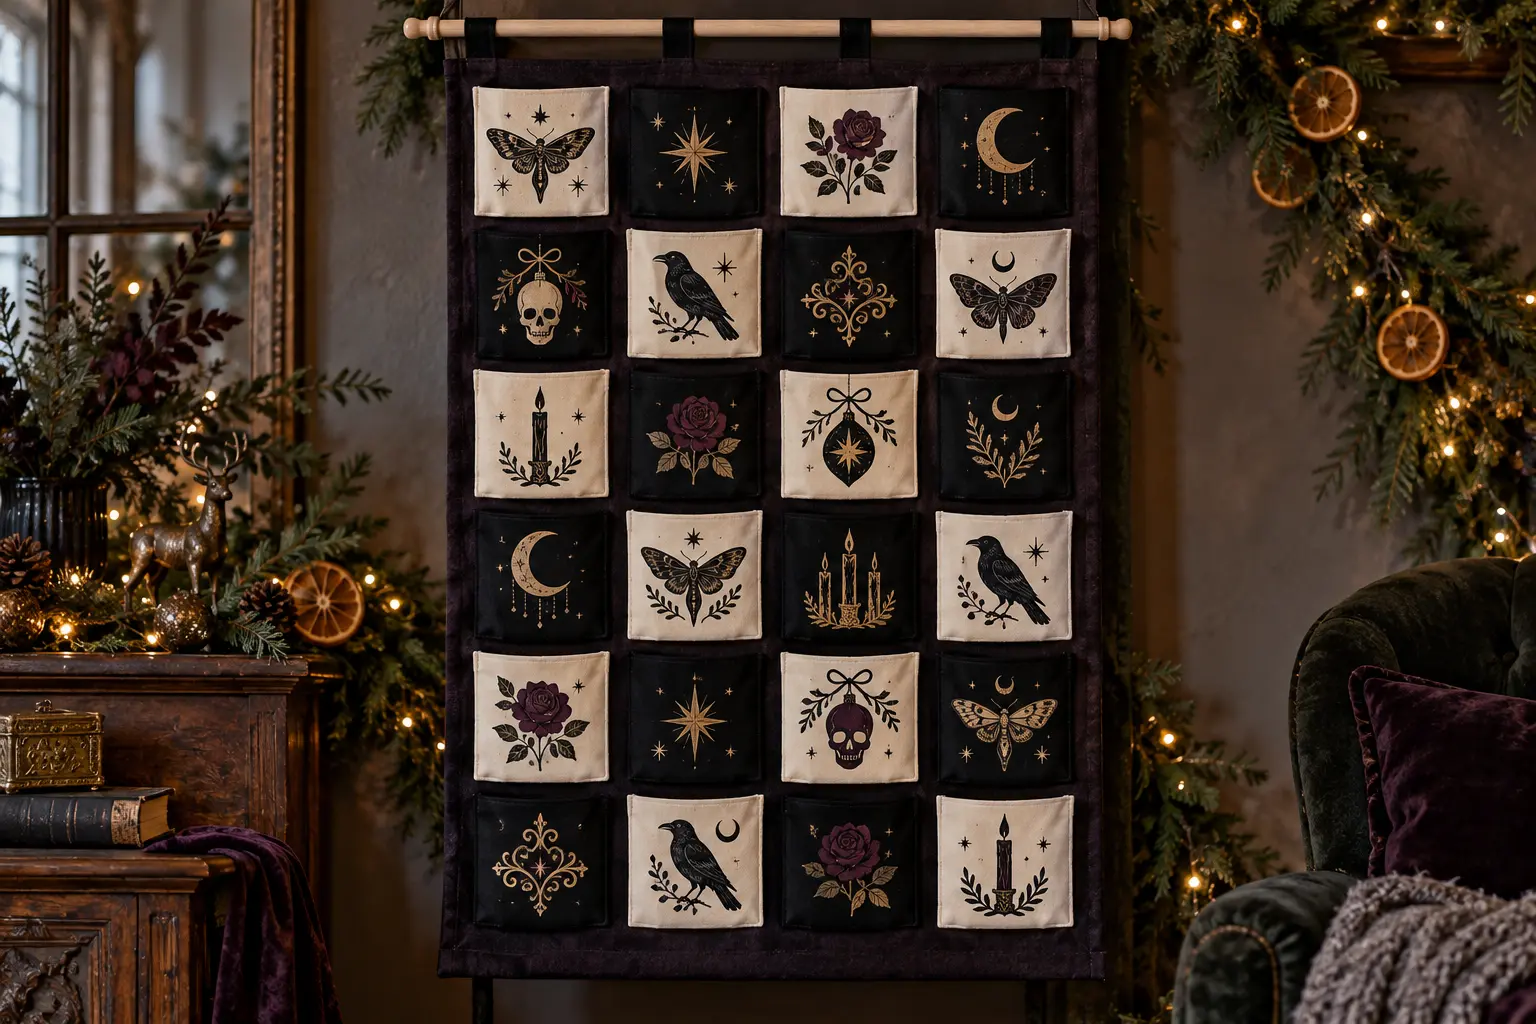
A reusable advent calendar can feel polished enough to become part of the room rather than a disposable countdown. This version uses a charcoal or deep-plum base with twenty-four small cream and black canvas pockets in a clear four-by-six grid. Twenty ornament motifs give the pockets variety; repeat four strong anchor motifs or add simple stars, then pair them with separately cut numbers 1 through 24 so the countdown stays easy to read.
This is an original project plan based on common cotton-canvas sewing and heat-transfer vinyl methods. Fabric fiber and finish, prewash shrinkage, seam bulk, interfacing, blade condition, mat grip, iron-on type, heat press, and hanging hardware can all change the result. Make a full-size paper map plus cut and press tests on scraps from the exact materials, follow the current directions from every fabric, vinyl, cutter, press, sewing-machine, and hardware maker, and preserve the purchased artwork while simplifying only duplicate working files. The featured KleanKutChaos bundle supplies the decorative motifs; the featured KleanKutChaos file is the design source for this tutorial, and this tutorial does not claim that the pictured combination was physically tested with the listing files.
What you’ll need
- 20 Gothic Christmas Ornament SVG Bundle from the featured KleanKutChaos listing
- One yard of charcoal or deep-plum cotton duck or canvas for the front panel
- Coordinating backing fabric and enough matching fabric to form a secure dowel sleeve
- Twenty-four cream and black canvas pocket rectangles cut from prewashed fabric
- Optional fusible woven interfacing approved for the exact front and backing fabrics
- Matte heat-transfer vinyl in antique gold, cream, plum, and black
- Cricut-, Silhouette-, or similar cutting machine with a sharp compatible fine-point blade
- Clean compatible cutting mat and cutting-machine software with duplicate working files
- Bold, license-appropriate number font for the separate numerals 1 through 24
- Heat press or mini press, firm pressing surface, and protective sheet only as directed by their makers
- Sewing machine with a canvas-compatible needle and strong polyester thread
- Iron and ironing surface for fabric preparation and seam allowances only as the fabric maker directs
- Rotary cutter, self-healing mat, quilting ruler, fabric scissors, clips, seam gauge, and marking tool
- Smooth natural-wood dowel, strong hanging cord, and wall hardware rated for the finished load and wall type
- Kraft paper or taped copy paper, pencil, ruler, scissors, and low-tack tape for the full-size placement map
- Eye protection, a lidded scrap container, and twenty-four small lightweight wrapped fillers
How to make it
- 1
Set the size and load limit
Choose the largest pocket filler first, then plan twenty-four finished pockets in a four-column by six-row grid. Allow seam and top-opening space, generous margins around the panel, a secure dowel sleeve, and a modest total load. Sketch the finished dimensions and write a conservative pocket and whole-calendar weight limit before cutting fabric.
- 2
Prepare the exact fabrics
Prewash, dry, and press the canvas and backing only as their makers direct so later shrinkage is less likely to buckle the vinyl or seams. Square the fabric grain, reject distorted or scorched areas, and fuse optional interfacing to a test piece before applying it to the full panel.
- 3
Cut a complete fabric proof
Cut paper templates for the panel, backing, dowel sleeve, and one pocket, including every seam and hem allowance. Arrange twenty-four paper pockets in four columns and six rows, tape the layout to a wall, and confirm that each opening can accept the planned filler without overlapping its neighbors.
- 4
Assign motifs and numbers
Choose twenty broad ornament motifs from the bundle and repeat four sturdy anchor designs, or substitute four simple stars made in the cutter software. Assign one motif and one bold number from 1 through 24 to each pocket. Keep the numbers consistent in size and place them where they remain readable after the pocket is filled.
- 5
Simplify duplicate artwork
Preserve the purchased files and edit only duplicates. Remove isolated dots and hairline flourishes, thicken weak bridges, enlarge tiny openings, and keep the smallest retained feature broad enough to weed. Limit each pocket to one main motif plus its number so the design does not disappear into seams or folds.
- 6
Map the full arrangement
Draw the four-by-six grid at finished size on kraft paper and place rough paper versions of every motif and number inside the pocket outlines. Leave clear zones at side seams, the lower stitching line, bartacks, and the top hem. View the map from normal room distance and move any number that becomes hard to scan.
- 7
Test-cut the iron-on
Cut the smallest number, narrowest filigree bridge, and one representative motif from scraps of every vinyl color. Mirror the iron-on design unless its maker specifically says otherwise, load it in the required orientation, and begin with the recommended material setting. Weed under bright light and enlarge any feature that tears or pulls away.
- 8
Prove heat on the exact stack
Apply the complete sample to a scrap that includes the exact pocket canvas and any approved interfacing. Use the temperature, time, pressure, peel method, pressing surface, and protective setup specified for that vinyl and base. Let it cool, then inspect and flex it; stop if fabric scorches, glosses, shrinks, ripples, discolors, smells unusual, or the vinyl lifts.
- 9
Cut and organize twenty-four sets
Mirror and cut the proven motifs and number sets by color. Weed each on its carrier sheet, then place the complete pieces for each pocket in a numbered paper envelope. Keep left-facing and right-facing motifs paired with the placement map so rows cannot be reversed during pressing.
- 10
Hem the pocket openings
Cut the twenty-four fabric pockets and mark their finished edges with a removable fabric tool. Fold and stitch the top hem of every pocket before adding vinyl, then press the hem allowance as the fabric maker allows. Keep the artwork below this layered edge so the heat press can contact a flat, even surface.
- 11
Press the flat pocket pieces
Lay each unassembled pocket on the approved firm pressing surface and transfer its motif and number according to the tested plan. Apply the minimum total heat needed, protect completed layers as directed, and never press over pins, clips, seams, or metal. Let every pocket cool flat and inspect all edges before sewing.
- 12
Sew and reinforce the grid
Transfer the grid lines from the full-size map to the front panel. Baste or clip one row at a time, keeping openings level and motifs upright. Stitch the sides and bottoms, add only the shallow pleat or gusset proven by the paper filler test, and bartack the upper corners without sewing through the vinyl.
- 13
Finish the panel and hanger
Add the backing and smooth dowel sleeve with the seam finish appropriate for the fabrics. Topstitch the perimeter if desired, keeping the pocket openings free. Insert a sanded dowel that extends safely beyond the sleeve, attach strong cord with secure knots, and use wall hardware rated for both the wall type and the complete calendar load.
- 14
Settle, hang, and audit
Allow the vinyl to settle for the period specified by its maker before folding or loading the calendar. Hang the empty panel, confirm that it is level and the dowel does not bow, then add only small lightweight wrapped fillers while distributing weight across the grid. Recheck stitching, vinyl edges, cord, dowel, and wall hardware before each season and weekly while displayed.
Practical finishing tips
- Number the paper map, pocket backs, and vinyl envelopes with the same row-and-column code before assembly.
- Use antique gold for a few focal motifs and repeat plum or cream accents so the palette feels deliberate rather than busy.
- Keep every numeral in one bold font and roughly the same visual height; legibility matters more than decorative complexity.
- Press vinyl onto flat pocket pieces before sewing them to the panel so seams and bartacks do not create uneven pressure.
- Save a tested fabric-and-vinyl scrap with notes about blade, cut, press, pressure, and peel settings for future repairs.
- Photograph the empty finished calendar and the approved filler arrangement so it is easy to rebuild the same safe load next year.
Troubleshooting
Stop and check the exact fabric and iron-on compatibility, prewash method, pressure surface, temperature, duration, and peel instructions. Repeat a scrap test and simplify fine lines; do not add uncontrolled heat or household glue to a failed transfer.
Stop pressing and discard the damaged pocket. Confirm that the temperature and protective setup suit the exact fiber and finish, reduce total heat only within the maker's directions, and complete another scrap test before continuing.
Return to a duplicate file, delete isolated marks, thicken narrow bridges, and enlarge the motif. Replace a dull blade and verify the material setting with a small test before recutting the entire color group.
Use a reusable paper placement jig that references the finished pocket sides and top hem. Align the carrier rather than the vinyl edge, press one test pocket, and compare it with the full-size map before completing the row.
Remove the fillers and check that the top hems are square, the openings were not caught in side seams, and the items fit the paper proof. Use smaller smooth wrapped fillers or rebuild the pocket with a shallow proven pleat; never force a rigid or sharp item inside.
Unload it immediately. Confirm that the dowel, sleeve, cord, wall hardware, and wall type meet their ratings, distribute lighter fillers evenly, and replace any bowed dowel or strained seam before rehanging.
Ways to make it yours
Use black pockets on a charcoal panel with cream numbers and one antique-gold motif per row for a quieter architectural look.
Decorate a factory-made twenty-four-pocket fabric calendar only after its maker confirms the fiber, coating, seam placement, load rating, and heat-tool compatibility.
Make a smaller three-by-four grid for the twelve days of Christmas and repeat the full paper proof, press test, hanging calculation, and load audit for the new proportions.
Swap the holiday ornaments for broad bats, pumpkins, moths, and moons, then number the pockets for a twelve- or twenty-four-day October countdown while keeping fillers light and individually wrapped.
Keep crafting
- DIY Gothic Christmas Ornaments With Frosted Acrylic and Vinyl — Turn pre-cut frosted acrylic blanks into a coordinated dark-holiday ornament set with crisp black vinyl, careful detail sizing, and a clean no-drill finish.
- DIY Gothic Candelabra Canvas Pillow With Metallic HTV — Turn a plain black canvas pillow cover into polished gothic décor with a large silver candelabra cut from metallic heat-transfer vinyl.
- DIY Witchy Halloween Countdown Flip Calendar With Cricut or Silhouette — Make a reusable tabletop Halloween countdown with sturdy flip cards, crisp vinyl decoration, and a dramatic witch-trio centerpiece.
Inspiration & further reading
This is an original Klean Kut Halloween Crafts project inspired by approachable techniques shared across trusted craft and home sources. Explore Cricut Everyday Iron-On instructions and Cricut Heat Guide for more ideas and technique background.