
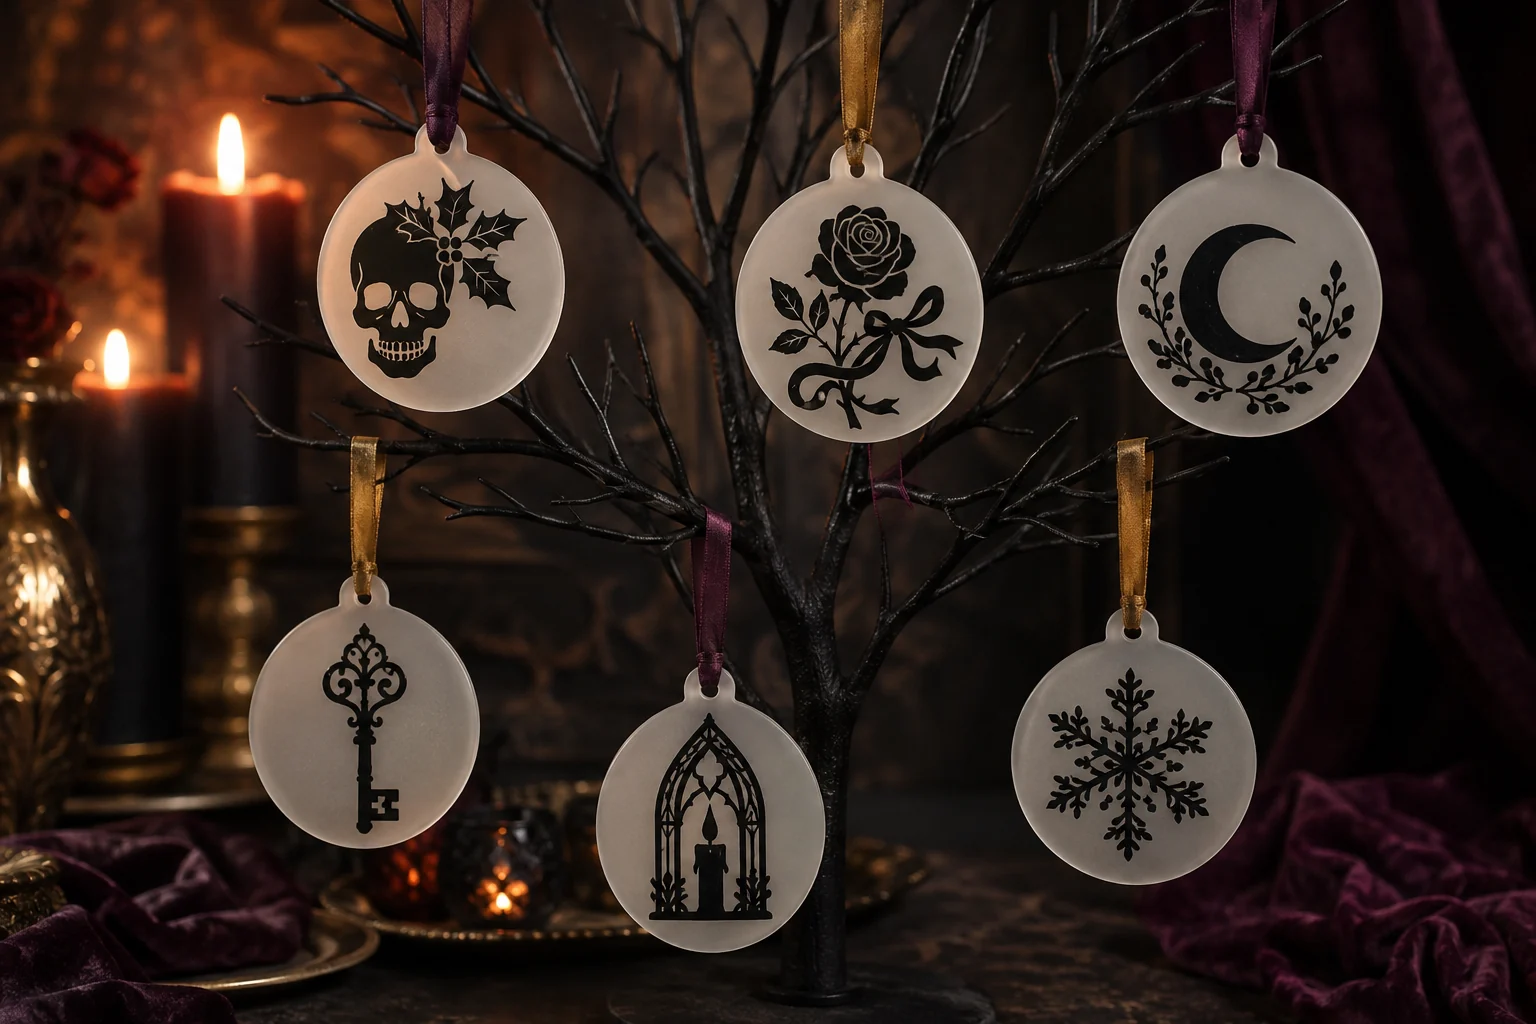
Frosted acrylic softens holiday lights while giving black vinyl enough contrast to read from across the room. This project turns six pre-cut, predrilled blanks into a matched ornament collection using motifs such as a skull with holly, cathedral candle, crescent moon, rose, antique key, and ornate snowflake. The result feels gothic without sacrificing a tidy, lightweight finish.
This is an original project plan based on standard adhesive-vinyl cutting and transfer methods. Acrylic composition, surface finish, vinyl adhesive, transfer tape, blade condition, room temperature, and design complexity vary. Treat the measurements as planning guidance, test the exact blank and vinyl first, and follow the current instructions supplied with every material and machine. This specific combination has not been represented as physically tested.
What you’ll need
- 20 Gothic Christmas Ornament SVG Bundle from the featured KleanKutChaos listing
- Six flat, pre-cut and predrilled frosted acrylic ornament blanks, ideally 3 to 4 inches across
- Smooth black permanent adhesive vinyl approved for rigid plastic surfaces
- Standard transfer tape matched to the chosen smooth vinyl
- Cricut-, Silhouette-, or similar cutting machine with a fine-point blade and appropriate mat
- Weeding tool, fine tweezers, scraper, ruler, and bright task light
- Plain copy paper for full-size placement tests
- Low-tack painter’s tape for hinge alignment
- Mild dish detergent, lukewarm water, and a clean soft lint-free cloth for acrylic-safe cleaning
- Soft cotton gloves or clean tissue for handling the prepared blanks
- Narrow velvet ribbon, satin ribbon, or waxed cord sized for the existing ornament holes
- Six acid-free tissue sleeves or soft lint-free pouches for storage
- Optional paper circle template with the hanging hole marked
How to make it
- 1
Inspect and measure the blanks
Use only intact, pre-cut blanks with smooth finished edges and factory-made hanging holes. Measure each usable face, then mark a no-design zone of at least one-quarter inch around the outer edge and hanging hole. If the blanks vary slightly, base the whole set on the smallest safe decorating area so the finished motifs share a consistent scale.
- 2
Choose six readable motifs
Select designs whose silhouettes differ but share the same dark-holiday vocabulary: for example a skull bauble, cathedral candle, crescent moon with holly, rose and ribbon, antique key, and ornate snowflake. Detailed linework needs room, so avoid shrinking every design to the maximum possible width; preserve open gaps that can be weeded and seen after hanging.
- 3
Decide which face receives the vinyl
Front application is simplest and keeps the file orientation unchanged. Back application protects the vinyl during handling and can create a smooth viewed-from-front effect, but the design must be mirrored before cutting. Test one small scrap on each side of a spare or hidden area because some frosted finishes diffuse black vinyl more than others.
- 4
Build full-size paper rehearsals
Print or cut each motif from plain paper at the intended size. Place the paper art on the actual blanks, align it around the hanging hole, and view the set from six to eight feet away. Increase any design that loses its identity, simplify tiny floating pieces, and record the final width and vertical centerline before opening the vinyl.
- 5
Clean the acrylic gently
Follow the blank maker’s care directions. A mild dish-detergent solution, lukewarm water, and a clean soft cloth are a conservative starting point for acrylic; rinse and blot dry. Avoid window cleaners, abrasive pads, acetone, and unapproved solvents, which can haze or damage plastic. Let the blanks air-dry fully, then handle the application area only by its edges.
- 6
Make a detail-scale test cut
Place the vinyl on the grip surface specified by its maker and cut a small sample containing a curve, narrow line, interior opening, and tiny leaf. Use the recommended starting setting, then weed the sample. If lines tear or corners lift, replace or clean the blade as permitted, increase the design size, or simplify fragile details before changing force repeatedly.
- 7
Cut and organize the six designs
Cut the final motifs in one color, mirroring only if you chose back application. Leave generous space between designs so each can be trimmed into a manageable transfer section. Label the liners or arrange them in project order; this prevents an asymmetrical key, candle, or crescent from being paired with the wrong orientation during assembly.
- 8
Weed from broad spaces inward
Remove large background vinyl first while the liner lies flat and supported. Work gradually around rose petals, holly points, candle openings, skull details, and narrow snowflake arms, holding neighboring lines with tweezers instead of stretching them. Compare each weeded piece with the original file before discarding scraps.
- 9
Load the transfer tape without bubbles
Cut standard transfer tape slightly larger than one motif. Touch down a narrow center strip or one edge first, then lower the rest while smoothing outward with a scraper. Burnish the front, flip the piece, and burnish the liner side. Peel the liner back at a low angle; if vinyl stays behind, lay it down and reburnish rather than pulling harder.
- 10
Align with a tape hinge
Set the blank on a soft lint-free surface and place the paper circle template beneath it if helpful. Center the transferred motif inside the recorded safe area, keeping all vinyl clear of the hanging hole. Run a strip of low-tack tape across the transfer sheet as a hinge, flip the design back, remove the liner, then lower the vinyl from the hinge while smoothing from the center outward.
- 11
Burnish and reveal the design
Press the design with firm, even strokes while the acrylic remains supported flat. Peel the transfer tape back on itself slowly at a low angle. Pause whenever a line lifts, replace the tape, and reburnish that area. Do not scrape aggressively enough to polish the frosted texture or bend the blank.
- 12
Finish, rest, and hang the set
Repeat the same margins and handling method on all six blanks. Allow the applied vinyl to rest for the full period recommended by its maker before adding ribbon or stacking the pieces. Thread ribbon through the existing holes without drilling, tie secure hanging loops, trim the ends evenly, and hang each ornament from a branch strong enough for its weight.
- 13
Store without scratching the faces
At season’s end, dust the ornaments with a soft dry cloth and place each in its own acid-free tissue sleeve or lint-free pouch. Store them flat in a rigid box away from heat and direct sun. Do not stack bare acrylic faces together because trapped grit, ribbon hardware, or raised vinyl edges can mark the finish.
Practical finishing tips
- Use one vinyl finish across the full set; matte black feels velvety on frosted acrylic, while glossy black gives stronger light reflections.
- Align designs by their visual weight rather than by the file’s rectangular bounding box; a crescent or leaning candle can look off-center even when the software says it is centered.
- Keep the most delicate linework toward the middle of each blank, where fingers and storage sleeves are less likely to catch it.
- Photograph the finished paper rehearsals with a ruler and hole position visible so a damaged ornament can be recreated at the same scale later.
- Choose ribbon narrow enough to move freely through the existing hole without sawing against the acrylic edge.
Troubleshooting
Burnish from both sides, turn the piece liner-side up, and peel the liner away from the tape at a low angle. If small details still remain, the cut may not have fully separated; return to a test cut and blade check instead of stretching the design.
Lay the transfer tape back down and burnish the exact area. If it repeatedly lifts, confirm that the blank is clean and dry and that the vinyl is compatible. Recut the motif larger or thicken the fragile line rather than adding liquid glue over adhesive vinyl.
Before the adhesive sets, push a small bubble gently toward the nearest edge with a soft-covered scraper. Replace a badly creased section; do not puncture against acrylic with a pin, which can scratch the blank or leave a visible channel.
Do not force ribbon or scrape vinyl away while it is on the blank. Remove and recut the motif at a smaller size with a clear hole-safe zone, then use the paper template to establish the vertical placement.
Back-applied vinyl must be mirrored before cutting. Remove it according to the vinyl maker’s guidance, clean the blank using an acrylic-safe method, mirror the file, and recut rather than treating the reversed side as the intended face.
Reduce static by working away from fabric scraps and forced-air vents, keep cleaned blanks covered until needed, and lift particles with an acrylic-safe soft cloth. Avoid aggressive rubbing, which can create more static and polish the frosted finish unevenly.
Ways to make it yours
Use translucent plum, oxblood, or deep green acrylic blanks with opaque black vinyl, testing the true viewed color before cutting the entire collection.
Keep the main motif black and add a few sturdy gold-vinyl berries, stars, or candle details as a separate layer, following the vinyl maker’s layering guidance and testing transfer-tape strength first.
Add a small recipient name on the reverse with a bold, weedable font, leaving the front artwork unchanged so the tag becomes reusable tree décor.
Cut the same motifs from heavy black cardstock and mount them over pearl vellum circles with a reinforced hanging tab, keeping paper ornaments away from open flame and damp greenery.
Keep crafting
- DIY Gothic Apothecary Drawer Labels With Removable Vinyl — Turn a plain mini-drawer cabinet into functional gothic storage with nine ornate frame decals, readable center labels, and a reusable placement jig.
- DIY Gothic Rose Window Mirror With Vinyl — Turn a thrifted mirror into a cathedral-inspired rose window with black vinyl, an antique-gold frame, and a clean reflective center.
- DIY Gothic Witch Book Box With Vinyl & Metallic Paint — Turn a plain book-shaped wooden box into an aged black, plum, and gold keepsake with an ornate witch cameo on the cover.
Inspiration & further reading
This is an original Klean Kut Halloween Crafts project inspired by approachable techniques shared across trusted craft and home sources. Explore Cricut Vinyl application guide, Cricut Transfer Tape Instructions, TAP Plastics acrylic application and care guide and ORAFOL ORACAL 651 craft vinyl specifications for more ideas and technique background.