
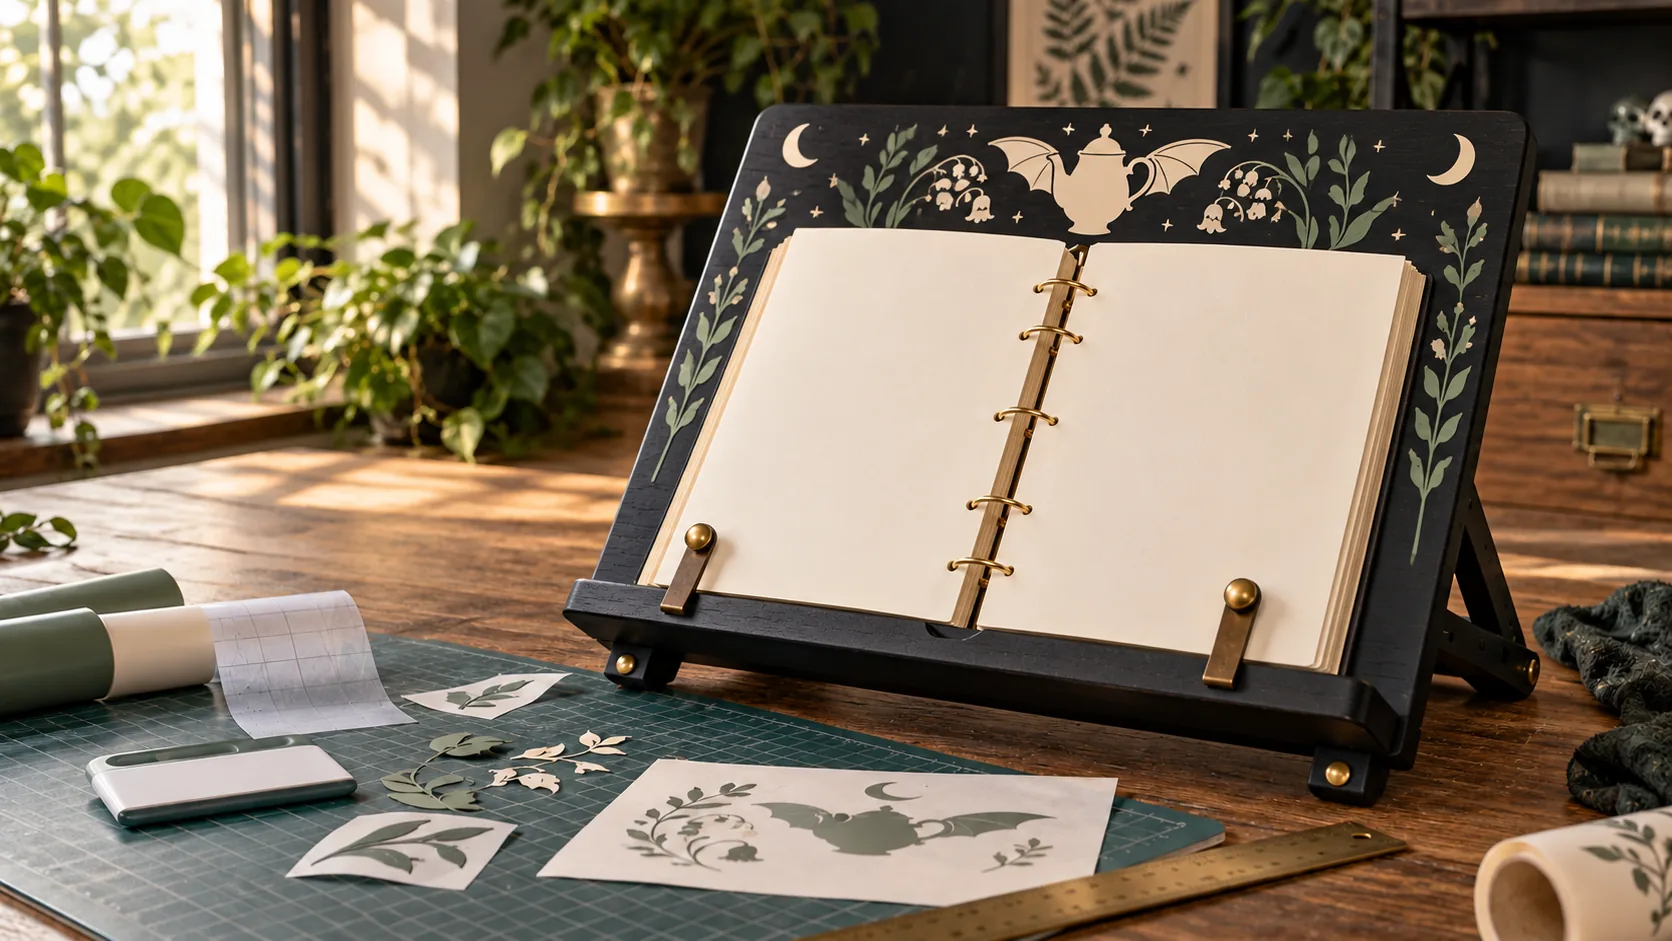
A folding cookbook stand keeps recipes upright and easier to read without putting vinyl on dishes, utensils, or food-contact surfaces. This project starts with a complete factory-made stand whose ledge, clips, support, hinges, pivots, and feet already work correctly. The decoration stays on cool exposed sections of the sealed back panel: a bat-wing teapot above the book plus restrained moons, stars, and leaves along the outer margins. Every moving part, handhold, book-contact point, and load-bearing surface remains bare.
This is an original project plan based on ordinary home-cutter and pressure-sensitive-vinyl methods. Stand geometry, finish, coating age, book size, vinyl formula, transfer tape, blade, mat, artwork detail, room temperature, and the makers' care directions can all change the result. Follow the current instructions for the exact stand, vinyl, tape, cutter, cleaner, and cookbook you use, and make a hidden surface test before committing. The KleanKutChaos listing supplies the featured digital artwork only. The featured KleanKutChaos file is the design source for this tutorial, and this tutorial does not claim that the pictured combination was physically tested with the listing files.
What you’ll need
- Goth Pottery SVG Bundle Part 1 with bat teapot and gothic tableware designs from the featured KleanKutChaos listing
- One complete commercially made folding wooden or sealed-composite cookbook stand with an intact support, factory hinges or pivots, non-slip feet, page ledge, and optional page clips; use the maker's published size and load guidance
- One medium hardcover cookbook or lightweight recipe binder that fits the stand without exceeding its maker's limits; keep a heavier or oversized book out of the first trial
- Adhesive craft vinyl approved by its maker for the stand's exact cool sealed finish, in one to three colors such as cream, muted sage, and soft gold
- Transfer tape matched to the vinyl; use strong-grip tape only when the vinyl maker specifically requires it
- Cricut, Silhouette, or similar cutting machine with current software, a clean fine-point blade, and the mat specified for the vinyl
- Paper, pencil, ruler, flexible measuring tape, low-tack painter's tape, and a full-size paper template of the exposed back panel
- Weeding hook or tweezers, scraper or felt squeegee, brayer, small scissors, and scrap vinyl for test cuts
- Low-lint cloths and only the mild cleaner approved by both the stand and vinyl makers; never mix cleaners or soak wood, seams, or hardware
- A stable dry worktable with bright task lighting, plus safety glasses and any protective equipment required by the tool and material makers
How to make it
- 1
Choose a complete stable stand
Select a factory-made cookbook stand that opens smoothly, locks or braces securely at its intended angle, sits flat on all feet, and has an undamaged ledge and page clips. Reject warped, cracked, loose, wobbly, splintered, improvised, or mystery hardware. Confirm that the maker allows the intended cookbook size and that the decorative surface is a cool sealed finish compatible with pressure-sensitive vinyl.
- 2
Choose a safe dry location
Plan to use the finished stand on a stable dry counter or table well away from a sink, cooktop, oven vent, kettle, open flame, splatter, steam, and traffic. The project is decorative organization, not a heat shield or food-preparation surface. If no cool dry placement is available, use the stand in a craft room or reading nook instead of the kitchen.
- 3
Dry-fit the actual cookbook
Open the stand exactly as its maker directs, engage the support fully, and place the closed cookbook on the ledge before opening it to a middle spread. Confirm that the feet stay planted, the book does not overhang dangerously, the ledge supports the cover, and page clips move without binding. Choose a smaller or lighter book if the stand tips, flexes, or slides.
- 4
Map every no-vinyl zone
Trace the exposed back panel at full size. Mark the ledge, page clips, hinge leaves, pivots, support-contact areas, feet, edges, seams, maker labels, handholds, book-contact zones, and any unfinished wood as off-limits. Add the larger of a half-inch buffer or the clearance required by either maker so vinyl cannot enter a joint or rub against the book.
- 5
Test the finish discreetly
Close the empty stand and identify a hidden sealed spot that is not structural. Clean it by the stand maker's method, let it dry, then apply small vinyl and transfer-tape samples. Inspect and remove them after the makers' stated interval. Stop if the finish lifts, clouds, stains, softens, absorbs cleaner, or requires aggressive burnishing.
- 6
Clean only the decorative face
With the stand empty and folded or supported according to its maker, wipe the flat decorative areas with the approved cleaner on a barely damp cloth. Keep moisture out of raw edges, seams, pivots, feet, and hardware. Let the stand become completely dry and room temperature before applying vinyl.
- 7
Build a paper layout
Cut paper versions of one bat-wing teapot, two crescents, a few stars, and two slender botanical accents. Tape them inside the safe outline, leaving calm space above and beside the cookbook. Reopen the stand and load the book to verify that no paper motif disappears under a clip, catches a hand, or reaches a moving or contact area.
- 8
Prepare a sturdy working copy
Duplicate the purchased artwork and preserve the originals. Size the bat-wing teapot for the broad upper panel and simplify isolated specks or hairline details that fall below the vinyl maker's minimum recommendation. Separate the side accents into small manageable pieces instead of one oversized transfer sheet.
- 9
Plan colors and registration
Limit the design to one, two, or three compatible vinyl colors. Favor adjacent color areas over fully stacked layers so the finished surface stays thin and edges stay easy to inspect. Add temporary registration marks outside the final art only if your chosen workflow needs them, then remove those marks before use.
- 10
Run a material test cut
Place a small scrap on the specified mat, choose the closest manufacturer setting, and cut a crescent plus one wing opening. Confirm that the blade cuts the vinyl cleanly without slicing the liner. Adjust one setting at a time and replace a worn blade or damaged mat instead of adding excessive pressure.
- 11
Cut, weed, and compare
Cut each color, then weed from the outside inward while the liner remains flat. Remove the openings in the bat wings, teapot handle, moon, stars, and leaves, and secure tiny scraps where children and pets cannot reach them. Compare each weeded piece with the software preview and paper layout before discarding excess vinyl.
- 12
Apply matched transfer tape
Attach transfer tape from the center or one end and burnish outward as its maker directs. Flip and burnish the liner side, then trim the tape into manageable rectangles without clipping the vinyl. Use lower-tack matched tape for delicate botanical lines unless the vinyl instructions say otherwise.
- 13
Hinge and transfer the centerpiece
Lay the empty stand flat or brace it exactly as its maker permits. Align the bat-wing teapot with the paper template and secure one edge with a low-tack tape hinge outside the motif. Peel the liner at a low angle, lower the design gradually, and burnish from the center outward. Peel the transfer tape back over itself instead of lifting it straight up.
- 14
Add the accents
Apply the crescents, stars, and botanical pieces one at a time, preserving every marked buffer. Do not bridge seams, wrap vinyl around an edge, or force a motif into a narrow strip beside a pivot. Remove temporary registration marks and inspect for loose points that could snag a book or cloth.
- 15
Let the vinyl cure empty
Leave the stand empty, clean, dry, and undisturbed for the vinyl maker's full cure interval. Keep the support in the maker-approved storage position and do not stack weight on the decals. Never speed curing with a heat gun, hair dryer, iron, oven, cooktop, sunlight, or heated press.
- 16
Recheck every mechanism
After cure, slowly open and close the empty stand through its normal range. Engage the support, move each page clip, and inspect hinges, pivots, feet, ledge, seams, and handholds from both sides. Remove and recut any decal that contacts hardware, curls into a joint, narrows a handhold, or reaches a book-contact surface.
- 17
Load and stability-test the cookbook
Set the stand in its cool dry location and open the lightweight cookbook to a middle spread. Press only the stand's intended controls—never the decorated panel—to adjust it. Turn several pages and confirm the book, clips, support, feet, and vinyl remain clear and stable. Stop using the stand if it rocks, slides, flexes, pinches, or begins to close.
Practical finishing tips
- Use one large, boldly simplified bat teapot above the book instead of filling the whole back panel with tiny details.
- Photograph the open stand from the side before decorating so you have a reference for the correct support position.
- Size the paper mockup with the actual cookbook in place; a motif that looks centered on an empty stand may vanish behind a tall book.
- Rounded leaf tips and thicker wing openings weed more reliably than long hairline flourishes on a frequently handled object.
- Keep a dry soft cloth near the stand for dusting, but never wipe vinyl while it is warm, damp, or exposed to cooking residue.
- Store the stand and cookbook by their makers' directions; never carry the stand by its page clips or vinyl-decorated panel.
Troubleshooting
Lay the transfer tape back down, burnish the liner side, and peel the liner away at a lower angle. If the hidden-area test also failed, switch to a compatible vinyl-and-tape combination rather than scraping harder on the stand.
Stop immediately and remove the remaining tape without enlarging the damaged area. The coating may be fragile, uncured, or incompatible. Do not cover the damage with more vinyl; follow the stand maker's repair guidance or use a separate removable paper decoration away from the mechanism.
Stop operating the stand and remove the interfering vinyl. Enlarge the no-vinyl buffer in the digital layout and recut the motif. Never loosen, remove, or alter factory hardware to make a decoration fit.
Use a shorter book or move a newly cut centerpiece higher within the already verified safe zone. Do not place vinyl on the ledge, clips, front lip, book cover, or contact surface to make the art visible.
Remove the book, fold the stand by its maker's method, and inspect the feet, support, surface, and load rating. Move to a level dry surface and use a smaller book only if the maker permits it. Replace rather than improvise a repair for damaged feet, pivots, supports, or ledges.
Move the stand away from moisture, heat, steam, and splatter. Clean and dry it only as both makers direct, then remove the failed decal rather than sealing it with an unapproved coating. Reapply only after the surface passes a fresh compatibility test.
Ways to make it yours
Cut the teapot, bats, moon, and foliage in cream as one simplified silhouette for faster weeding and a restrained black-and-ivory look.
Use the decorated stand outside the kitchen for a family recipe binder, keeping the same stability, load, hardware-clearance, and book-contact rules.
Mount the motifs on a separate cardstock panel displayed behind—not beneath—the cookbook when the stand finish cannot accept adhesive, and remove it before folding or storing the stand.
Use the smaller bat-tableware motifs on removable labels for closed craft-supply boxes kept away from food; do not apply them to dishes, utensils, food containers, or surfaces that will be washed.
Keep crafting
- DIY Kitchen Witch Recipe Card Carousel With Cricut Print Then Cut — Turn a ready-made rotary index-card file into a durable kitchen-witch recipe carousel with printable dividers, handwritten 4-by-6 cards, and a calm gothic palette.
- DIY Haunted Teacup Halloween Tea-Towel Ladder With Cricut HTV — Dress a small countertop display ladder with three washable cotton towels featuring haunted teacup, bat-teapot, and celestial spoon motifs cut from heat-transfer vinyl.
- DIY Gothic Snake Mug Display Riser With Cricut Vinyl — Turn a stable two-tier countertop shelf into a gothic mug display with snake-and-teacup vinyl motifs applied only to the cool, non-contact front aprons.
Inspiration & further reading
This is an original Klean Kut Halloween Crafts project inspired by approachable techniques shared across trusted craft and home sources. Explore Cricut Vinyl instructions, Cricut Transfer Tape Instructions and U.S. Consumer Product Safety Commission Art and Craft Safety Guide for more ideas and technique background.