
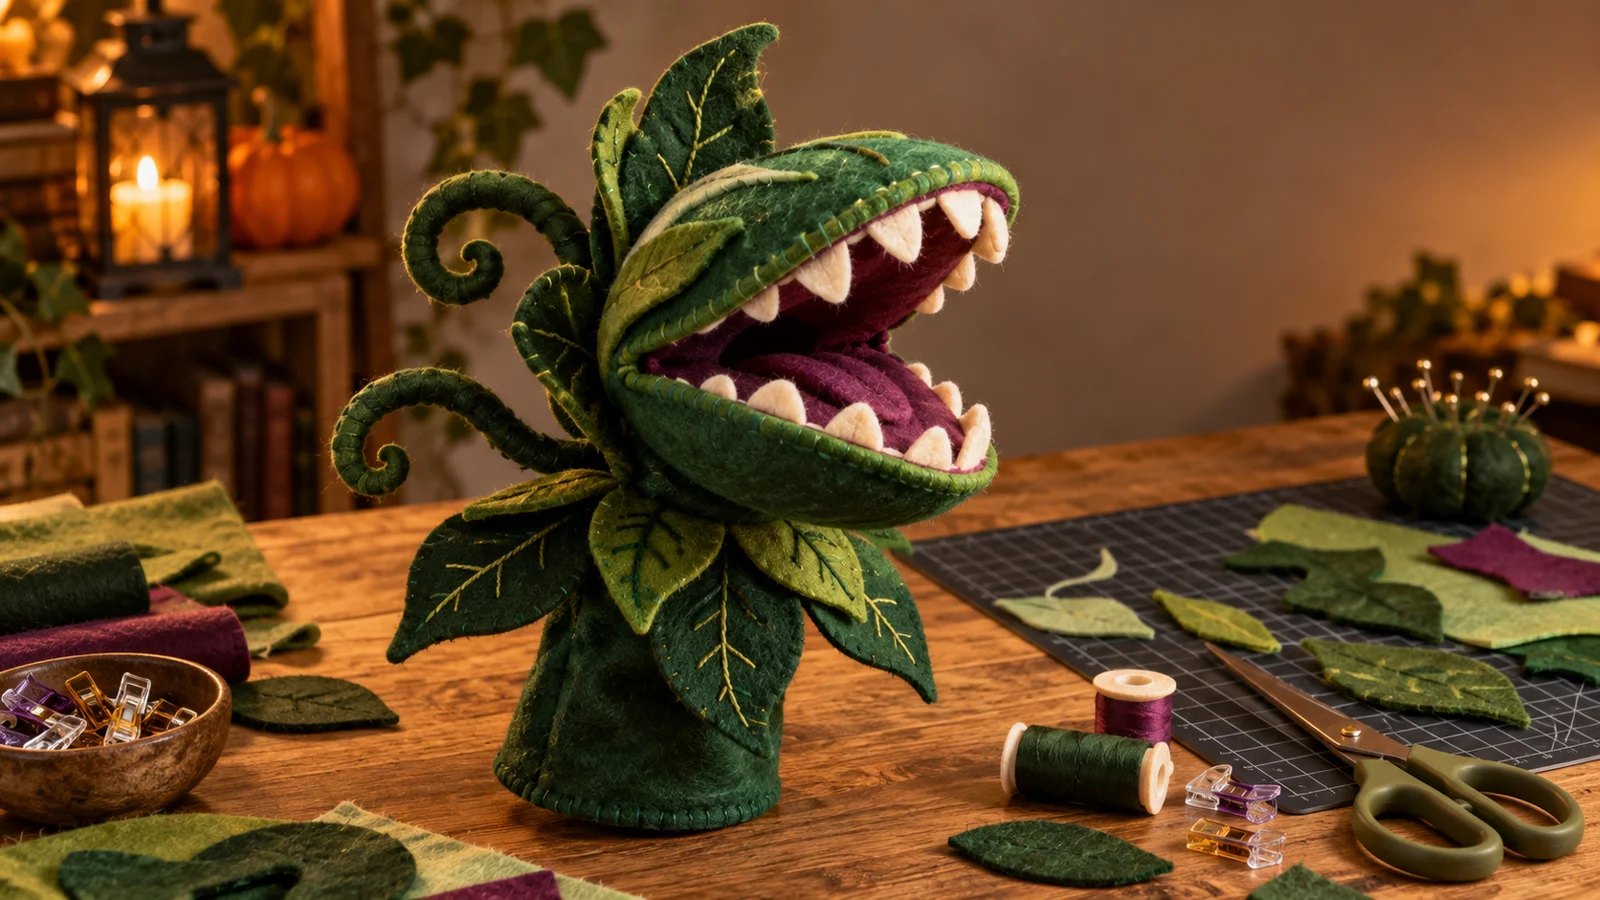
A hand puppet is a playful way to give a dramatic plant silhouette real movement without building a rigid prop. The lower felt cuff hides the maker's hand, the thumb and fingers operate two soft mouth plates, and layered leaves make the head look full while remaining light enough for short performances, party photos, or a Halloween storytelling corner. The finished puppet is decorative and expressive rather than a chew toy or an unsupervised child's toy.
This is an original project plan based on common rotary-cut felt, appliqué, soft-sculpture, and hand-puppet construction methods. Felt density, fiber content, stabilizer, blade type, mat condition, machine model, seam allowance, adhesive chemistry, hand size, and artwork complexity can change the result. Test the exact felt and construction method, follow every current machine, blade, mat, fabric, needle, thread, and adhesive instruction, and preserve the purchased artwork by editing only duplicate working files. The featured KleanKutChaos listing supplies the plant artwork, while the featured KleanKutChaos file is the design source for this tutorial. This tutorial does not claim that the pictured combination was physically tested with the listing files.
What you’ll need
- Audrey II Monster Plant SVG from the featured KleanKutChaos listing
- Dense wool-blend or acrylic craft felt approved for the chosen cutting method: deep green for the body and two or three greens for leaves
- Plum or burgundy felt for the mouth lining and cream felt for the teeth
- Optional lightweight flexible fabric stabilizer only when its maker and the cutting-machine instructions approve it for the selected felt
- Cricut Maker-family, Silhouette Cameo, or another machine that supports the chosen fabric blade and material
- Compatible rotary or bonded-fabric blade specifically approved for the machine, material, and mat
- Clean FabricGrip or other machine-approved fabric cutting mat
- Cutting-machine software and a duplicate working copy of the purchased art
- Paper, cardstock, low-tack tape, ruler, pencil, and a flexible tape measure for the hand-size prototype
- Sharp fabric scissors, small detail scissors, clips, washable fabric marker, and a seam gauge
- Matching all-purpose polyester thread and hand-sewing needle or a sewing machine set up for felt
- Optional washable flexible fabric adhesive approved for felt, used only as its maker directs
- A small amount of polyester stuffing for the lip rolls or leaves, kept out of the hand cavity
- Scrap felt from every color for cut, seam, adhesive, and flex tests
- Closed containers for needles, blade caps, offcuts, and discarded teeth or other small pieces
How to make it
- 1
Measure the operating hand
Measure across the knuckles, from wrist crease to fingertip, and from the thumb base to the opposite edge of the palm. Decide whether the thumb will operate the lower jaw and the fingers the upper jaw, then add comfortable ease plus the seam allowance required by the chosen construction. Make the wrist cuff wide enough to enter without straining the finished seams.
- 2
Duplicate and simplify the artwork
Keep the purchased files untouched and edit only a copy. Choose the clearest open-mouth plant, remove tiny thorns, isolated specks, hairline vines, and details that would become loose parts, then separate the silhouette into broad body, upper jaw, lower jaw, mouth lining, leaf, and tooth shapes. Round sharp internal corners so felt can flex without tearing.
- 3
Create full-size template pieces
Size the head around the measured hand and add a consistent seam allowance outside every sewn edge. Make mirrored left and right body panels, two mouth-plate shapes, two mouth linings, a cuff or stem panel, paired leaves, and broad teeth that are safely captured inside a seam. Label grain direction, fold lines, matching points, and the side of each piece.
- 4
Prototype the hand cavity in paper
Cut the body, mouth plates, and cuff from paper or inexpensive cardstock, tape them loosely, and slide the hand inside. Confirm that the jaws open without pinching, the cuff reaches past the wrist, and the plant stays balanced. Enlarge the cavity or shorten the head now; do not rely on stretching dense felt later.
- 5
Test the felt and approved blade
Condition the mat and load the felt exactly as the machine and material makers direct. Cut a representative leaf tip, inner curve, seam notch, and tooth from scrap at the recommended starting setting. Stop if the felt shifts, pills, compresses excessively, or requires repeated passes beyond the blade maker's guidance; change the approved material, mat, or method instead.
- 6
Cut mirrored body and leaf pieces
Place felt with the approved side against the mat, use a brayer only if the mat maker permits it, and cut small grouped sections rather than an overcrowded mat. Mark each mirrored pair as it is removed, lift the felt without stretching narrow bridges, and trim only minor fibers with fabric scissors. Hand-cut any piece the machine cannot produce cleanly.
- 7
Cut the mouth plates and teeth
Cut two sturdy but flexible mouth plates and two matching plum linings. Make each tooth broad at the base with a rounded tip, then lay the upper and lower rows against the paper prototype. Reduce the number of teeth if their bases overlap or create a stiff ridge; every tooth must be fully enclosed by stitching or approved adhesive.
- 8
Build the captured tooth rows
Arrange the teeth between each green mouth edge and plum lining with the tips pointing inward. Clip, baste, or temporarily secure them using the chosen maker-approved method, then stitch or bond the full base of every tooth. Turn the row outward and tug-test each piece before continuing; remove and recut any tooth that can pull free.
- 9
Join the upper and lower mouth
Align the two finished mouth plates at the rear hinge, keeping the linings toward the inside. Sew a flexible hinge with reinforced ends or use the tested adhesive construction exactly as directed, leaving enough movement for the hand to open the jaws. Insert the hand and check reach before attaching the outer head.
- 10
Attach the body panels to the jaws
Clip one mirrored body panel around the upper and lower mouth edges, matching the marked points without stretching either layer. Stitch or bond from the rear hinge toward the front on both sides, then repeat with the second body panel. Keep all seam bulk outside the finger and thumb contact areas and stop if the mouth twists.
- 11
Close the head and shape the lips
Join the remaining head seams while leaving the cuff opening accessible. Turn the head if the construction uses hidden seams, ease the curves with a blunt turning tool, and add only a narrow, fully enclosed wisp of stuffing where the lip needs definition. Do not place loose stuffing inside the operating cavity.
- 12
Add the stem cuff and hand tunnel
Form the green cuff into a tapered tube that extends comfortably beyond the wrist, then attach its upper edge around the base of the head. Add a simple internal felt divider between the finger and thumb zones if the paper test showed the hand sliding; secure every divider edge and keep the palm area free of rough seams or exposed adhesive.
- 13
Layer leaves without blocking motion
Pair or appliqué the leaf pieces, then attach them around the head base and cuff with broad stitched areas rather than tiny points. Angle leaves away from the hinge, hand opening, and sight line. Flex the puppet repeatedly as each layer is added so decorative foliage never restricts the jaws or hides a loose seam.
- 14
Finish, inspect, and rehearse
Trim thread tails, allow any approved adhesive to cure for its full stated time, and inspect every seam, tooth, leaf, and cuff edge under bright light. Flex the mouth through its full range, perform a gentle tug test on all applied parts, and wear the puppet for a short interval to check heat and comfort. Retire it immediately if any piece loosens, the lining tears, or the hand becomes numb or irritated.
Practical finishing tips
- Make the paper prototype first; a quarter-inch change at the hinge can matter more than an extra hour of decorative stitching.
- Use fewer, larger teeth for a cleaner cut, stronger captured seam, and more readable expression from across a room.
- Cut paired leaves together only when the machine and blade guidance permit the combined thickness; otherwise mirror them digitally and cut one layer at a time.
- Place the darker felt inside the mouth and the lighter green on the outer lips so the opening reads clearly in photographs.
- If switching between machine-cut and hand-cut pieces, keep the same seam allowance and matching marks on both methods.
- Store the puppet loosely supported in a breathable box so the mouth is not crushed and felt fibers are not pulled by hooks.
Troubleshooting
Stop the cut before the blade drags the material. Confirm that the felt, mat, blade, orientation, and setting are approved for the machine; use a clean compatible fabric mat and reduce the number of pieces per pass. Hand-cut from the tested paper template if the material remains unstable.
Return to the paper pattern and enlarge the hand cavity or move the hinge rearward. Check for bulky tooth bases, stretched body seams, or leaves crossing the hinge, and rebuild the affected section instead of forcing the hand into a tight opening.
Compare the mirrored body panels and matching points, then unpick or separate the most recent seam before the distortion is locked in. Reclip from the rear hinge toward the front with equal ease on both sides and keep the mouth plates flat while joining.
Review the material maker's fiber and stabilizer guidance, verify blade condition, and test a larger simplified shape. Trim only loose surface fibers with fabric scissors; do not keep adding pressure or passes when that is outside the blade recommendation.
Stop using the puppet and remove it from children's reach. Open the adjacent seam enough to recapture the entire base with sound material, or replace the damaged piece; surface glue over a failing attachment is not a reliable repair.
Remove nonessential upper leaves and stuffing, shorten the head in the working pattern, or extend the cuff for support. Keep decorative weight near the hand rather than adding wire, beads, magnets, or rigid counterweights.
Ways to make it yours
Use only a felt adhesive whose maker explicitly approves the materials and joint type, increase every bonded overlap, observe ventilation and full cure directions, and treat the result as supervised display décor rather than a durable toy.
Scale the same broad pieces into a static stuffed sculpture, close the mouth in a fixed pose, and mount it in a weighted fabric pot kept away from young children and pets.
Swap the dark greens and plum for teal, lime, and coral while keeping the same captured-piece construction and rounded tooth shapes.
Mirror the base pattern and change only the leaf silhouette, mouth color, and expression so two puppets can interact without creating a second untested hand-cavity design.
Keep crafting
- DIY Carnivorous Plant Halloween Fascinator With Felt and HTV — Turn felt, soft foam, and small HTV accents into a compact carnivorous-plant fascinator that stays above the brow and adds theatrical bite to a Halloween outfit.
- DIY Carnivorous Plant Pop-Up Halloween Card With Cricut or Silhouette — Build a dimensional carnivorous-plant card that opens into a tiny haunted flower shop, then folds flat for an envelope with measured tabs, clean score lines, and sturdy paper layers.
- DIY Haunted Houseplant Canvas Pot Covers With Heat-Transfer Vinyl — Give three ordinary nursery pots a gothic makeover with washable canvas covers, crisp haunted-botanical HTV, and a plant-safe double-container setup.
Inspiration & further reading
This is an original Klean Kut Halloween Crafts project inspired by approachable techniques shared across trusted craft and home sources. Explore Cricut FabricGrip mat tips and care, Cricut machine materials and compatible blades, Silhouette Rotary Blade Guide, U.S. Consumer Product Safety Commission Art and Craft Safety Guide and U.S. Consumer Product Safety Commission choking-hazard guidance for more ideas and technique background.