
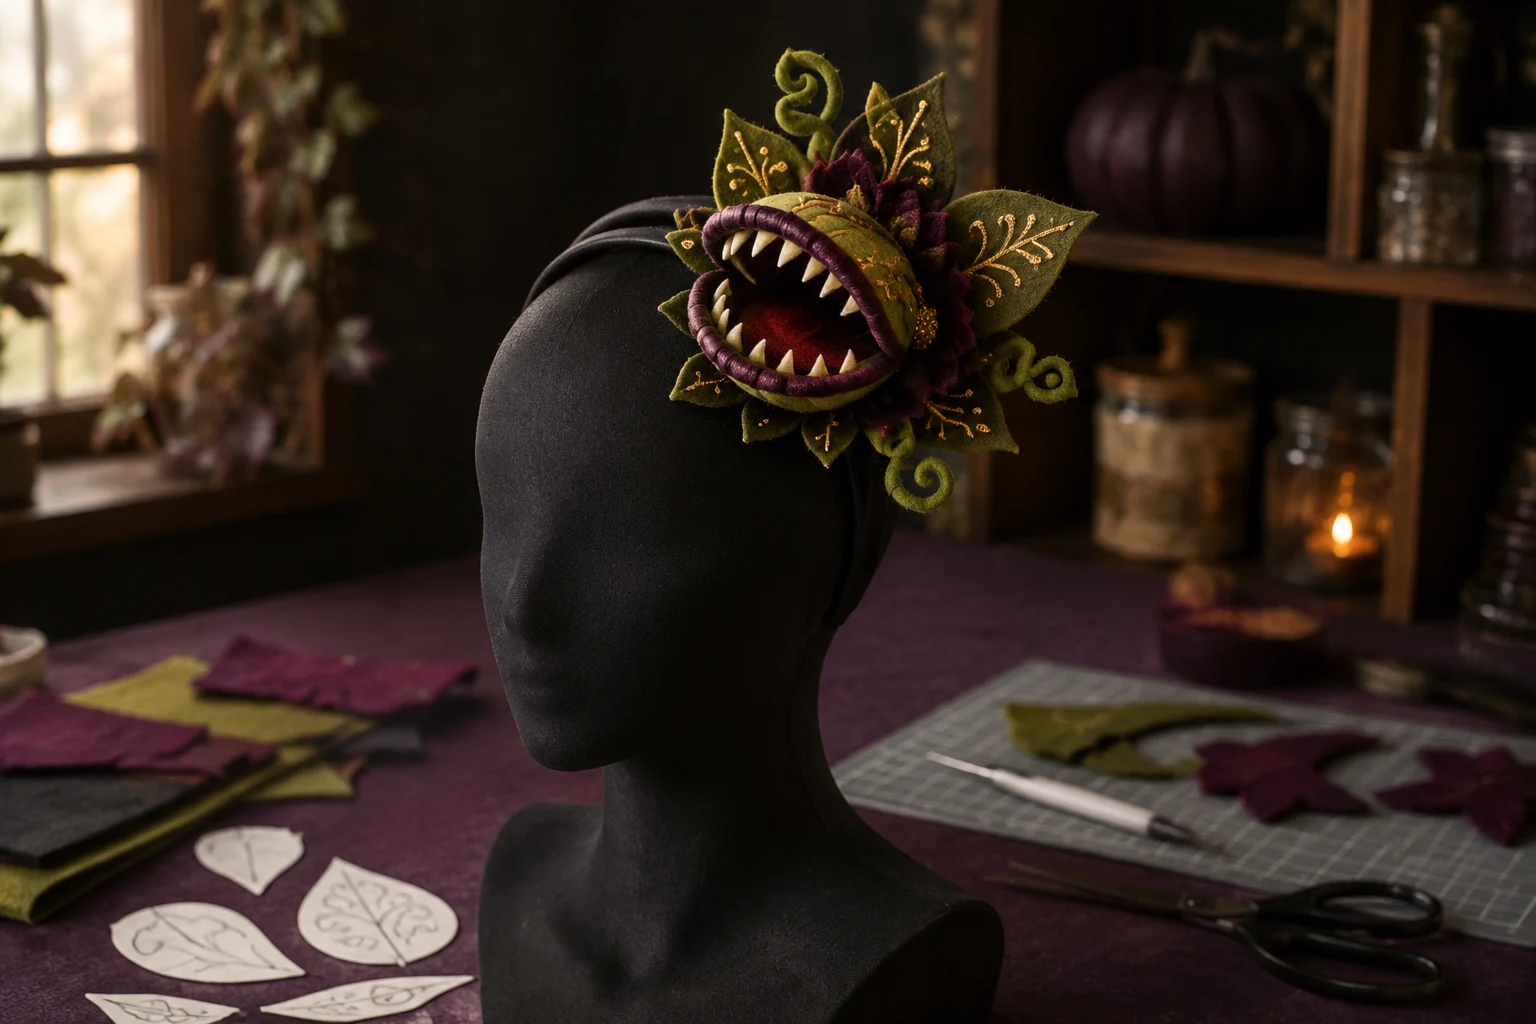
This compact fascinator turns a bold monster-plant silhouette into a wearable dimensional bloom rather than placing a flat decal on a shirt. A lightweight foam-and-felt mouth sits above one temple, soft felt teeth ring the opening, and pressed vinyl veins give the surrounding leaves a crisp cut-file finish. Because every decorative part is built on a separate felt base before it reaches the headband, you can test balance, visibility, and comfort at each stage.
This is an original project plan based on common felt-appliqué, soft craft-foam, heat-transfer-vinyl, and fascinator-base construction. Felt fiber, foam density, headband shape, adhesive, blade, mat, HTV, pressing tool, temperature, pressure, motif complexity, finished weight, and the wearer's hair and head shape all affect the result. Make the full paper mockup, cut and press the exact material scraps, cure every bond completely, and follow the current directions from the cutting-machine, blade, mat, felt, HTV, press, foam, adhesive, and headband makers. The featured KleanKutChaos artwork supplies visual inspiration and decorative shapes; it does not include the structural mouth, felt pattern, or headband assembly described here. This exact material combination has not been represented as physically tested.
What you’ll need
- Audrey II Monster Plant SVG from the featured KleanKutChaos listing
- One plain flexible headband about 3/8 to 3/4 inch wide with no sharp teeth or exposed metal
- Wool-blend or dense craft felt in olive green, burgundy, plum, cream, and black
- One sheet of 2-millimeter soft EVA craft foam for the internal mouth shells
- Medium-weight sew-in interfacing or stiff felt for the separate fascinator base
- Small pieces of black and metallic-gold heat-transfer vinyl approved for the chosen felt
- Cricut-, Silhouette-, or similar cutting machine with the blade and mat recommended for each material
- Printer, copy paper, pencil, flexible ruler, and low-tack tape for the full-size mockup
- Small heat press or iron plus a firm pressing mat and protective sheet approved by the HTV maker
- Fabric scissors, paper scissors, fine tweezers, weeding tool, and brayer
- Flexible fabric adhesive or low-temperature glue system approved for felt and EVA foam
- Hand-sewing needle, strong polyester thread, thimble, clips, and pins with counted storage
- Two small black felt rectangles for headband tunnels and one oval felt backing piece
- Optional soft felt cord for short curled vines; do not use exposed wire
- Kitchen scale, tabletop mannequin or rolled towel, mirror, and a second adult for fit checks
How to make it
- 1
Choose a safe finished position
Put on the undecorated headband and mark a spot above one temple where a five-inch paper oval can sit without crossing the eyebrow, touching the ear, or entering central or peripheral vision. Turn the head in every direction and look up and down. Keep the opposite side undecorated so the piece remains light, and abandon the wearable version if the headband itself pinches, slips, or has sharp teeth.
- 2
Simplify the artwork for felt
Import the monster-plant SVG and duplicate it before editing. Keep the overall open-mouth silhouette, broad leaves, and two or three strong vein paths. Remove tiny spots, hairline vines, narrow gaps, and character-specific facial details that would create loose felt fragments. Separate the design into simple color layers; the SVG is a decorative reference, not a ready-made three-dimensional pattern.
- 3
Make a full paper mockup
Print the simplified mouth and leaf shapes at the intended size. Cut the mouth as two blunt semicircular jaws roughly five inches wide, then tape them around an oval paper opening with a shallow half-inch gap at the back. Add paper leaves behind it and tape the assembly to a paper headband strip. Test on a mannequin first, then use a mirror and second adult to confirm sightlines and scale before touching fabric.
- 4
Draft the structural pattern
Trace the approved upper and lower jaw shells onto paper, adding a narrow seam allowance that will wrap over the foam edges. Draw one curved gusset strip for the back and sides; leave the front open. Create a separate oval base no larger than needed to support the flower and leaves. Mark a clear centerline and the intended headband direction on every pattern piece so the finished mouth points outward rather than toward the wearer.
- 5
Test-cut each felt and foam
Cut a scrap containing one rounded tooth, a leaf point, an inside mouth curve, and a small foam arc. Use only the blade, mat, and material setting listed for that exact machine and material; compatible tools differ by model. Brayer fabric evenly, keep fingers away from the carriage, and unload before lifting pieces. If the felt stretches or fuzzes, simplify the shape, stabilize it only as its maker allows, or cut the paper pattern by hand with fabric scissors.
- 6
Press the HTV before assembly
Mirror one small leaf-vein motif and one petal accent, then cut and weed them from HTV. Test on the exact felt, using the HTV maker's current heat, time, pressure, protective-sheet, and peel directions rather than a universal setting. Check the reverse for scorching, flattening, adhesive bleed, or distortion. Press approved accents only onto flat leaf and petal pieces; never press the assembled headpiece, foam, headband, glue, or elastic.
- 7
Build the soft mouth shells
Cut two EVA-foam jaw shapes by hand with rounded edges, then cut matching green felt covers with the drafted allowance. Apply a thin, even layer of compatible adhesive to the foam away from the future mouth edge. Wrap the felt smoothly over each shell and clip it until fully cured. Do not heat-shape unknown foam or force stiff foam into a curve; the shallow gusset creates dimension without high heat.
- 8
Form the fixed open mouth
Wrap the curved foam gusset in burgundy felt, then attach it between the upper and lower shells along the back and side edges. Keep the front completely open and the deepest part of the mouth shallow. Use clips instead of pins where possible and let the bond cure on a supported paper form. The finished unit should spring back lightly when pressed and contain no rigid projection, staple, or exposed foam edge.
- 9
Add rounded felt teeth and lips
Cut cream felt teeth with broad bases and rounded tips, making them decorative rather than sharp. Arrange them around the inner opening with generous spacing and keep every point inside the soft lip. Glue or hand-sew each base flat, then cover the join with a narrow rolled-felt lip. Pull gently on every tooth after curing; remove and remake any piece that loosens or scratches.
- 10
Layer leaves and short vines
Stack two felt layers for each leaf, placing the pressed HTV side outward. Glue or edge-stitch the layers and keep the leaf tips blunt. Make optional curls from short felt cord or narrow doubled felt strips, securing both ends within the flower base. Avoid wire, fishing line, long tendrils, beads, bells, glitter, or dangling parts that could snag hair, costumes, doors, branches, pets, or other people.
- 11
Construct the separate base
Sandwich interfacing or stiff felt between two black felt ovals and stitch or glue around the perimeter. Arrange the mouth and leaves on this base while it lies flat, keeping most weight over the headband mark rather than cantilevered outward. Attach the largest piece first, then leaves and curls. Let the complete ornament cure overnight or for the adhesive maker's full stated time before mounting it.
- 12
Create removable headband tunnels
Wrap two small felt rectangles around the headband at the marked position without gluing to the headband. Stitch each rectangle into a snug tunnel on the underside of the fascinator base, keeping all knots buried and needles accounted for. Slide the headband through both tunnels. Add a third tunnel only if the base rotates; do not drive glue, staples, wire, or rigid fasteners through the headband.
- 13
Balance and inspect the finished piece
Weigh the undecorated headband and finished assembly so unexpected glue or hardware weight is obvious. Support the headband on a mannequin or rolled towel for at least an hour, then check for sagging, twisted tunnels, separated layers, sharp seams, heat damage, and loose teeth. Shake it gently by hand over a table; if it rotates or drops, reduce the decoration rather than tightening the band against the head.
- 14
Complete a supervised wear test
Test indoors in full light with another adult present. Wear it for ten quiet minutes, check that vision, hearing, balance, and head movement remain unrestricted, then remove it and inspect for pressure marks or headache. Repeat with the complete costume and hairstyle. Do not wear it while driving, cycling, running, cooking, using stairs in dim light, near flame or heat, or anywhere it could catch on surroundings.
Practical finishing tips
- Press all HTV while the felt is flat. Heat applied after foam, glue, thread, or the headband is assembled can melt, distort, or weaken the structure.
- Use the SVG's bold silhouette as the design language, then redraw tiny details as larger leaf veins or omit them. Wearable felt rewards simple shapes.
- Make the decorative base removable from the headband with sewn tunnels. It is easier to repair, store, or swap than a permanently glued assembly.
- Build the visual volume behind the mouth with flat layered leaves instead of adding a heavy pot, stem, or wire armature.
- Keep a count of every needle and pin before, during, and after assembly, especially if the headpiece will be worn around children or pets.
- Store the fascinator supported in a rigid box away from heat and direct sun so the mouth opening and HTV details do not flatten or warp.
Troubleshooting
The felt, blade, mat, or setting may not be compatible. Stop the cut, replace a damaged blade or mat as directed, test a bonded or stiffer felt only if its maker permits, and simplify the path. Hand-cutting around a printed pattern is safer than repeating excessive machine passes.
Temperature, dwell time, pressure, or the material pairing is wrong. Discard the damaged scrap, verify the exact HTV and base-fabric combination in the current heat guide, and make another small test. Do not cover scorching with a second vinyl layer.
The foam shells may be too soft, the gusset too narrow, or the assembly insufficiently cured. Remove it from the headband, support the original paper opening, and add a wider soft-foam gusset within the existing edges. Never prop it open with exposed wire, skewers, or rigid spikes.
The base is too heavy or the tunnels are loose and poorly spaced. Remove leaves from the farthest edge, move the tunnels farther apart, or add a third sewn tunnel. Do not compensate with a painfully tight headband or adhesive on hair and skin.
Trim the felt into a rounder shape, cover the edge with a second soft layer, and retest by pressing it against the inside of the wrist. Any rigid, scratchy, or shedding piece should be removed before the fascinator is worn.
Take it off immediately. Slide the tunnel-mounted base farther back or reduce the mouth and front leaves using the paper pattern. If the sightline cannot remain completely clear during normal head movement, display the project on a hat stand instead of wearing it.
Ways to make it yours
Skip HTV and add broad leaf veins with contrasting felt appliqué or simple hand stitching, keeping knots enclosed between layers.
Scale the simplified flower to three inches, omit the gusset, and mount the flat layered motif on a commercial locking brooch base that is fully enclosed and kept away from children.
Slide the finished ornament onto a broad hat band instead of a headband, provided it stays outside sightlines and the hat remains stable during the complete costume test.
Mount the flower on a weighted felt-covered display block and add a short soft-felt stem, turning the same ornament into nonwearable desk or party décor.
Keep crafting
- DIY Carnivorous Plant Pop-Up Halloween Card With Cricut or Silhouette — Build a dimensional carnivorous-plant card that opens into a tiny haunted flower shop, then folds flat for an envelope with measured tabs, clean score lines, and sturdy paper layers.
- DIY Haunted Houseplant Canvas Pot Covers With Heat-Transfer Vinyl — Give three ordinary nursery pots a gothic makeover with washable canvas covers, crisp haunted-botanical HTV, and a plant-safe double-container setup.
- DIY Gothic Corset Halloween Favor Boxes With Cricut or Silhouette — Turn sturdy cardstock, tiny eyelets, and satin ribbon into structured gothic corset favor boxes for Halloween parties, movie nights, or dramatic place settings.
Inspiration & further reading
This is an original Klean Kut Halloween Crafts project inspired by approachable techniques shared across trusted craft and home sources. Explore Cricut machine material compatibility guide, Cricut blade and machine-tool guide, Cricut Everyday Iron-On instructions and U.S. Consumer Product Safety Commission Halloween costume guidance for more ideas and technique background.