
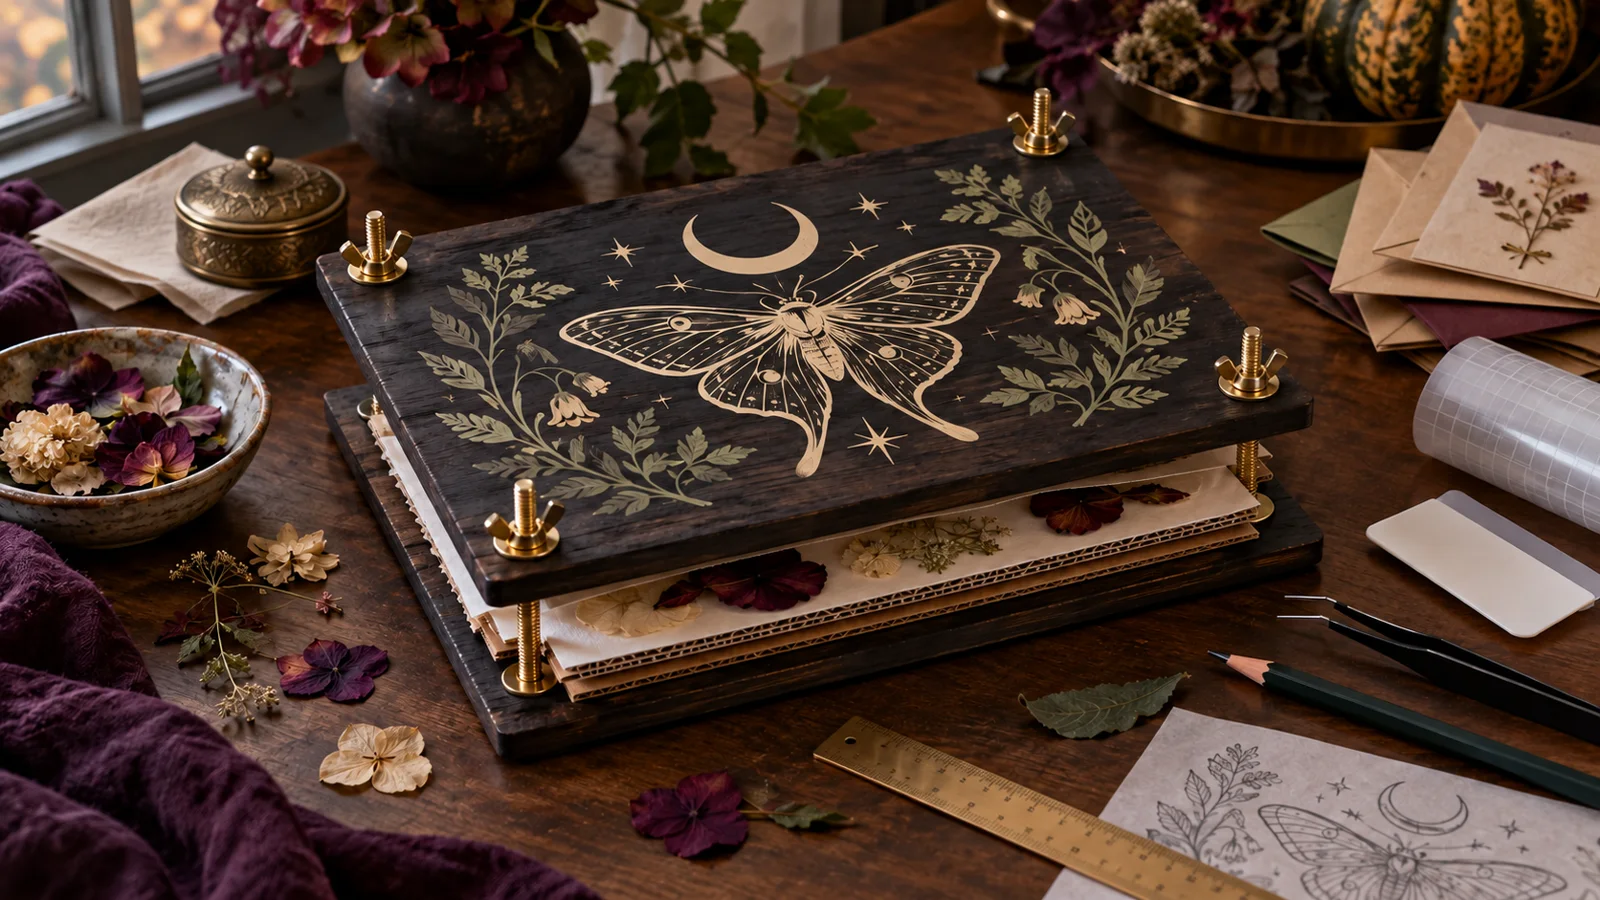
A screw-style flower press is useful long after Halloween, and its broad top board makes a forgiving vinyl surface when the finish is compatible. This project starts with a complete, commercially made wooden press whose boards are already drilled and whose hardware, cardboard ventilators, and absorbent sheets fit correctly. The decorative work stays on the cool outer face of the top board, well clear of bolts, wing nuts, edges, and handholds. Inside, only dry, positively identified, legally gathered, non-irritating garden or florist material goes between the paper layers.
This is an original project plan based on ordinary home-cutter, pressure-sensitive-vinyl, and flower-press methods. Wood finish, coating age, board thickness, hardware, paper absorbency, room humidity, plant thickness, vinyl formula, transfer tape, blade, mat, and artwork detail can all change the result. Follow the current instructions for the exact press, plants, vinyl, transfer tape, cutter, and cleaning products, and make both a surface test and a small pressing test. The KleanKutChaos listing supplies the featured digital artwork only. The featured KleanKutChaos file is the design source for this tutorial, and this tutorial does not claim that the pictured combination was physically tested with the listing files.
What you’ll need
- Sun Print Inspired SVG Bundle with botanical moth and celestial motifs from the featured KleanKutChaos listing
- One complete, commercially made screw-style wooden flower press with predrilled top and bottom boards, four matching bolts, washers and wing nuts, plus intact maker-specified cardboard ventilators and absorbent sheets
- Adhesive craft vinyl approved by its maker for the press's exact sealed wood finish, in one to three colors such as cream, muted sage, and soft gold
- Transfer tape matched to the selected vinyl; use strong-grip tape only when the vinyl maker specifically requires it
- Cricut, Silhouette, or similar cutting machine with current software, a clean fine-point blade, and the mat specified for the vinyl
- Paper, pencil, ruler, flexible measuring tape, low-tack painter's tape, and a full-size paper template of the top board and hardware clearances
- Weeding hook or tweezers, scraper or felt squeegee, small scissors, brayer, and scrap vinyl for test cuts
- Low-lint cloths and only the mild surface cleaner approved by both the press and vinyl makers; never mix cleaners or wet raw wood
- Fresh, dry, positively identified, non-protected and non-irritating flowers or leaves gathered from your own garden or obtained with clear permission; florist material is a convenient alternative
- Replacement blotting paper, unprinted absorbent paper, corrugated ventilators, or newspaper only when the press maker approves the exact material and arrangement
- Pencil-written specimen slips or separate paper labels for date, source, and plant name; keep ink and adhesive labels away from damp specimens
- A clean tray, plant snips used according to their maker, disposable paper for trimmings, and a dry ventilated indoor pressing location
- Nitrile-free or other suitable gardening gloves if needed for a known sensitivity, plus safety glasses and any protective equipment required by the tool and material makers
How to make it
- 1
Choose a complete predrilled press
Use a commercially made flower press with flat, uncracked boards; smooth edges; four aligned factory-drilled holes; straight bolts; correct washers and wing nuts; and a full internal stack. Reject warped, splintered, moldy, improvised, or mystery hardware. Buying the press complete avoids drilling and keeps the clamping system within its maker's design.
- 2
Choose safe and lawful botanicals
Plan to press only plants you can positively identify and are allowed to collect. Favor clean material from your own unsprayed garden or a florist. Never collect protected or wild plants without permission, and skip unknown, poisonous, thorny, sap-heavy, pesticide-treated, moldy, wet, or skin-irritating material. Keep every plant away from mouths, food-preparation areas, children, and pets.
- 3
Inspect and inventory the press
With clean hands, disassemble the empty press on a dry table and photograph the maker's original layer order. Check that each bolt moves freely, each hole is undamaged, and every paper and cardboard layer lies flat. Count and label the components so nothing is reversed or omitted after decorating.
- 4
Map permanent no-vinyl zones
Trace the top board at full size. Mark the four holes, washers, wing-nut sweep, edges, corners, maker marks, handhold areas, and any unfinished wood as off-limits. Add at least a half-inch buffer around hardware and edges—or more when either maker requires it—so the decal cannot catch while the press is tightened, lifted, or stored.
- 5
Test the finish discreetly
Clean a hidden sealed section by the press maker's method and let it dry. Apply small samples of the selected vinyl and transfer tape, then inspect or remove them after the makers' stated interval. Stop if the finish lifts, clouds, stains, softens, absorbs cleaner, releases pigment, or will not accept the vinyl without aggressive burnishing.
- 6
Clean the top board only
Remove all paper, cardboard, plants, and hardware from the decorative board. Wipe only the sealed top face with the approved cleaner on a barely damp cloth; do not flood holes, edges, end grain, or raw wood. Let the board become fully dry and room temperature before vinyl touches it.
- 7
Build a full-size paper composition
Place paper-cut versions of one large moth, a crescent, a few stars, and two or three leafy branches inside the safe outline. Preserve calm space around every washer and wing nut. Reassemble the empty boards temporarily to confirm that hands can reach and turn all hardware without rubbing the paper mockup.
- 8
Prepare a sturdy working copy
Duplicate the purchased artwork and preserve the originals. At final size, simplify isolated specks and extremely thin botanical lines that fall below the vinyl maker's minimum recommendation. Keep the moth broad enough to weed confidently and separate the leafy accents into manageable pieces rather than one floppy transfer sheet.
- 9
Plan colors and registration
Limit the design to one, two, or three compatible vinyl colors. Prefer adjacent color areas instead of full stacked layers, which add thickness and exposed edges. Add temporary registration marks outside the final art only if the chosen workflow requires them, and remove those marks before the press returns to service.
- 10
Run a material test cut
Place a small scrap on the correct mat, choose the closest manufacturer setting, and cut a leaf or star. Confirm that the blade cuts the vinyl cleanly without slicing the liner. Adjust one setting at a time and replace a worn blade or damaged mat instead of forcing excess pressure.
- 11
Cut, weed, and compare
Cut each color, then weed from the outside inward while the liner stays flat. Remove intended openings in the moth wings, moon, stars, and leaves, and secure tiny scraps where children and pets cannot reach them. Compare every weeded motif with the software preview and paper mockup before discarding the excess vinyl.
- 12
Apply the matched transfer tape
Attach the transfer tape from the center or one end and burnish outward as its maker directs. Flip and burnish the liner side, then trim the tape into manageable rectangles without clipping the vinyl. Use a lower-tack matched tape for delicate lines unless the vinyl instructions say otherwise.
- 13
Hinge, transfer, and check hardware
Align the moth on the top board with the paper template and hold one edge with a low-tack tape hinge outside the motif. Peel the liner at a low angle, lower the adhesive gradually, and burnish from the center outward. Peel transfer tape back over itself, then apply the smaller accents. Reinsert the empty hardware and confirm that every washer and wing nut turns freely without contacting vinyl.
- 14
Let the empty press cure
Remove the hardware again if the press maker permits and leave the decorated board flat, clean, dry, and undisturbed for the vinyl maker's full cure interval. Do not clamp plants inside, stack weight on the decal, or speed curing with a heat gun, hair dryer, oven, sunlight, or heated press.
- 15
Prepare a small specimen batch
After cure, choose fresh material with no surface water, soil, insects, disease, or visible residue. Trim it with the approved snips and blot gently without crushing. Start with a few naturally flat petals or leaves of similar thickness; bulky centers and overlapping stems trap moisture and are poor beginner choices.
- 16
Load the maker-approved stack
Rebuild the press in its documented order. Place each specimen between the approved absorbent sheets without pieces touching or overlapping, add a pencil-written slip beside—not on—the plant if desired, and alternate with the specified corrugated layers. Keep every specimen and paper edge clear of bolt holes.
- 17
Tighten evenly and dry patiently
Seat the top board, add washers and wing nuts in the maker's order, and finger-tighten opposite corners gradually so the boards stay parallel. Never use pliers or stand on the press. Store it flat in the dry, ventilated location specified by its maker, away from flame, heat, food, damp rooms, and direct sun. Follow the exact checking and drying interval for the press and plant type; extension guidance notes that many pressed floral materials need about four undisturbed weeks.
Practical finishing tips
- One large moth and two leafy branches leave more practical hand space than a dense border around every wing nut.
- Photograph the original internal layer order before decorating and keep that reference with the press.
- Choose naturally flat, similarly thick specimens for the first batch so pressure and drying are more even.
- Write collection details on a separate slip in pencil; damp plant material can make marker ink migrate.
- Keep a second set of clean blotters if the press maker expects paper changes, and replace stained, wrinkled, or moldy components rather than reusing them.
- Dust the cured decorative board with a dry soft cloth; keep cleaner, plant moisture, and pressing debris away from vinyl edges and raw wood.
Troubleshooting
Lay the transfer tape back down and burnish the liner side, then peel the liner away at a lower angle. If the hidden-area test also failed, switch to a compatible vinyl-and-tape combination rather than scraping harder on the wooden board.
Stop immediately and remove the remaining tape without enlarging the damaged area. The coating may be uncured, fragile, or incompatible. Do not cover damage with more vinyl; repair or replace the board according to its maker and use a separate cardstock insert for decoration.
Remove the hardware and decal before operating the press. Enlarge the hardware clearance in the design and recut the affected motif. Never reduce washer size, omit hardware, or tighten against vinyl to make an unsafe layout fit.
Release the pressure, verify the layer stack is centered and equally thick, then finger-tighten opposite corners in small alternating turns. Stop if a bolt binds, a board bows, or a hole splits; damaged presses need maker-approved repair or replacement.
Thick, wet, overlapping, or poorly ventilated material dries unevenly. Discard any moldy batch without opening it near food or sensitive people, clean or replace components as the press maker directs, and restart with dry-surfaced, thinner, non-overlapping material in the documented layer order.
Do not pull them free forcefully. Follow the press maker's removal guidance and allow the full drying interval; early opening can tear delicate material. For the next batch, use fresh approved absorbent sheets and avoid crushed or sap-heavy blooms.
Ways to make it yours
Cut the moth, crescent, and foliage as one cream silhouette for faster weeding and a quiet Victorian field-guide look.
Use the same layout rules on a complete commercially made mini press, keeping even larger proportional clearances around its smaller hardware and pressing only specimens suited to its capacity.
Mount the motifs on a removable cardstock panel stored beside the press when the wood finish cannot accept adhesive; never place loose card inside the pressing stack unless the maker approves it.
Cut coordinating moth-and-moon shapes from cardstock for separate storage envelopes after the plants are fully dry, keeping adhesive, ink, and decorations away from the damp press interior.
Keep crafting
- DIY Gothic Rose Pressed-Flower Acrylic Frame With Cricut Vinyl — Layer fully dried flowers, a favorite photo, and a bold cathedral-rose vinyl border inside a clear magnetic acrylic frame.
- DIY Celestial Moth Magnetic Message Board With Cricut Vinyl — Turn a smooth metal memo board into useful celestial décor with a bold moth, moon phases, and a clear space for everyday notes.
- DIY Haunted Houseplant Care Caddy With Cricut Vinyl — Organize your mister, labels, pruning tools, and plant-care basics in a sturdy black caddy decorated with crisp haunted botanical vinyl.
Inspiration & further reading
This is an original Klean Kut Halloween Crafts project inspired by approachable techniques shared across trusted craft and home sources. Explore Cricut Vinyl instructions, Cricut Transfer Tape Instructions, Mississippi State University Extension: Creating a Pressed Floral Design and U.S. Consumer Product Safety Commission Art and Craft Safety Guide for more ideas and technique background.