
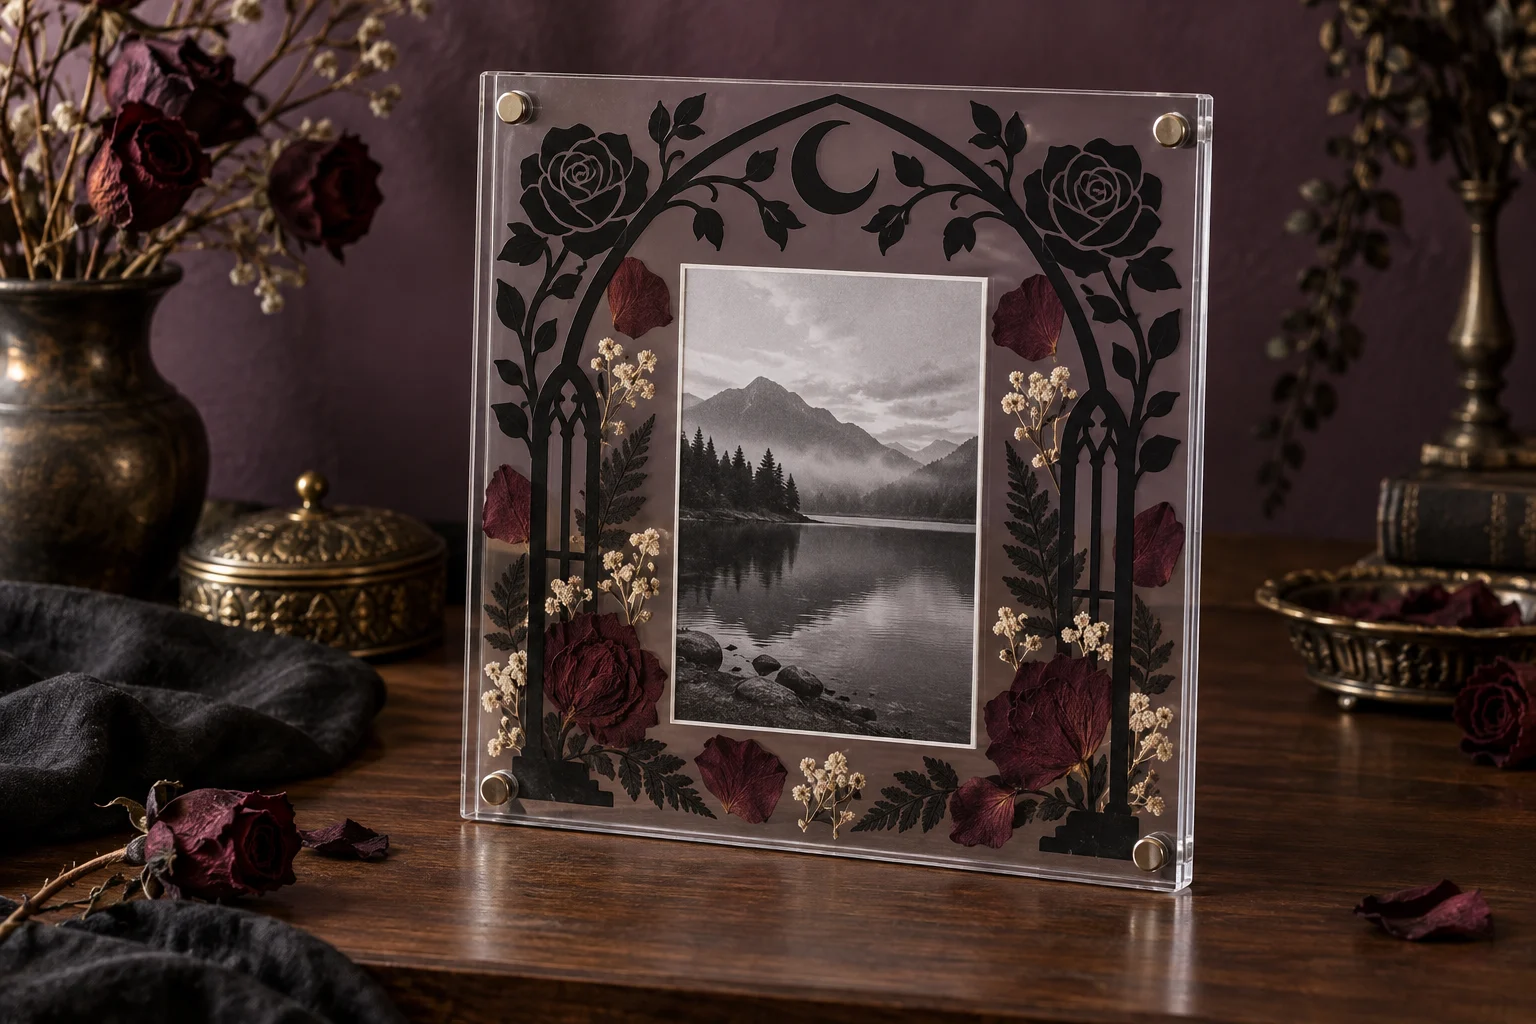
A clear magnetic frame becomes a tiny botanical window when a photograph and fully dried flowers float between its panels. Applying the decorative vinyl to the rear exterior surface protects the design from routine front cleaning, while a generous open center keeps the photograph readable. The result feels ornate and dimensional without requiring glass cutting, resin, heat, or permanent glue on the flowers.
This is an original project plan based on common adhesive-vinyl application, pressed-botanical display, and magnetic acrylic-frame methods. Acrylic composition, panel thickness, edge finish, magnet strength, cleaner compatibility, vinyl adhesive, artwork detail, blade condition, mat grip, transfer-tape tack, flower thickness, residual moisture, photo paper, room temperature, humidity, and sunlight exposure can all change the result. Make full-size paper proofs, test the exact vinyl on an inconspicuous rear corner, and trial the complete stack without the keepsake photo before final assembly. Follow the current directions from the frame, magnet, cleaner, vinyl, transfer-tape, cutting-machine, blade, mat, paper, and flower-press makers. The featured KleanKutChaos bundle supplies the decorative frame artwork; simplify a duplicate for reliable vinyl cutting. The featured KleanKutChaos file is the design source for this tutorial, and this tutorial does not claim that the pictured combination was physically tested with the listing files.
What you’ll need
- 10 Gothic Rose Frames Bundle from the featured KleanKutChaos listing
- One freestanding two-panel magnetic acrylic photo frame with smooth, finished edges
- A duplicate or replaceable photograph sized smaller than the frame's visible area
- Acid-free cardstock or photo mat board for a narrow backing mat
- Fully dried, very flat pressed flowers and leaves
- Matte black permanent adhesive vinyl approved for smooth acrylic
- Transfer tape matched to the chosen vinyl
- Cricut-, Silhouette-, or similar cutting machine with a clean fine-point blade
- Compatible clean standard-grip cutting mat
- Cutting-machine software, copy paper, printer or pencil, scissors, ruler, and low-tack painter's tape
- Scraper, brayer, weeding tool, fine tweezers, and bright task light
- Acrylic-maker-approved cleaner, distilled water if permitted, and lint-free cloths
- Small acid-free photo corners or archival mounting strips
- Clean blotting paper, smooth books or a flower press, and a dry storage envelope
- Eye protection and a lidded scrap container
How to make it
- 1
Choose a frame that can be opened safely
Select a purpose-made two-panel acrylic frame whose maker intends the panels to separate for photo changes. Inspect the edges, corners, feet, magnets, and fasteners. Reject any frame with chips, cracks, sharp edges, loose magnets, distorted panels, or unclear opening instructions. Do not pry apart glued panels or modify captive hardware.
- 2
Prepare botanicals well in advance
Press fresh flowers between clean absorbent sheets using a flower press or smooth heavy books, following the press maker's directions. Replace damp papers as needed and continue until the botanicals are completely dry, flat, cool to the touch, and free of odor, flexible wet tissue, pests, or visible mold. Discard questionable pieces rather than sealing moisture inside acrylic.
- 3
Map the visible area
Measure the full panel and every magnet or fastener, then mark those obstructions on a paper rectangle. Center the photo within a generous open window and reserve at least a half-inch clear boundary around magnets, feet, panel edges, and the opening grip. Keep the vinyl and flowers out of all contact points.
- 4
Make a full-size paper composition
Print the selected gothic rose frame at final size and cut out its open center. Place the paper frame, a copy of the photo, and traced flower shapes on the map. Step back several feet and confirm that the arch supports the photograph instead of hiding it. Photograph the approved arrangement for reference.
- 5
Simplify a duplicate of the artwork
Preserve the original file and edit only a duplicate. Keep the broad cathedral arch, two large roses, a crescent, and several sturdy leaves. Remove isolated dots, hairline thorns, tiny petals, overlapping micro-vines, and narrow stained-glass openings. Thicken weak bridges so every retained line can survive cutting, weeding, transfer, and routine wiping.
- 6
Decide the rear-facing orientation
The vinyl goes on the rear exterior surface and is viewed through the acrylic from the front. Mirror the artwork before cutting so asymmetrical moons, vines, or lettering would face correctly through the panel. Mark the rear panel's outside surface on removable painter's tape so the placement direction cannot be confused during assembly.
- 7
Clean and test the acrylic
Wash hands and place the rear panel on a clean lint-free cloth. Clean only with the frame maker's approved method; many acrylics can haze or craze when exposed to ammonia, alcohol, acetone, abrasive pads, or paper towels. Let the panel dry, then apply a small vinyl test square to a hidden outer corner and inspect it after the recommended settling time.
- 8
Test-cut the smallest retained details
Place a scrap of the exact vinyl on the mat and start with the vinyl maker's recommended setting. Include a rose center, leaf tip, arch corner, and crescent point from the final-size design. Weed and transfer the sample to scrap acrylic if available. Adjust one setting at a time or simplify further until the shapes release without stretched lines or deep carrier cuts.
- 9
Cut and weed the frame decal
Cut the mirrored design with the tested setup. Remove large waste areas first, then weed from the outer arch toward the roses and leaves while supporting narrow vinyl with the tool tip. Compare the weeded decal with the paper proof. Recut any torn bridge, missing petal, distorted curve, or incomplete cut instead of patching the visible frame.
- 10
Transfer the vinyl to the rear surface
Apply matched transfer tape and burnish gently. Align the decal on the rear panel's outside surface using the paper map beneath the clear acrylic. Create a painter's-tape hinge through the center, remove half the backing, and apply from the hinge outward. Repeat on the second half, then peel the transfer tape back slowly at an acute angle.
- 11
Let the vinyl settle flat
Leave the decorated rear panel face up in a clean, dry room for the vinyl maker's recommended settling period. Keep it separate from flowers and the front panel. Do not add heat, liquid sealer, polish, resin, spray adhesive, or aggressive burnishing. Inspect every edge under side light before building the inner composition.
- 12
Mount the replaceable photo
Cut an acid-free mat slightly larger than the photo and use acid-free photo corners or archival strips to hold a duplicate print. Keep adhesive off the image face and away from the flowers. Center the mounted print on the inner side of the rear panel using the paper map, but leave it removable so the photograph can be replaced later.
- 13
Arrange the pressed flowers
Use clean dry tweezers to place the flattest botanicals around the mat without crossing the photo, vinyl border, magnets, or panel edges. Keep the layer sparse and thinner than the frame maker's permitted interior clearance. Close the panels temporarily over a protected table and stop if they bow, rock, gap, crush stems, or prevent the magnets from seating fully.
- 14
Close, display, and maintain
After a successful dry fit, remove any dust with an approved cloth and close the frame exactly as its maker directs, keeping fingers clear of snapping magnets. Set it upright on a stable surface away from direct sun, steam, sinks, vents, radiators, and high humidity. Inspect the panels, magnets, vinyl, photo, and botanicals monthly, and open the frame immediately if condensation, odor, discoloration, mold, insects, lifting vinyl, or loose hardware appears.
Practical finishing tips
- Use a replaceable photo copy rather than an irreplaceable original; enclosed plant pigments and paper chemistry can change over time.
- Choose only two or three botanical varieties so the pressed flowers support the black vinyl instead of competing with every rose detail.
- A wide arch and large rose silhouettes weed more reliably than the bundle's most intricate tracery at an eight-inch frame size.
- Lay the paper map beneath the clear panel during alignment so centerlines never need to be drawn directly on acrylic.
- Store extra pressed flowers flat in a labeled dry envelope for future replacement rather than overfilling the frame now.
- Photograph the finished layer order before closing the panels; it makes later cleaning and reassembly much easier.
Troubleshooting
Stop and check the frame maker's cleaning guidance. Remove residue only with an approved cleaner and cloth. Do not polish over vinyl or try stronger household solvents; replace a damaged panel if safe clarity cannot be restored.
Peel the tape nearly flat against the acrylic, pause at each lifting line, and reburnish gently. If multiple details fail, the design may be too fine, the surface incompatible, or the transfer tape too aggressive; simplify and retest rather than forcing the decal.
Open the frame over a protected table and remove the thickest stems, layered petals, or bulky mounting material. Never force magnetic panels together or add stronger loose magnets. Use only a stack that stays within the frame maker's stated clearance.
Reopen the frame and reduce the number of botanicals. Place flatter pieces where the panels make even contact, or secure only the paper mat with archival corners. Avoid wet glue, spray adhesive, resin, or thick foam dots that can stain plants and prevent closure.
Open the frame immediately in a dry ventilated area, remove the photograph and botanicals, and discard any plant material with dampness, odor, pests, or mold. Clean the acrylic only as directed and do not reassemble until the moisture source is resolved.
Increase the open center, remove lower vines, or switch to one rose cluster and a simpler arch. Recut the whole decal so both sides remain balanced rather than trimming the installed vinyl by hand.
Ways to make it yours
Use black fern fronds, cream baby's breath, and a grayscale photograph with one crescent-and-rose arch for a restrained year-round display.
Choose flowers associated with the person or pet being remembered and use a replaceable photo copy, leaving the center free of permanent lettering so the display can evolve.
Skip botanicals and float the matted photograph between the panels with one simplified rose arch on the rear exterior surface.
Use rust leaves and cream grasses for autumn, then replace only the interior botanicals while keeping the permanent black vinyl border unchanged.
Keep crafting
- DIY Gothic Rose Window Mirror With Vinyl — Turn a thrifted mirror into a cathedral-inspired rose window with black vinyl, an antique-gold frame, and a clean reflective center.
- DIY Gothic Witch Book Box With Vinyl & Metallic Paint — Turn a plain book-shaped wooden box into an aged black, plum, and gold keepsake with an ornate witch cameo on the cover.
- DIY Celestial Insect Shrink-Plastic Charm Garland — Turn mystical moth, beetle, bee, and dragonfly artwork into a lightweight gothic garland with a measured shrink test, clean printed detail, and securely closed hanging loops.
Inspiration & further reading
This is an original Klean Kut Halloween Crafts project inspired by approachable techniques shared across trusted craft and home sources. Explore Cricut vinyl cutting and application guide, Cricut transfer tape instructions and U.S. Consumer Product Safety Commission magnet safety guidance for more ideas and technique background.