
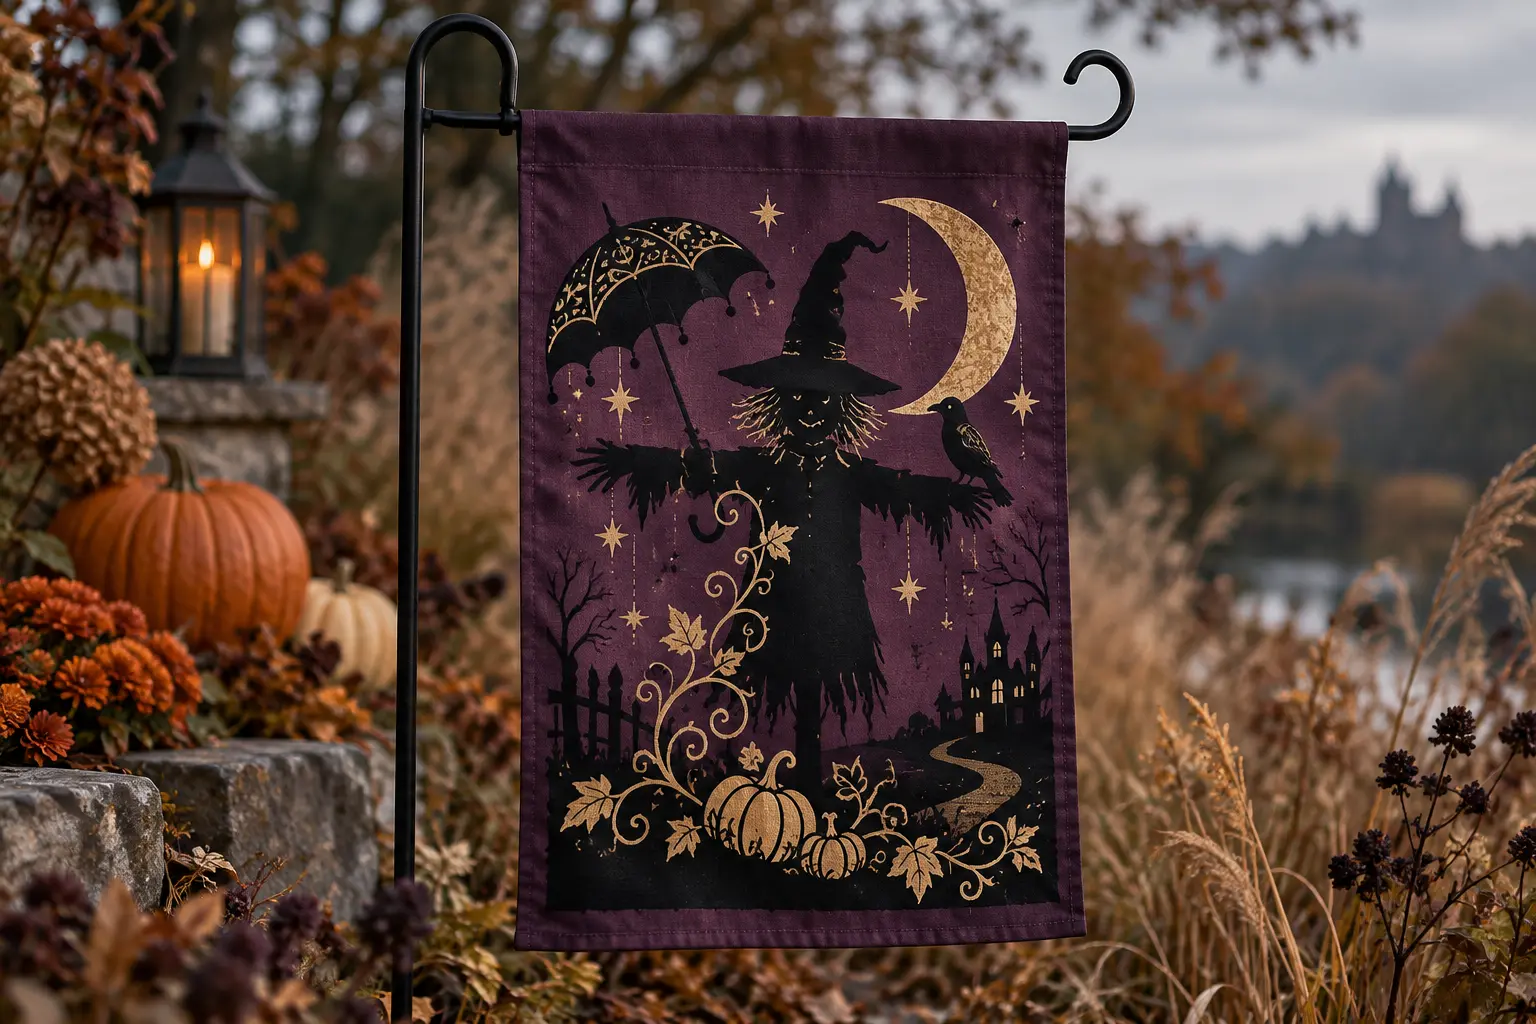
A small garden flag is a useful scale for dramatic dark-fantasy art: large enough to preserve the top hat, limbs, and umbrella silhouette, but compact enough to sew from two coordinated panels. This version gives each face a different composition, with one broad scarecrow pose on the front and a simpler top-hat-and-moon arrangement on the reverse. An opaque inner layer keeps one side from showing through the other, while restrained antique-gold, cream, plum, and black iron-on makes the artwork readable from the walkway.
This is an original project plan based on common fabric-flag sewing and heat-transfer vinyl methods. Outdoor fabric coatings, fiber content, dye, seam finish, interfacing, blade condition, mat grip, vinyl chemistry, heat press, flag stand, wind, sunlight, rain, and temperature can all change the result. Make full-size paper proofs plus cut and press tests using scraps from the exact materials, follow the current directions from every fabric, vinyl, cutter, press, sewing-machine, and flag-hardware maker, and preserve the purchased artwork while simplifying only duplicate working files. The featured KleanKutChaos pack supplies the fantasy character artwork; the featured KleanKutChaos file is the design source for this tutorial, and this tutorial does not claim that the pictured combination was physically tested with the listing files.
What you’ll need
- 6 Turnip Head SVG Bundle from the featured KleanKutChaos listing
- Two prewashed heat-compatible woven flag panels in deep plum, charcoal, or black, cut with seam allowances
- One opaque lightweight woven liner or interfacing approved for the face fabrics and pressing method
- Matte heat-transfer vinyl in black, antique gold, warm cream, and optional plum
- Cricut-, Silhouette-, or similar cutting machine with a sharp compatible fine-point blade
- Clean compatible cutting mat and cutting-machine software with duplicate working files
- Heat press or mini press, firm pressing surface, and protective sheet only as their makers direct
- Sewing machine with the needle, thread, and stitch settings recommended for the fabric stack
- Factory-made garden-flag stand or shepherd's hook with intact welds, smooth edges, and a stated load rating
- Optional flag stopper or clip supplied or approved by the stand maker
- Kraft paper or taped copy paper for two full-size face proofs
- Rotary cutter, self-healing mat, quilting ruler, fabric scissors, clips, seam gauge, and removable marking tool
- Brayer, weeding tool, fine tweezers, lint roller, bright task light, and labeled paper envelopes
- Eye protection and a lidded container for blades, thread ends, carrier sheets, and vinyl scraps
How to make it
- 1
Inspect the stand and set the flag size
Check the factory-made stand for rust, sharp burrs, cracked coating, bent rods, loose welds, and an unstable ground stake. Measure the usable horizontal arm, stopper position, ground clearance, and the maker's recommended flag dimensions. Plan a finished rectangle that can slide freely without reaching the hook, ground, plants, or path.
- 2
Choose a heat-compatible fabric stack
Read the fiber and care information for the two face fabrics, liner, and any interfacing. Prewash and dry only when their makers direct. Reject coated, waterproofed, stretch, or unknown fabric unless both the fabric and iron-on makers approve heat application. Layer the scraps together and make sure the reverse design will not show through.
- 3
Plan two distinct flag faces
Choose one broad scarecrow pose for the front and a simpler pose, top hat, or umbrella detail for the reverse. Keep both compositions inside the same safe rectangle, leaving generous space at the side seams, lower hem, upper sleeve, and fold. Orient both faces upright when the sleeve is at the top.
- 4
Simplify duplicate artwork
Preserve the purchased originals and edit only duplicates. Remove isolated dots, dense hatching, hairline straw, tiny facial features, and narrow interior islands. Thicken the hat brim, arms, legs, and umbrella ribs, then combine small accents into larger stars, a crescent moon, or a simple vine that can survive cutting and outdoor viewing.
- 5
Make two full-size paper proofs
Draw the finished flag and every seam and sleeve allowance on two paper rectangles. Place printed or rough-cut versions of the designs at final size, tape the proofs back to back, and hang them on the empty stand. View both sides from the walkway and resize anything that disappears, crowds the sleeve, or becomes confusing in reverse silhouette.
- 6
Cut and stabilize the fabric
Cut both face panels, the liner, and any approved stabilizer with accurate grain and seam allowances. Mark the finished rectangle, turning gap, sleeve fold, and all no-vinyl zones on the wrong sides. Keep the liner slightly inside the seam allowance if its maker recommends reducing bulk.
- 7
Test-cut the smallest retained detail
Mirror the iron-on artwork unless its maker specifically says otherwise. Cut one hat point, umbrella rib, straw bridge, star, and vine curl from each exact vinyl. Begin with the material maker's recommended setting, inspect the cut before unloading, and enlarge or delete any feature that tears, stretches, or refuses to weed cleanly.
- 8
Prove the pressing method on scraps
Build a scrap sandwich using the exact face fabric, liner, and any interfacing, then apply a representative multi-color sample with the specified time, temperature, pressure, peel method, surface, and protective setup. Let it cool completely and flex it. Stop if the fabric shrinks, scorches, glosses, bleeds dye, delaminates, puckers, smells unusual, or the vinyl lifts.
- 9
Cut and organize both designs
Cut the proven front and reverse layers, keeping every color on its carrier. Weed under bright light and store each complete face in a separate labeled envelope. Compare the weeded pieces with the paper proofs before pressing so a mirrored or misplaced layer is caught while it can still be recut.
- 10
Press each face while flat
Place one unassembled panel on the approved firm surface and align the largest layer with a paper or low-tack placement guide. Apply the minimum total heat allowed, protecting completed layers as directed. Repeat for the second panel, never pressing over pins, clips, seams, thick folds, or metal, then let both faces cool flat.
- 11
Sew the reversible flag body
Place the decorated panels right sides together with the liner in the position its maker specifies. Keep every vinyl edge clear of the seam allowance. Stitch the sides and bottom with the proven seam, leaving a turning gap where it will not weaken a corner. Trim bulk as appropriate, turn carefully, shape corners without puncturing them, and press only from the wrong side if every material maker permits it.
- 12
Topstitch and form the sleeve
Close the turning gap with a secure stitch and topstitch the perimeter without crossing vinyl. Fold the top to form a sleeve sized for the measured stand arm, keeping a safe margin above the artwork. Stitch the sleeve on a level guide, then test it on the uninstalled stand before taking the project outdoors.
- 13
Allow the vinyl to settle
Leave the finished flag flat indoors for the full settling period specified by the iron-on maker. Inspect every vinyl edge, seam, corner, and sleeve. Gently flex the fabric and slide a smooth dowel or the detached stand arm through the sleeve; repair or retire the flag if layers lift or stitching opens.
- 14
Install and complete a weather audit
Place the stand only as its maker directs, away from utilities, irrigation, doors, paths, play areas, vehicles, and overhead hazards. Hang the flag with the approved stopper, confirm that it cannot touch the ground or nearby objects, and observe it in a light breeze. Bring it indoors before rain, snow, high wind, freezing conditions, extreme heat, or prolonged direct sun, and inspect it after every display period.
Practical finishing tips
- Give each face a different focal silhouette but repeat the same moon, star, and vine colors so the flag feels intentionally reversible.
- Use one large character rather than several small figures; detailed expert files become easier to cut and clearer from the sidewalk.
- Keep the vinyl at least one inch below the sleeve fold and well inside the side and bottom seams.
- Press every decorative layer before the flag is sewn; seam bulk prevents even pressure and can mark the finished face.
- Write down the proven blade, cut, pressure, heat, peel, and care settings and store the note with the folded flag.
- Display the flag for short seasonal periods and store it clean, dry, flat, and out of sunlight rather than assuming craft HTV is permanent outdoor signage.
Troubleshooting
Return to a duplicate file, delete hatching and isolated pieces, thicken narrow bridges, and increase the finished size. Replace a dull blade and repeat the smallest-feature test before cutting the full layer.
Stop rather than adding uncontrolled heat. Confirm that the coating, fiber, and iron-on are compatible and that the test used the correct surface, temperature, time, pressure, and peel method. If the makers do not approve the combination, choose another uncoated fabric or omit the vinyl.
Discard the damaged panel and review the fabric's heat limit. Use only maker-approved protection and settings, reduce total heat only within those directions, and prove a fresh scrap before pressing another face.
Use a darker or more opaque approved liner, simplify the lighter design, or choose two heavier compatible face fabrics. Repeat the complete heat and sewing tests because a thicker stack changes both pressing and seam behavior.
Remove the flag and compare the sewn sleeve with the measured paper proof. Check for a tapered fold, trapped liner, bulky seam, or undersized channel, then rebuild the sleeve rather than forcing it over the arm.
Take it down immediately. Use only the stand maker's approved stopper or anti-wrap accessory, move the display to a more sheltered permitted location, or keep the flag indoors. Do not add heavy weights, loose wire, magnets, or improvised clips.
Ways to make it yours
Use a charcoal face with one oversized warm-cream scarecrow and a few antique-gold stars for the easiest cutting and strongest viewing distance.
Replace the ground stand with a smooth wooden dowel and rated wall hook, then repeat the hanging and load checks for an indoor banner that avoids weather exposure.
Keep the detailed scarecrow on one side and use a broad pumpkin, crescent, and winding-vine composition on the other for a more general autumn display.
Decorate both sides of a factory-made double-layer flag only when its maker confirms the fiber, coating, seam construction, heat compatibility, and outdoor-care limits.
Keep crafting
- DIY Magical Fire Spirit Quilted Book Sleeve With Heat-Transfer Vinyl — Sew a padded, lined book sleeve with a warm fire-spirit motif, a measured flap, and material-specific HTV tests for a practical piece of magical autumn reading gear.
- DIY Witchy Yellow Brick Road Trunk-or-Treat Backdrop With Vinyl — Build a freestanding, weather-aware trunk-or-treat scene with modular corrugated-plastic panels, a winding gold road, and witchy vinyl silhouettes cut on a home machine.
- DIY Gothic Witch Folding Room Divider With Removable Vinyl — Transform a smooth three-panel folding screen into removable gothic witch décor with large silhouettes, celestial borders, and careful hinge clearance.
Inspiration & further reading
This is an original Klean Kut Halloween Crafts project inspired by approachable techniques shared across trusted craft and home sources. Explore Cricut Everyday Iron-On instructions and Cricut Heat Guide for more ideas and technique background.