
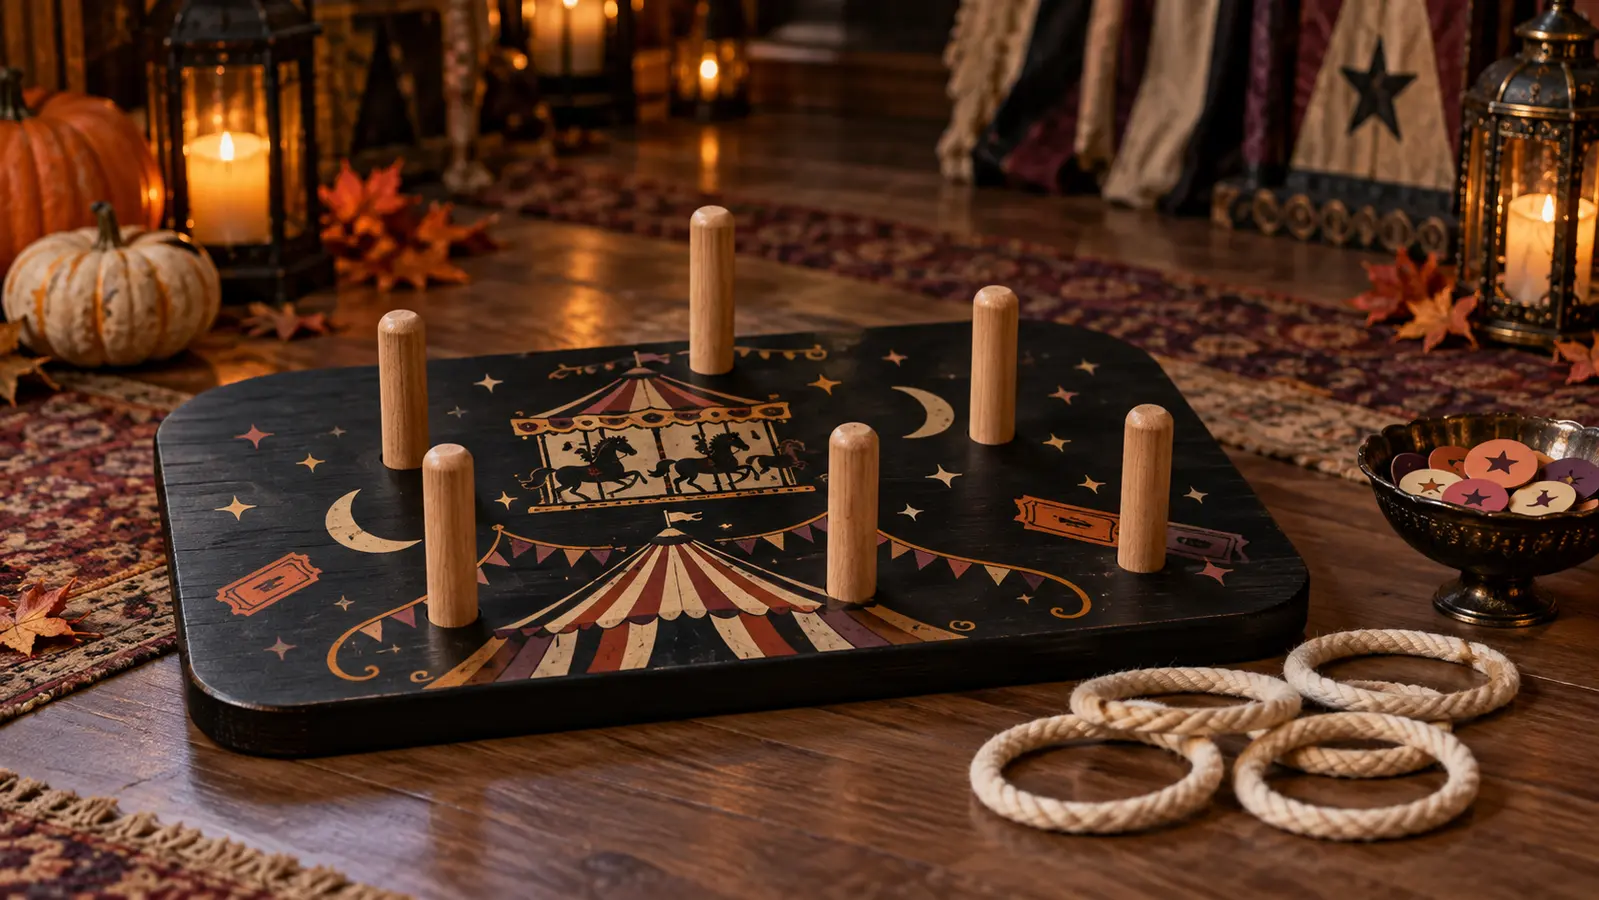
A ring-toss game earns its party-table space when it is sturdy enough for repeat play, easy to reset, and readable from the throwing line. This version starts with a commercially made or properly constructed wooden set with a wide base and blunt pegs. Matte black paint turns the board into a stage for a haunted carousel, big-top tent, moons, stars, and ticket-shaped accents, while soft rope rings and separate paper tokens keep the decorated surface from doing double duty as a scorecard.
This is an original project plan based on ordinary adhesive-vinyl application and supervised ring-toss play. Wood species, moisture, finish, paint, sealer, vinyl chemistry, cutter, blade, mat, artwork scale, transfer tape, room temperature, handling, and curing time can all affect the result. Test the complete paint-finish-vinyl stack on scrap, follow the current directions for every product and tool, and edit only a duplicate working copy of the purchased artwork. The KleanKutChaos listing supplies the featured motif artwork; the featured KleanKutChaos file is the design source for this tutorial. This tutorial does not claim that the pictured combination was physically tested with the listing files.
What you’ll need
- Haunted Circus SVG Bundle from the featured KleanKutChaos listing
- Commercially made wooden ring-toss set with a broad stable base, securely fixed smooth pegs, rounded peg tops, and soft rope rings; inspect the maker's age rating and instructions
- Fine-grit sanding sponge suitable for the board's existing finish, plus a clean tack-free cloth
- Water-based craft paint or furniture paint approved for the exact wood or existing coating
- Compatible primer and clear finish only if their makers approve the full paint-and-vinyl system
- Permanent adhesive vinyl approved for smooth sealed indoor wood in matte black, antique cream, muted orange, dusty plum, or similar colors
- Cricut-, Silhouette-, or similar cutting machine with current software, compatible fine-point blade, and mat
- Standard transfer tape for smooth vinyl, or the exact transfer tape specified by the vinyl maker
- Scraper or felt-edged burnisher, weeding tool, brayer, scissors, and low-tack painter's tape
- Ruler, flexible measuring tape, pencil, paper, and a full-size paper placement template
- Scrap board prepared with the same primer, paint, and finish for adhesion tests
- Heavy cardstock and optional printable sticker paper for separate score tokens and rule cards
- Self-healing cutting mat and craft knife for adult use only if hand-cutting tokens
- Battery-operated candles and lightweight décor for styling; keep all props outside the throwing lane
- Safety glasses, ventilation, and other protective equipment required by the paint, finish, sanding, or tool makers
How to make it
- 1
Choose a safe, stable game set
Use a complete ring-toss set whose base sits flat and does not rock, with short smooth pegs that are firmly attached and blunt at the top. Follow its maker's age rating, setup instructions, playing distance, and supervision guidance. Reject sets with splinters, cracks, loose hardware, sharp points, exposed fasteners, or rings that can snag.
- 2
Map the play surface before decorating
Measure the base, peg spacing, ring diameter, and clear path each ring needs to settle around a peg. Draw a full-size paper plan with every peg and an exclusion circle around it. Reserve the peg bases, ring landing zones, edges, feet, hardware, and underside; vinyl belongs only on smooth flat areas that do not affect play.
- 3
Rehearse the composition on paper
Print or sketch paper stand-ins for one carousel, one big top, a few stars and moons, and two ticket accents. Arrange them inside the safe zones, then toss every ring from the maker-approved distance. Move or shrink motifs that make the target hard to read or place a delicate vinyl edge where rings repeatedly land.
- 4
Prepare a matching test board
Coat scrap wood with the same primer, paint, and clear finish planned for the game, observing every sanding, ventilation, coat, drying, and cure instruction. Let the sample reach the required cure state before adding vinyl. A finish that still feels soft, oily, chalky, waxed, or textured is not ready for an adhesion decision.
- 5
Disassemble only when the maker permits
If the game maker expressly allows the pegs to be removed, label their positions and use the specified tool. Otherwise leave the set assembled and mask each peg carefully. Never pry, drill, shorten, or modify a fixed peg or safety feature merely to simplify painting or vinyl placement.
- 6
Clean, scuff, and paint the base
Prepare only as the coating makers direct. Remove dust, apply thin compatible coats, and keep paint off peg shafts, feet, hardware, joints, and any surface that must slide or grip. Maintain ventilation and drying conditions, and wait for the full stated cure rather than treating a dry-to-touch surface as finished.
- 7
Simplify the haunted-circus artwork
Open a duplicate of the purchased files and choose a carousel, big top, and a few simple accents. Remove isolated specks, thicken fragile bridges, reduce layered colors, and preserve recognizable negative space. Do not add tiny type or score values to vinyl; separate paper tokens are easier to replace and read.
- 8
Size motifs to the measured safe zones
Create rectangles in the cutting software that match each usable area, then keep artwork inside them with a generous margin. Divide a large carousel or tent into manageable color layers only when alignment marks can stay on the carrier and outside the final design. Confirm the finished dimensions numerically before cutting.
- 9
Test-cut the smallest detail
Use a small star or carousel detail to check the selected material setting, blade, mat, and scale. The vinyl should cut cleanly through the film without deeply scoring the liner. Adjust one setting at a time and repeat until fine corners lift cleanly; do not force a poor cut to weed.
- 10
Cut and weed one color at a time
Cut each color layer in a labeled group, leaving enough carrier margin for handling. Weed at a low angle in strong side light and trim away excess carrier without cutting registration references. If a narrow line stretches or tears, enlarge or simplify that element and recut it instead of patching it on the board.
- 11
Prove adhesion on the cured sample
Apply a complete small layered motif to the prepared scrap using the intended transfer tape and burnishing method. Wait for the vinyl maker's stated settling interval, then check corners, overlaps, color transfer, paint pull, and removal of the transfer tape. Change the finish or vinyl system if the paint lifts or edges refuse to stay flat.
- 12
Place the first large motif with a hinge
Center the paper template on the board and mark only removable reference points. Position the weeded vinyl on transfer tape, anchor it with a painter's-tape hinge, lift one side, remove that portion of liner, and squeegee from the hinge outward. Repeat on the other side without stretching the film.
- 13
Add remaining layers and accents
Align the next color through the clear carrier or with removable registration marks, then burnish only as firmly as the surface and vinyl makers allow. Keep overlaps minimal, remove the tape back at an acute angle, and add stars, moons, and ticket shapes within the mapped safe zones. Never wrap vinyl around a peg.
- 14
Remove temporary marks and let vinyl settle
Lift painter's tape and approved removable marks without scraping the finish. Inspect every edge under side light and reburnish only where the instructions allow. Leave the game flat, unloaded, and untouched for the full adhesive-rest interval in a clean room at the specified temperature.
- 15
Make separate score tokens and a rules card
Cut large cardstock tokens in three high-contrast colors and place them in a shallow bowl outside the throwing lane. Write one simple rule card—for example, one token per successful ring, first player to five wins—using plain readable text. Avoid score values on the board so damaged paper pieces can be replaced without disturbing the vinyl.
- 16
Run a supervised play and safety check
Set the board on a level nonslip surface with a clear throwing lane and no breakables, pets, cords, candles, or bystanders nearby. From the distance approved for the set, toss each soft ring several times. Stop if the base shifts, a peg loosens, paint marks the ring, vinyl lifts, or décor interferes with play; repair or retire the game before using it with guests.
Practical finishing tips
- Keep the carousel or big top as one bold focal shape and use small stars to balance empty areas; dense detail becomes visual noise around the pegs.
- Photograph the paper layout with a ruler in frame before cutting so the arrangement is easy to rebuild after painting.
- Use separate cardstock scoring pieces instead of chalkboard vinyl on the game base; dust and repeated rubbing are poor companions for adhesive edges.
- Choose soft rope or foam rings supplied for the set. Rigid metal or hard plastic rings can damage the finish and increase injury risk.
- Store the rings in a breathable bag and the board flat so damp rope, pressure, or heat does not distort the game or vinyl.
- At each party, assign one adult game host to reset rings, keep the lane clear, and stop play when someone crosses the throwing line.
Troubleshooting
Stop immediately. The coating may be incompatible, under-cured, or too weak for the tape. Recreate the full finish stack on scrap, allow the complete stated cure, and test a lower-tack tape approved for the vinyl. Do not continue on the game until the sample releases cleanly.
Check for wax, oil, texture, dust, uncured coating, or a finish the vinyl maker excludes. Clean only with an approved method and retest the complete stack. Replace the surface treatment or use removable paper signage rather than adding stronger unapproved adhesive.
Increase the design size, remove tiny hatching, thicken bridges, slow the weeding motion, confirm blade condition, and repeat the test cut. A bold simplified silhouette will survive ring contact better than miniature engraved detail.
Keep carriers square, use two registration marks outside the final artwork, and lower each layer from one controlled edge. If a layer has stretched, recut it; pulling adhesive vinyl back into position can distort both the film and the painted surface.
Stop play and identify the collision. Remove or redesign the affected accent, increase clearance around the peg, and retest every throwing angle. Do not cover a lifting edge with clear tape or sealer unless both material makers explicitly approve that system.
Move it to a level high-friction surface and use only nonslip feet or matting approved by the game's maker. Shorten the throwing distance only if the instructions permit. Never ask a person to hold the board while rings are being thrown.
Ways to make it yours
Use a compact tabletop set and replace the large carousel with one big-top silhouette, keeping the same stable-base, clear-zone, and supervised-play requirements.
Add a few removable glow-vinyl stars only when the vinyl and finished surface makers approve the pairing; keep them outside the ring landing zones and use normal room lighting for actual play.
Create two sets of oversized cardstock tokens in plum and orange, then let players collect a token after each successful ring instead of writing on the board.
Mount printed haunted-circus art on a separate freestanding backdrop behind the game, outside the throwing path, for an undecorated borrowed set that must be returned unchanged.
Keep crafting
- DIY Witchy Crystal Ball Halloween Prize Wheel With Cricut Vinyl — Turn a factory-made dry-erase prize wheel into reusable witchy party décor with removable vinyl wedges, celestial icons, and a crystal-ball centerpiece.
- DIY Gothic Corset Halloween Favor Boxes With Cricut or Silhouette — Turn sturdy cardstock, tiny eyelets, and satin ribbon into structured gothic corset favor boxes for Halloween parties, movie nights, or dramatic place settings.
- DIY Horror Clown Movie-Night Party Kit — Make a coordinated horror movie-night set with snack boxes, drink decals, table cards, and a bold feature sign.
Inspiration & further reading
This is an original Klean Kut Halloween Crafts project inspired by approachable techniques shared across trusted craft and home sources. Explore Cricut Vinyl cutting and application instructions, Cricut Transfer Tape instructions, Cricut cutting-machine material guidance and U.S. Consumer Product Safety Commission Art and Craft Safety Guide for more ideas and technique background.