
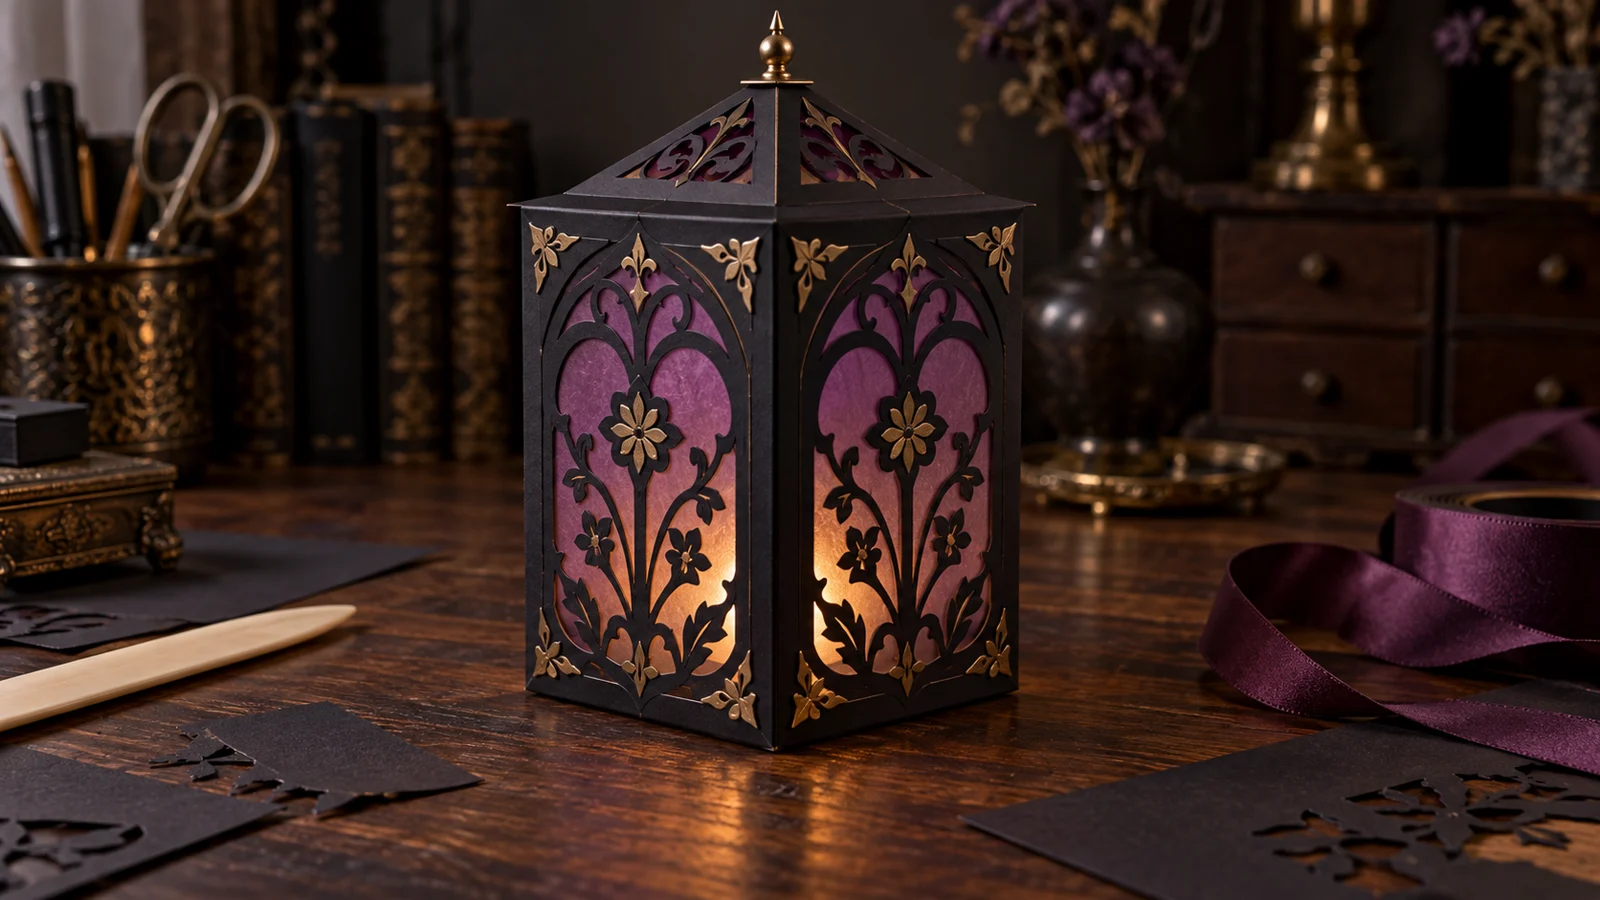
A lantern is a smart way to make an intricate frame design feel architectural without committing it to a wall or permanent surface. This version uses four independent black-cardstock panels, translucent plum vellum, and a removable floor that holds a battery-powered LED. The frame artwork becomes the window structure, while wide borders, reinforced corners, and tested folds keep the centerpiece stable enough to reuse and flat-pack after the season.
This is an original project plan based on common cardstock-box, scoring, and paper-lantern methods. Cardstock coating, grain, humidity, blade wear, mat tack, score pressure, adhesive chemistry, panel size, cut-file complexity, vellum weight, and LED construction can all affect the result. Make cut, score, fold, adhesive, light, and stability tests with the exact materials; follow the current instructions from every cardstock, vellum, adhesive, cutter, scoring-tool, and LED maker; and preserve the purchased artwork while simplifying only duplicate working files. The featured KleanKutChaos listing supplies the ornate frame artwork, while the featured KleanKutChaos file is the design source for this tutorial. This tutorial does not claim that the pictured combination was physically tested with the listing files.
What you’ll need
- 9 Ornate Vintage Frames SVG bundle from the featured KleanKutChaos listing
- Four or five sheets of smooth, solid-core black cardstock in a weight approved for the cutter and scoring tool
- Translucent craft vellum in plum, smoke, amber, or warm white, confirmed compatible with the selected adhesive
- One flameless LED puck or LED tea light with an intact child-resistant battery compartment and current manufacturer instructions
- Cricut-, Silhouette-, or similar cutting machine with a sharp compatible fine-point blade
- Compatible scoring wheel, scoring stylus, perforation tool, or manual scoring board used according to its maker's directions
- Clean cutting mats with the tack recommended for the exact cardstock and vellum
- Cutting-machine software with duplicate working files for the frame art and lantern template
- Strong paper adhesive or narrow double-sided tape that dries clear and is approved for cardstock and vellum
- Low-tack paper tape, small binder clips, or clothespins for temporary alignment tests
- Metal ruler, bone folder, pencil, craft knife, and self-healing mat for adult hand-finishing where appropriate
- Kraft paper or inexpensive cardstock for a full-size structural prototype
- Optional narrow ribbon, metallic paper accents, or removable paper labels kept clear of the light and battery access
- Bright task light, weeding tool, tweezers, lint-free cloth, and a lidded container for blades and scraps
How to make it
- 1
Choose a stable lantern size
Plan four matching panels about 5 by 8 inches or another size that fits the chosen mat, material, and LED with generous clearance. Draw a removable floor slightly larger than the light, a roof or open top, side glue tabs, and a bottom retention lip. Keep the finished lantern low and broad enough that it cannot tip easily.
- 2
Audit the LED before designing
Read the light maker's instructions and inspect the casing, switch, battery door, and fastener. Use only an undamaged flameless LED; never use a candle, incense, bulb, light string, or improvised battery pack inside paper. Measure the real light and reserve open access for its switch and battery compartment.
- 3
Build a plain paper prototype
Cut four blank panels and a floor from kraft paper. Tape the walls temporarily, insert the unlit LED, and confirm switch access, floor removal, top clearance, stability, and the fold-flat direction. Adjust the footprint and tabs before adding decorative windows.
- 4
Select and simplify the frame artwork
Preserve the purchased files and edit only duplicates. Choose one broad Victorian frame or two closely related frames. Remove hairline curls, isolated dots, tiny interior islands, and fragile crossings; thicken narrow bridges and keep a solid outer border so each panel remains one connected piece.
- 5
Turn the frame into a lantern window
Size the simplified frame inside the safe panel margin, then use the software's weld, subtract, offset, or compound-path tools as appropriate to create a single window cutout. Leave at least a half-inch solid border around the window and extra material at every fold and glue tab. Verify that all intended centers remain connected before cutting.
- 6
Create and attach the score lines
Draw vertical fold lines between panels and tabs plus any bottom-lip folds required by the prototype. Set them to the machine's score operation rather than cut, then attach each score line to the correct panel in the software. Keep score lines out of the frame artwork and confirm the selected tool is approved for the cardstock.
- 7
Test the smallest bridge and fold
Cut one frame corner, the narrowest retained bridge, and a scored tab from scrap. Start with the material maker's recommended setting and keep the mat supported during loading and unloading. Revise the file or setting until the cut releases cleanly and the score folds without cracking through the cardstock.
- 8
Cut the structural panels
Place cardstock on the clean mat in the orientation required by the scoring-tool instructions. Cut and score one panel first, inspect it, and only then cut the remaining walls and base. If the design is too large for a single sheet, use four separate wall panels with full-height joining tabs rather than shrinking the windows into fragile lace.
- 9
Cut replaceable vellum liners
Measure the back of each finished window and cut vellum rectangles with at least a quarter-inch overlap on every side, while keeping them clear of fold lines and tabs. Test-cut vellum separately because it may need a different mat and pressure. Number the liners lightly on a hidden margin if their windows differ.
- 10
Bond vellum without warping it
Test the adhesive on scraps and view the sample both lit and unlit. Apply a very thin continuous line or narrow tape to the solid cardstock margin, not across open detail. Lower each vellum liner from one edge, smooth gently with clean dry hands, and let the panels dry flat under light, even pressure that does not emboss the cutwork.
- 11
Pre-fold every structural crease
Fold along scored lines with the decorative side oriented as planned, using a bone folder only as the cardstock maker permits. Support delicate frame bridges with your other hand and avoid dragging the tool over open cutouts. Fold and unfold the prototype sequence once so the final lantern will collapse in the intended direction.
- 12
Join the walls in stages
Bond one full-height tab at a time on a square work surface, align top and bottom edges, and clip only solid margins. Let each joint set before closing the last seam. Check the lantern against a ruler or box corner as it dries; a twisted wall assembly will make the removable base bind.
- 13
Build the removable floor
Fold the floor's retention lips upward and test it without the light. It should seat securely but slide out without pulling on the decorative walls. Add a paper pull tab outside the lantern if needed, then place the LED at the center using only the light maker's approved base or holder, never permanent glue over a battery door.
- 14
Light, observe, and store safely
Set the lantern on a level, dry, uncluttered surface and switch on the flameless LED while an adult remains nearby. Observe it for the light maker's recommended initial period and stop if the casing, paper, adhesive, or surface becomes warm, distorted, odorous, or unstable. Switch it off after use, remove batteries for long storage if directed, and flat-pack the lantern only after every panel is cool and dry.
Practical finishing tips
- One large frame window per wall is stronger and easier to weed than a collage of small motifs.
- Cut frame details parallel to the cardstock grain when possible, then orient every panel consistently so folds behave alike.
- Use double-sided tape near vellum edges if liquid adhesive creates waves or visible shiny spots in the light.
- Keep the brightest LED below the lower third of the windows so the glow spreads across the vellum instead of creating one harsh dot.
- Save one spare vellum liner and the final cut settings inside the flattened lantern for quick repairs next season.
- Photograph the base and wall-fold sequence before disassembly so the lantern is easy to rebuild later.
Troubleshooting
Stop before cutting the other panels. Replace a dull blade, reduce unsupported detail, thicken bridges, and repeat the smallest-feature test. Remove cardstock by bending the mat away from the paper instead of lifting the cut straight up.
Confirm the score tool and pressure match the stock, then test the reverse material orientation or a lighter score as the manufacturers allow. Use solid-core cardstock so exposed fold edges remain dark, and replace any panel whose crease has split through.
Use less adhesive, move it farther into the solid border, and let the panel dry flat. If the product remains visible when lit, replace the liner and test a compatible narrow dry tape rather than stacking more glue on the same vellum.
Check whether one tab was stretched, one score line is off square, or the base is forcing the footprint wider. Release only the affected joint if the adhesive permits, square the panels around the paper prototype, and rebuild the base rather than trimming random edges.
Do not force the decorative bridges. Recheck the planned accordion direction, base removal, roof clearance, and glue-tab placement. If the structure was designed as a rigid box, store it assembled or rebuild with separate hinged wall pairs.
Switch it off, remove it from the paper structure, and stop using it. Follow the light maker's service or disposal instructions; never tape over a damaged battery compartment, mix batteries, or substitute a real flame.
Ways to make it yours
Use one pointed-arch frame on each face, warm ivory vellum, and a narrow antique-gold paper border for a restrained gothic chapel look.
Sandwich pressed-look printed botanicals between two vellum layers, keeping all ink and adhesive choices compatible and the imagery clear of structural folds.
Hang a removable paper number tag from the exterior ribbon so the lantern can guide guests without permanently changing the reusable frame panels.
Skip the box form and join two framed vellum panels as a shallow accordion screen placed in front of a separate, maker-approved LED puck with stable clearance.
Keep crafting
- DIY Slasher Silhouette Luminary Village — Build a row of glowing paper luminaries with a different horror silhouette hidden in every window.
- DIY Gothic Rose Window Mirror With Vinyl — Turn a thrifted mirror into a cathedral-inspired rose window with black vinyl, an antique-gold frame, and a clean reflective center.
- DIY Gothic Christmas Ornaments With Frosted Acrylic and Vinyl — Turn pre-cut frosted acrylic blanks into a coordinated dark-holiday ornament set with crisp black vinyl, careful detail sizing, and a clean no-drill finish.
Inspiration & further reading
This is an original Klean Kut Halloween Crafts project inspired by approachable techniques shared across trusted craft and home sources. Explore Cricut Cardstock Instructions, Cricut Scoring Wheel Tools guide and CPSC Button Cell and Coin Battery Safety Center for more ideas and technique background.