
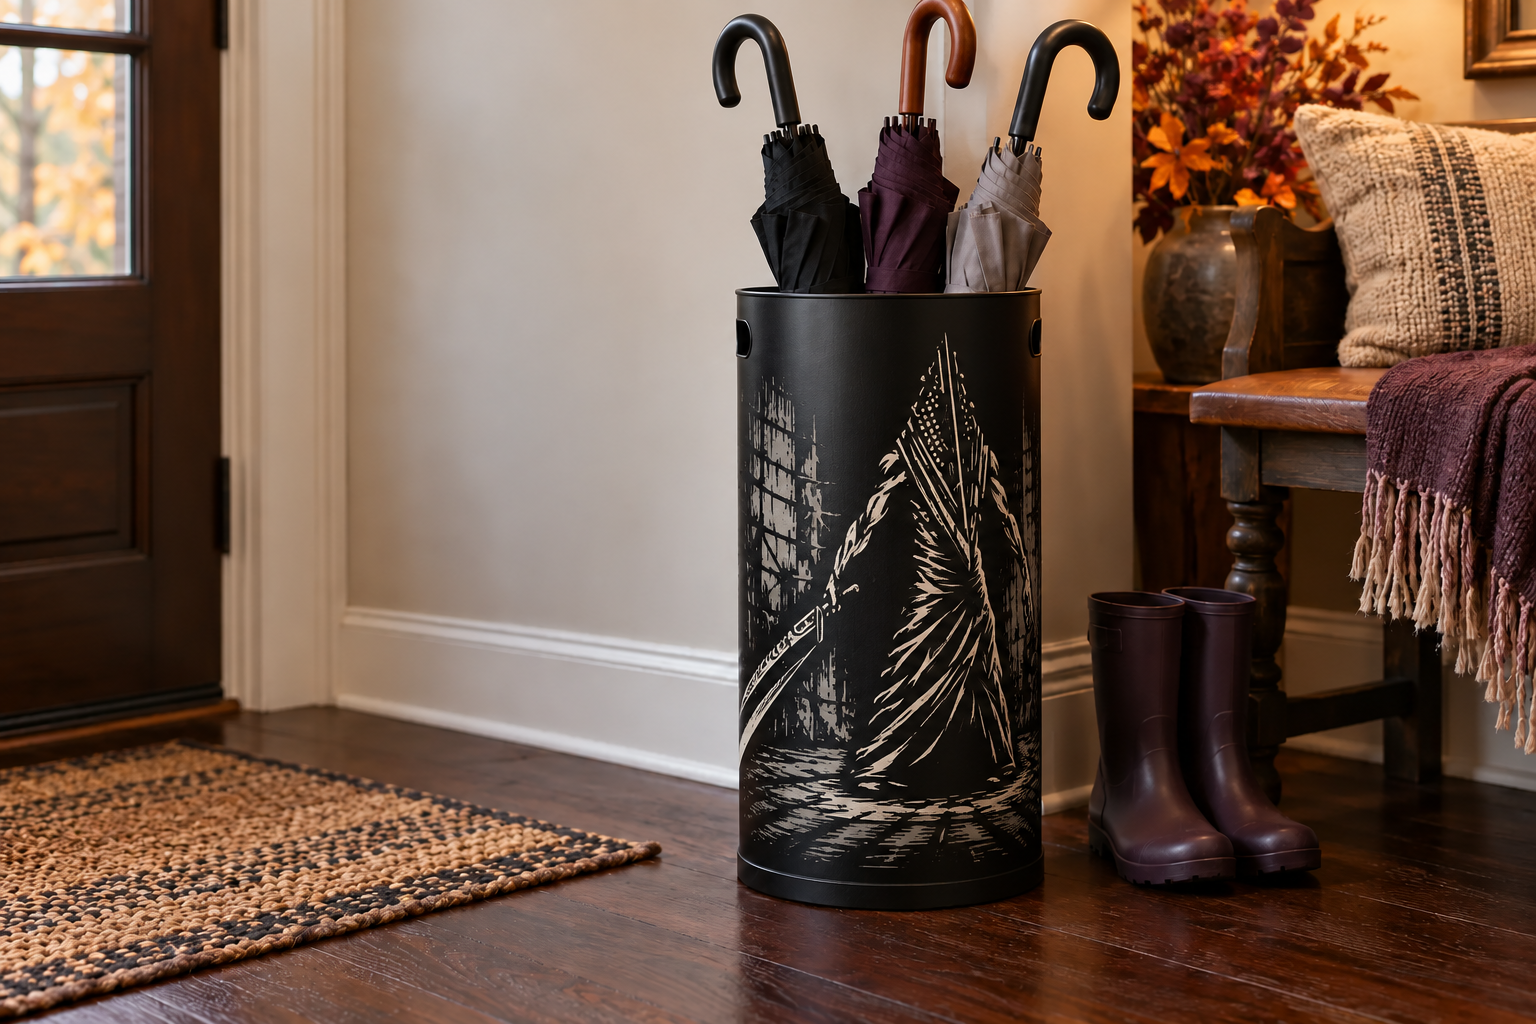
An umbrella stand is easiest to decorate when the artwork stays on one broad, cool exterior face and the wet-work parts remain completely functional. This project begins with a complete factory-made stand that already has a stable base, smooth sealed finish, original drip insert, and intact ventilation. Three restrained vinyl colors create depth: smoky gray fog in front, muted plum hills and trees in the middle, and a warm-bone crescent moon behind one simplified distant creature. The rim, handholds, vents, seams, feet, base, interior, and every umbrella-contact area stay bare.
This is an original project plan based on ordinary home-cutter and pressure-sensitive-vinyl methods. Stand material, powder coat, paint age, curvature, drainage, ventilation, cleaner, vinyl formula, transfer tape, blade, mat, room temperature, humidity, umbrella length, and floor surface can all change the result. Follow the current instructions for the exact stand, insert, vinyl, cutter, mat, cleaner, and transfer tape you use, and test the actual exterior finish in a hidden area. The KleanKutChaos listing supplies the featured digital monster artwork only. The featured KleanKutChaos file is the design source for this tutorial, and this tutorial does not claim that the pictured combination was physically tested with the listing files.
What you’ll need
- Silent Hill Inspired Horror Graphics Pack from the featured KleanKutChaos listing, used as the source for one simplified distant monster silhouette
- One complete factory-made umbrella stand with an intact stable base, smooth sealed exterior, original drip insert or tray, unobstructed ventilation, and published use and cleaning directions
- Two or three rolls of permanent adhesive craft vinyl approved for the stand's exact cool sealed finish, such as smoky gray, muted plum, and warm bone
- Transfer tape matched to the selected vinyl; use strong-grip tape only when the vinyl maker specifically requires it
- Cricut, Silhouette, or similar cutting machine with current software, a clean fine-point blade, and the mat specified for the vinyl
- Plain paper or removable drafting film for full-size panel templates and layout tests
- Ruler, flexible measuring tape, pencil, low-tack painter's tape, and removable notes
- Weeding hook or tweezers, scraper or felt squeegee, small scissors, and scrap vinyl for test cuts
- Low-lint cloths and only the mild cleaner approved by both the stand and vinyl makers
- Three closed, cool, clean umbrellas that fit within the stand maker's stated size and capacity; include the longest one planned for normal use
- The stand's original removable drip insert, liner, feet, and hardware; do not substitute an improvised container or absorbent filler
- A dry, level, water-resistant floor location outside all doors, walkways, stairs, heat sources, outlets, cords, and emergency routes
- Safety glasses and any hand or eye protection required by the cutter, blade, cleaner, vinyl, or transfer-tape makers
How to make it
- 1
Choose a complete stable stand
Use a factory-made stand that sits flat on every foot and includes the insert, tray, or drainage system its maker specifies. Check the published capacity and confirm the exterior is a smooth sealed surface approved for adhesive décor. Reject a narrow, wobbling, rusted, cracked, sharp-edged, peeling, improvised, or mystery-finish container.
- 2
Select a safe entryway location
Place the empty stand on a level water-resistant floor where a person can approach it without crossing a stair, doorway swing, heater, outlet, cord, rug edge, or busy walking path. Confirm that the base cannot rock or slide and that the longest closed umbrella clears shelves, lights, frames, and door hardware.
- 3
Inspect every functional part
Remove the factory insert only as its maker directs, then inspect the rim, handholds, ventilation holes, seams, fasteners, feet, interior, and base. Clear debris by the approved method and reinstall the insert for a dry fit. Stop if parts are missing, drainage is blocked, metal is corroded, or the structure changes shape when lightly loaded.
- 4
Dry-fit the actual umbrellas
Place the selected closed, dry umbrellas into the undecorated stand one at a time. Confirm that the load stays upright, no tip catches a vent or seam, handles do not pull the stand off balance, and an umbrella can be removed without dragging across the planned exterior art panel. Choose a larger or heavier approved stand if the fit is crowded or unstable.
- 5
Map every no-vinyl zone
Trace the broad exterior face at full size. Mark the rim, handholds, openings, vents, seams, fasteners, labels, feet, base, bottom drainage area, interior, and any umbrella-contact surface as off-limits. Add the larger of a half-inch buffer or the clearance required by the stand and vinyl makers so decal edges cannot bridge structure or trap moisture.
- 6
Test the finish discreetly
Clean a hidden sealed spot by the stand maker's method and let it become fully dry and room temperature. Apply small samples of each vinyl and the chosen transfer tape, then inspect or remove them after the makers' stated interval. Stop if the coating lifts, clouds, softens, stains, releases pigment, or needs forceful burnishing.
- 7
Measure the usable art panel
Measure only inside the verified buffers and note the panel's curve. Make a paper template at that exact size, tape it lightly to the stand, and smooth it from the center outward. Divide a strongly curved stand into narrower application zones rather than trying to force one wide carrier around the cylinder.
- 8
Plan three visual depths
Sketch broad pale fog bands for the foreground, a restrained tree and hill layer for the middle, and a crescent moon with one distant figure behind them. Keep the lower artwork above the base and drainage zone, and leave calm open space around handholds, vents, and the top edge.
- 9
Prepare a sturdy working copy
Duplicate the purchased artwork and preserve the original download. Choose one figure with a readable outer contour, then remove weapons, isolated specks, hairline gaps, and tiny facial marks that will not survive at the planned scale. For a more original scene, treat the figure as a distant shadow among trees rather than reproducing a complete character illustration.
- 10
Build the fog and forest layers
Draw simple wavy fog strips, tree silhouettes, hills, and a moon in the cutting software or use shapes you created and are licensed to use. Keep every strip thick enough to weed and round tight inside corners that could lift. Use knockout openings where possible so large layers do not stack into stiff ridges.
- 11
Separate the design into sections
Split the layout into manageable left, center, and right groups that follow the stand's curvature. Add temporary registration marks only when the chosen transfer method requires them, placing those marks outside the final art but still within the safe panel so they can be removed cleanly after alignment.
- 12
Run a representative test cut
Place a scrap on the specified mat and cut one fog curve, narrow branch, moon point, and part of the creature contour. Confirm the blade cuts the vinyl cleanly without slicing the liner. Adjust one setting at a time and replace a worn blade or damaged mat instead of forcing additional pressure.
- 13
Cut, weed, and compare
Cut each color, then weed from the outside inward while the liner remains flat. Secure every tiny scrap where children and pets cannot reach it. Compare the weeded pieces with the software preview and paper template so an accidentally missing tree, fog opening, or body section does not change the planned scene.
- 14
Clean only the approved exterior panel
Move the umbrellas and drip insert away from the work area. Wipe only the exterior safe zone with the approved cleaner on a barely damp low-lint cloth, keeping all liquid out of openings, seams, the interior, feet, and base. Let the surface dry completely and return to room temperature.
- 15
Apply the back layer first
Keep the stand empty and brace it against movement without clamping, drilling, or stressing its walls. Hinge the moon and distant hills in place with low-tack tape outside the motif, peel the liner at a low angle, and squeegee from the center outward. Peel transfer tape back over itself rather than lifting straight away from the curve.
- 16
Add the figure and trees
Align the simplified creature and tree sections with the paper guide, preserving every structural buffer. Apply narrower sections one at a time so they can follow the curve without wrinkles. Do not bridge vents, continue vinyl into a handhold, wrap it around the rim, or trim it in place against the stand.
- 17
Finish with separate fog bands
Apply the front fog strips as individual pieces, using knockout gaps to reveal the stand color and middle layer. Keep overlaps to the minimum allowed by the vinyl maker and remove temporary registration marks promptly. Smooth only with the approved tool and pressure; do not heat the vinyl or seal it with an unapproved coating.
- 18
Cure the stand empty
Leave the stand upright, empty, dry, and undisturbed for the vinyl maker's full cure interval. Keep it away from children, pets, doors, direct sun, heaters, water, and foot traffic. After cure, inspect every decal edge plus each vent, seam, handhold, foot, and base from multiple angles.
- 19
Restore the insert and test normal use
Reinstall the completely dry original drip insert exactly as its maker directs. Load the closed umbrellas one at a time, confirm the stand remains stable, and remove each umbrella without rubbing the decal or catching a vent. During wet weather, empty and dry the insert at the interval required by the stand maker and keep standing water away from vinyl edges.
Practical finishing tips
- Use two wide fog bands instead of many thin strips; broad shapes weed faster and look more convincing from across an entryway.
- Make the distant silhouette smaller than the moon and nearest tree so the scene reads as depth rather than a sticker collage.
- For cylindrical stands, trim transfer tape into narrow vertical sections before application while leaving the vinyl liner intact until each section is positioned.
- Photograph the paper layout straight on and from the normal doorway angle; adjust the composition before cutting if the curve hides a key shape.
- Keep the lightest vinyl near eye level and the darkest accents lower so water spots and floor dust are less visually prominent.
- Remove umbrellas and the insert before routine cleaning, then wipe only by the stand and vinyl makers' approved methods—never spray toward openings or decal edges.
Troubleshooting
Stop before burnishing farther and return the piece to its liner when possible. Divide the working copy into narrower sections with more open space, then recut. Do not stretch the vinyl, heat the stand, or slice wrinkles in place.
Stop immediately and remove the remaining tape without enlarging the damaged area. The coating or tape may be incompatible. Do not hide the damage under more vinyl; follow the stand maker's repair guidance or display a separate removable paper panel outside the wet-contact area.
Keep the stand empty and compare the failure with the hidden-area adhesion test. If the surface and cure conditions are valid, recut that section with a wider rounded end. Never add glue, clear coat, a heat gun, or stronger pressure unless the exact makers approve it.
Remove the smallest trees and one fog strip, then recut the distant figure as a simpler solid shadow. More visible stand color between layers will make the remaining shapes easier to read.
Remove every umbrella and inspect the feet, floor, base, and published capacity. Move it only to another safe level location allowed by the maker or replace it with a more stable complete stand. Do not add loose weights, adhesive feet, or an improvised base.
Unload the stand, empty and dry the original insert by its instructions, and inspect drainage and decal edges. Move the lower artwork higher on a replacement layout if needed. Stop using the stand if it leaks, rusts, traps water, or has a damaged insert.
Ways to make it yours
Cut the moon, two fog bands, and one distant creature in warm-bone vinyl for a fast, graphic version with less alignment and no stacked layers.
Replace the creature with a small cabin and bridge silhouette from a related licensed design, keeping the same exterior-only placement and structural clearances.
Apply the scene to a separate maker-approved magnetic or rigid insert displayed only on a compatible exterior face when the stand finish cannot accept adhesive; keep the panel clear of the rim, vents, handholds, base, and wet interior.
Use the layout on a complete factory-made cane or walking-stick stand only when its maker permits decorative vinyl and the art cannot interfere with grips, tips, balance, accessibility, or retrieval.
Keep crafting
- DIY Foggy Monster Layered Shadow Box — Layer vellum, torn paper, bare trees, and monster silhouettes into a misty dimensional scene for a shelf or gallery wall.
- DIY Haunted Countryside Door Draft Stopper With Cricut HTV — Decorate a removable cotton-canvas draft-stopper cover with a layered haunted-countryside panorama while keeping seams, closures, door hardware, vents, and required clearances safe.
- DIY Slasher Silhouette Luminary Village — Build a row of glowing paper luminaries with a different horror silhouette hidden in every window.
Inspiration & further reading
This is an original Klean Kut Halloween Crafts project inspired by approachable techniques shared across trusted craft and home sources. Explore Cricut Vinyl instructions, Cricut Transfer Tape Instructions and U.S. Consumer Product Safety Commission Art and Craft Safety Guide for more ideas and technique background.