
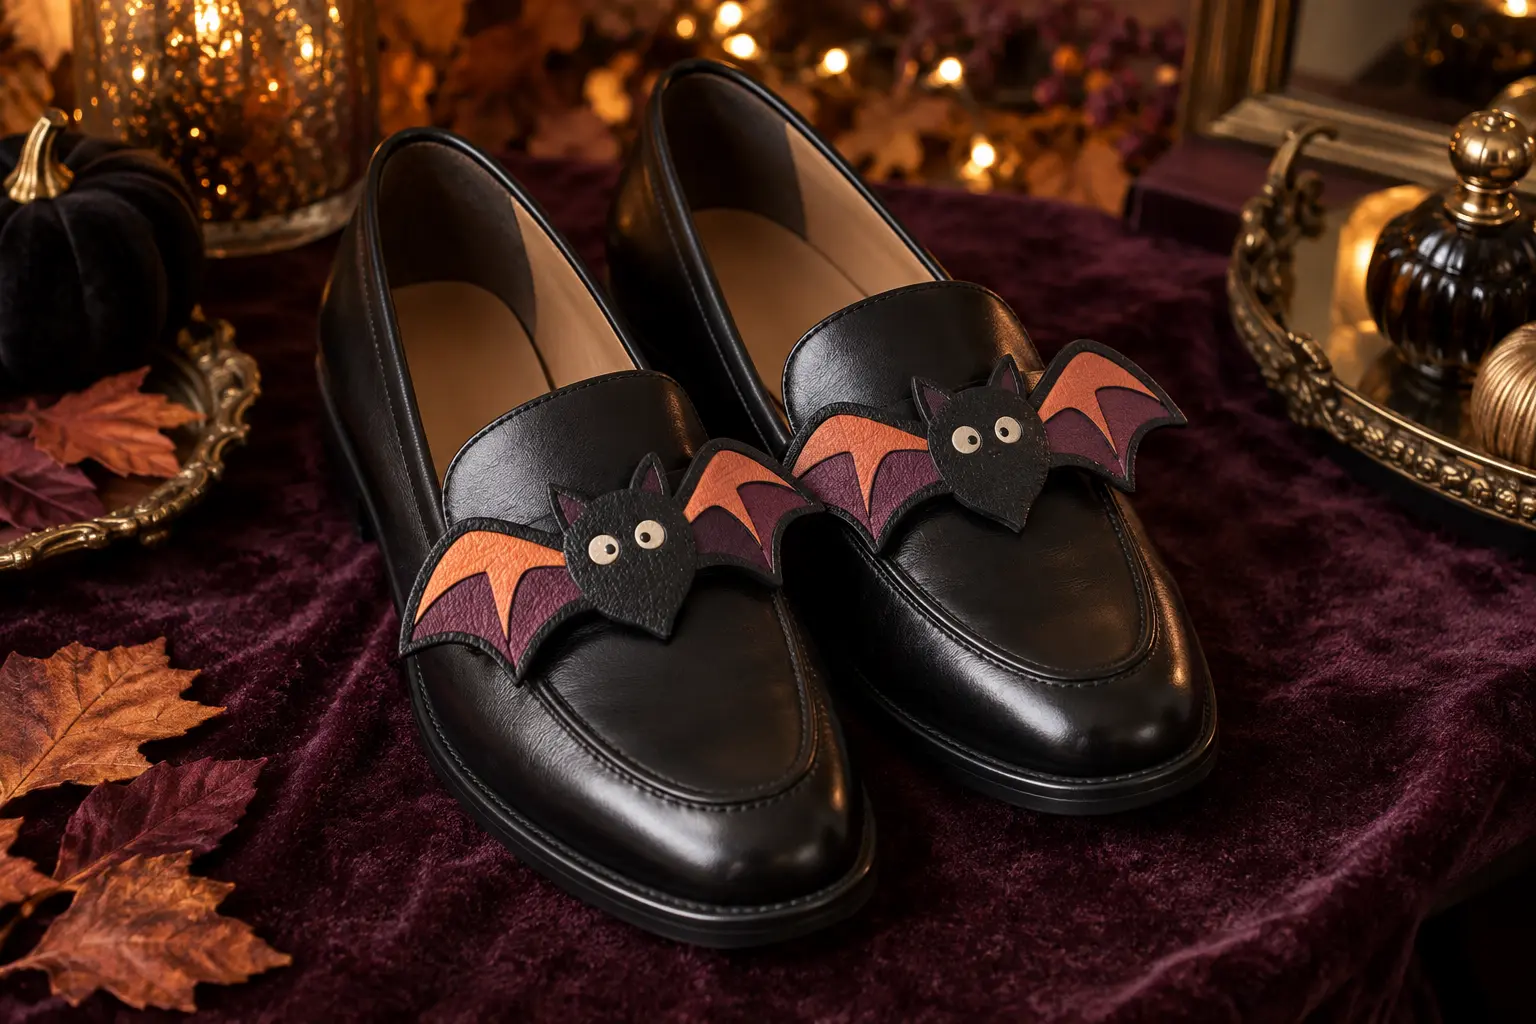
Removable shoe clips add a bold Halloween detail without permanently decorating the shoes. This project builds each bat as a lightweight faux-leather sandwich, applies the colored wing and eye details while the pieces are flat, and encloses a purpose-made shoe-clip blank between soft backing layers. A mirrored paper fitting keeps the pair balanced before any specialty material is cut.
This is an original project plan based on common faux-leather cutting, heat-transfer vinyl application, flexible-adhesive use, and factory-made shoe-clip hardware. Faux-leather composition, thickness, stretch, backing, blade condition, mat grip, iron-on type, press temperature, adhesive compatibility, clip tension, shoe finish, and walking conditions can all change the result. Make cardstock and material tests, follow the current directions from every material and tool maker, and stop if a clip changes the fit, damages the shoe, or affects walking. Preserve the purchased artwork and simplify only duplicate working files. The featured KleanKutChaos bundle supplies the decorative bat artwork; the featured KleanKutChaos file is the design source for this tutorial, and this tutorial does not claim that the pictured combination was physically tested with the listing files.
What you’ll need
- 24 Cute Halloween Bats SVG Bundle from the featured KleanKutChaos listing
- Paper-thin cutter-compatible faux leather with a smooth face and soft, non-shedding backing
- Heat-transfer vinyl approved for the exact faux leather in burnt orange, plum, cream, and optional black
- Cricut-, Silhouette-, or similar cutting machine with the blade and settings recommended for the chosen faux leather
- Compatible clean strong-grip or fabric-grip cutting mat, as directed by the material and machine makers
- Cutting-machine software and a duplicate working copy of two broad bat designs
- Two matching factory-made shoe-clip blanks with smooth, covered jaws and intact hinges
- Thin coordinating felt or a second faux-leather layer for the backs
- Flexible adhesive specifically approved for the selected faux leather, backing, and metal clip blanks
- Mini heat press or iron, firm pressing surface, and protective sheet only when their makers approve the combination
- Cardstock, printer or pencil, ruler, scissors, and low-tack tape for the full-size fitting proof
- Brayer, weeding tool, fine tweezers, bright task light, and small clips or weights if the adhesive maker permits
- A clean pair of sturdy closed-vamp, lace, or strap shoes suitable for removable clips
- Eye protection and a lidded container for blades, scraps, and small hardware
How to make it
- 1
Inspect the shoes and clip blanks
Choose sturdy shoes with a firm vamp, lace panel, or broad strap that can accept a removable accessory without changing the fit. Check both shoes for weak stitching, delicate coatings, cracks, or soft edges. Open and close each purpose-made shoe clip, confirm that its jaws are smooth and covered, and reject any clip with burrs, exposed teeth, weak tension, rust, or a loose hinge.
- 2
Set a safe finished size
Measure the flat clipping area on each shoe while it is empty and unworn. Plan a bat about 3 to 3.5 inches wide, then reserve clearance from the floor, sole, walking crease, laces, buckle, skin, and the other shoe. The wings must not brush the ground, hook clothing, or overlap when the feet pass each other.
- 3
Choose broad mirrored bats
Select one bat with a compact body, substantial wing bridges, and few narrow tips. Duplicate and mirror it so the pair faces outward symmetrically. Keep both finished shapes identical in size and use color only for the major wing panels and eyes rather than retaining every tiny decorative mark.
- 4
Simplify duplicate artwork
Preserve the purchased files and edit only duplicate working copies. Weld tiny gaps, thicken the neck and wing roots, round needle-like points, delete isolated dots, and enlarge the eye pieces enough to weed cleanly. Offset the full silhouette slightly to create a strong faux-leather base behind the colored details.
- 5
Make and fit a cardstock proof
Cut two paper bats at full size, tape them temporarily to the outside of the empty shoes, and compare them from the front, side, and normal standing distance. Put on the shoes without the metal clips and take a few careful indoor steps. Resize or reposition the proof if a wing reaches the floor, touches skin, covers a buckle, or crowds the other shoe.
- 6
Test-cut the material stack
Cut a wing tip, eye, and narrow body bridge from scraps of the exact faux leather and iron-on. Begin with the makers' recommended mat, blade, and setting. Check the cut before unloading the mat, and change only one setting at a time. Enlarge or simplify any feature that tears, stretches, frays, or stays attached.
- 7
Cut the faux-leather bases
Place faux leather on the mat in the orientation its maker specifies; Cricut paper-thin faux leather is commonly cut face down. Move machine star wheels or take other setup steps only when the machine and material instructions require them. Cut two mirrored front bases and two backing shapes, verify complete cuts before unloading, then peel the mat away from the pieces to reduce curling.
- 8
Cut and weed the iron-on accents
Mirror every heat-transfer layer before cutting unless its maker says otherwise. Cut the orange and plum wing panels and the cream eye shapes with the proven settings. Weed on the carrier sheet under bright light, keeping each bat's layers in a labeled envelope so the mirrored pair cannot be mixed up.
- 9
Prove the heat settings on scraps
Press an iron-on sample onto a scrap of the exact faux leather with the protective setup, temperature, time, pressure, and peel method specified by both makers. Let it cool, then flex it gently. Stop if the face glosses, melts, shrinks, bubbles, discolors, smells unusual, or if the iron-on lifts.
- 10
Press the flat front layers
Position the largest wing accents on the unassembled faux-leather fronts and tack them only for the minimum approved time. Add later colors and eyes with the least total heat allowed, protecting completed areas as directed. Let both bats cool completely on a flat surface. Never press over attached metal hardware.
- 11
Plan the clip pockets
Place each clip blank on the back of its finished bat with the hinge centered over the body and the jaw opening toward the shoe. Mark a pocket or narrow channel in the backing so the hinge can move freely while most metal remains enclosed. Keep the clip jaws, spring, hinge, and shoe-contact faces completely free of adhesive.
- 12
Bond the hardware and backs
Apply only the flexible adhesive maker's approved amount to the safe bonding areas of the clip blank and backing. Sandwich the hardware between the decorated front and soft back, aligning the edges without flooding the hinge or jaws. Weight or clamp only as directed, then leave the pair flat and untouched for the full cure time.
- 13
Flex-test and match the pair
After the complete cure, open each clip repeatedly over a protected table and gently flex every wing root. Tug the layers lightly in several directions. Confirm that the backs stay bonded, the hardware remains centered, no edge is sharp or sticky, and the mirrored bats sit at the same height and angle.
- 14
Attach, walk-test, and store
Test the clips first on a hidden part of the shoe finish, then attach them only to the approved sturdy area. Put the shoes on while seated and walk slowly on a dry, level indoor floor with support nearby. Remove the clips immediately if they slip, catch, scratch, press the foot, change the fit, or affect gait. Store them unclipped in a rigid box so the wings and springs are not crushed.
Practical finishing tips
- Use a single broad bat silhouette for both shoes; symmetry makes the pair look intentional and simplifies fitting.
- Photograph the approved cardstock placement from directly above before removing the proof.
- Keep faux-leather wings lightweight and no larger than needed so the clip is less likely to rotate.
- Press every decorative layer before adding metal hardware; direct heat can damage the clip, shoe, or adhesive.
- Color-code the carrier sheets with left and right labels so mirrored eye and wing pieces stay paired.
- Carry the storage box if the clips are worn away from home, making it easy to remove them if conditions change.
Troubleshooting
Use the mat type, face orientation, brayer pressure, blade, and star-wheel position specified for the exact material. Tape only outside the cut area if the maker allows it, replace a dull blade, and repeat the scrap test before cutting full bats.
Stop rather than adding uncontrolled heat. Confirm material compatibility, correct mirroring, press temperature, pressure, duration, peel method, and carrier removal. If the makers do not approve the combination, omit the iron-on and layer compatible faux leather with the tested flexible adhesive.
Reduce total heat within the product instructions, press shorter separate layers, and cool the piece flat under a clean heat-safe weight only if the material maker permits. Recut any permanently warped base.
Remove it from use. Reduce the bat width and weight, move the hardware closer to the center of mass, and choose a firmer clipping area. Never add sharp teeth, pins, magnets, or abrasive grip material.
Retire the clip until repaired. Remove failed adhesive as its maker directs, enlarge the safe bonded area without blocking the mechanism, and repeat the complete cure and flex test. Replace the piece if the materials remain incompatible.
Remove both clips immediately. Return to the cardstock proof, shorten and round the wings, raise the placement, or choose a different shoe. Do not wear accessories that can touch the floor, the other foot, stairs, pedals, or moving equipment.
Ways to make it yours
Use black flocked iron-on over black faux leather for subtle texture, provided both makers approve the heat combination.
Replace one broad wing layer with glow-in-the-dark iron-on and keep the eyes cream for a playful trick-or-treat detail.
Skip clip hardware and cut paired lace slots into a reinforced faux-leather base for shoes whose maker permits decorative lace accessories.
Resize the same broad bats for a sturdy bag strap or hatband, then perform a fresh fit, snag, and hardware test for that surface rather than assuming the shoe dimensions apply.
Keep crafting
- DIY Cute Bat Magnetic Bookmarks for Halloween Reading — Turn six playful bat cut files into slim magnetic bookmarks with hidden paired magnets, reinforced paper hinges, and book-friendly rounded edges.
- DIY Pink & Orange Kawaii Bat Garland — A happy Halloween garland made with cardstock, twine, and cute bat cut files in colors that feel warm and cheerful.
- DIY Carnivorous Plant Halloween Fascinator With Felt and HTV — Turn felt, soft foam, and small HTV accents into a compact carnivorous-plant fascinator that stays above the brow and adds theatrical bite to a Halloween outfit.
Inspiration & further reading
This is an original Klean Kut Halloween Crafts project inspired by approachable techniques shared across trusted craft and home sources. Explore Cricut faux leather cutting instructions and Cricut Everyday Iron-On instructions for more ideas and technique background.